Posts: 1,259
Threads: 187
Joined: Sep 2018
Reputation:
122
Gimp version:
Operating system(s): Windows (Vista and later)
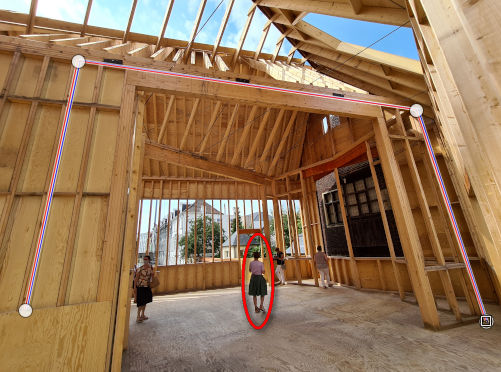
One way remove unwanted moving persons from a scene is take two or more photos with little time between and, put them in layers and wipe out the unwanted persons. If the photos are taken handhold (with care), there is always a little difference in POV. The challenge is to align the photos in gimp. I used two photos in this quick made example, load them as layers and make a two paths with 4 points on the same places of the two photos. Then I used following plugin from Ottia Tuota on one photo (remove one layer): Filters / Distorts / Perspective transform / Perspective transform - 4 points to 4 points. I then load the first (unchanged) photo in gimp and copy the corrected photo on a new layer. Now both photos are aligned and I can wipe the unwanted person. I think this can be automated but with this example I just want to find out if this alignment in gimp was possible.
I want to remove this person (he was in different places on two photos), 2 paths are made :

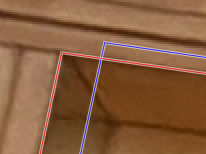
Detail of paths :

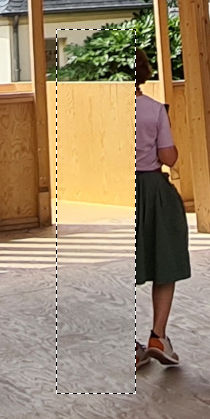
Person partly wiped (to compare) :

Posts: 1,538
Threads: 71
Joined: May 2021
Reputation:
167
Gimp version:
Operating system(s): Linux
07-23-2021, 05:05 AM
(This post was last modified: 07-23-2021, 05:15 AM by PixLab.)
Quote:The challenge is to align the photos in gimp
To align two photo, put the one on top in Mode "Difference", what is perfectly black is aligned 
A perfectly aligned photo will be totally black (except the part you want to remove),
Make this experience > import a picture > duplicate that picture -> put it in Mode "Difference" take the move tool and move that layer... Enjoy 

Once aligned, just put back the mode to "Normal" or which either mode you wanted to do
Posts: 1,259
Threads: 187
Joined: Sep 2018
Reputation:
122
Gimp version:
Operating system(s): Windows (Vista and later)
07-23-2021, 01:16 PM
(This post was last modified: 07-23-2021, 01:42 PM by denzjos.)
@PixLab, thanks for the tip. In the case I described, two or more photos taken handhold have another POV. When one take one or multiple photos without the camera mounted on a tripod, but from the same spot, the position of the camera move slightly in space because the one who is holding the camera can not stand in a 'frozen' position(specially when it's freezing cold...). The little difference in point of view results in a slightly different perspective and minor lens distortion. The distortion of perspective can be corrected with the plugin from Ottia Tuota. The lens distortion is in this case negligible.
Example, not really what this post is all about, but explains the perspective difference (and other things) :
https://www.researchgate.net/figure/Two-..._221516190
Test with the difference layer :
With the first layer difference on two not perspective aligned photos (aligned manual):

With the first layer difference on two perspective aligned photos :

There are more white lines visible on the not perspective aligned photos : more perspective distortion.
Posts: 1,538
Threads: 71
Joined: May 2021
Reputation:
167
Gimp version:
Operating system(s): Linux
07-23-2021, 04:20 PM
(This post was last modified: 07-23-2021, 04:22 PM by PixLab.)
Quote:.....//photos without the camera mounted on a tripod, but from the same spot, the position of the camera move slightly in space because the one who is holding the camera can not stand in a 'frozen' position(specially when it's freezing cold...)//...........
...//....The distortion of perspective can be corrected with the plugin from Ottia Tuota..........///....
Oh... Ok now I got it, I certainly have a bit over looked your first post, sorry.
I would like to try the Ottia Tuota's plug in, that you're speaking in your first post, do you know where I can download it? The Result Looks great!
Thanks for the tip!
Posts: 1,058
Threads: 87
Joined: Aug 2018
Reputation:
83
Gimp version:
Operating system(s): Windows Vista or 7, 8, 10 (64-bit)
(07-23-2021, 04:20 PM)PixLab Wrote: I would like to try the Ottia Tuota's plug in, that you're speaking in your first post, do you know where I can download it? The Result Looks great!
Thanks for the tip!
Perspective transform revisited - https://www.gimp-forum.net/Thread-Perspe...1#pid20941
Posts: 1,259
Threads: 187
Joined: Sep 2018
Reputation:
122
Gimp version:
Operating system(s): Windows (Vista and later)
Posts: 1,058
Threads: 87
Joined: Aug 2018
Reputation:
83
Gimp version:
Operating system(s): Windows Vista or 7, 8, 10 (64-bit)
(07-23-2021, 05:53 PM)denzjos Wrote: @Krikor : http://kmarkku.arkku.net/Perspective_tra...aster.html
Denzjos,
Rather than providing the direct download link ( found in post #22 of the link I provided in my previous post), I found it useful to provide the link where clarifications (details, images etc) about the plugins could be found.
A link to a good read for those who download the plugins but need more information or even want to post any questions without having to create a new topic for it.
In any case the link in post #22 takes you directly to the downloads page.
"All roads lead to Rome"
Posts: 1,538
Threads: 71
Joined: May 2021
Reputation:
167
Gimp version:
Operating system(s): Linux
Thanks a lot Guys, I appreciate both links 
Posts: 1,259
Threads: 187
Joined: Sep 2018
Reputation:
122
Gimp version:
Operating system(s): Windows (Vista and later)
07-24-2021, 08:50 AM
(This post was last modified: 07-24-2021, 09:30 AM by denzjos.)
If needed, one can also align a part of a photo, even with a greater difference in POV. An example from two photos of a wind mill with blocked vanes, corrected on the vanes only. The corrected layer is made transparent on the other layer to see how the rest of the photos have another perspective. The vanes are corrected and cover nicely on both layers. The blue path is from the photo that is transformed (original photo not visible here)

I made some photos from art on beach cabines. Because I set a wrong big resolution on my smartphone and I want the cabines straight on the photos I used the 4 tot 4 points plugin from Ottia Tuota to correct them. I want that the cabines on the different photos have the same size. So I've made one path with this right size and used this to correct the different photos using there own path around the cabin. I used the crop tool to made the dimensions of the photos equal. Example, red lines

Some cabines :

Posts: 1,259
Threads: 187
Joined: Sep 2018
Reputation:
122
Gimp version:
Operating system(s): Windows (Vista and later)
If one want to erase unwanted information on a photo using several takes (camera handhold), then it is not necessary to transform the whole photo with the Ottia Tuota '4 to 4 points' plugin. Just make a selection of the part on one of the photos where is no unwanted information and set this selection in a new layer ('Edit / Copy' then 'Edit / Paste / Paste as / New Layer'). Move this new layer a little so you can see the things you want to erase on both layers. Then make 4 points path on the same image positions of both layers. Use the Uttia Tuota '4 to 4 point' plugin to transform the selection layer and see how the selection layer is transformed and placed on the right place you want to erase something. In the example photo people were constantly passing by and I took several pictures.
The selection layer on the first layer

After activating the plugin

|


