Posts: 65
Threads: 11
Joined: Nov 2020
Reputation:
3
Gimp version:
Operating system(s): Windows Vista or 7, 8, 10 (64-bit)
  
Not mad at GIMP, the forum just ate my earlier post. lol. Probably too many image examples. I will try to be more concise.
Found this post: https://www.gimp-forum.net/Thread-Roofto...p-building
Rich made a video on that one that was excellent and just wanted to shout out to Rich for doing these, they are a life saver.
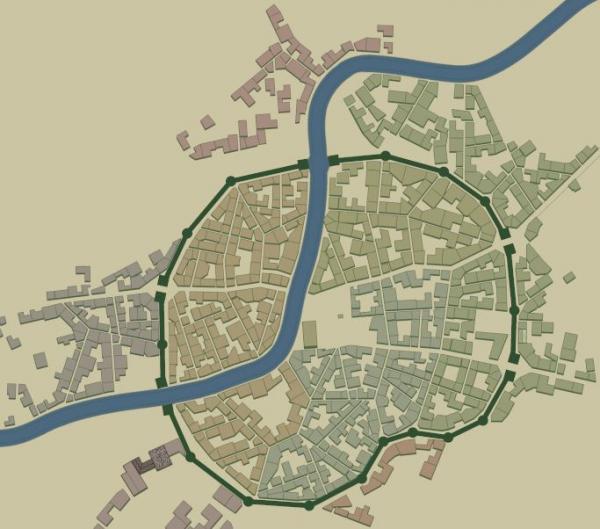
So I build maps, different kinds depending on needs for gaming. At the moment, I am looking to texture, pattern or stamp buildings for about 70 cities. These were generated using the Watabou generator and thus the angles of the buildings can be quite varied. I am looking for a way to align the rooftop patterns to the angles of the roof, essentially, in a quick manner. Here is an example city:

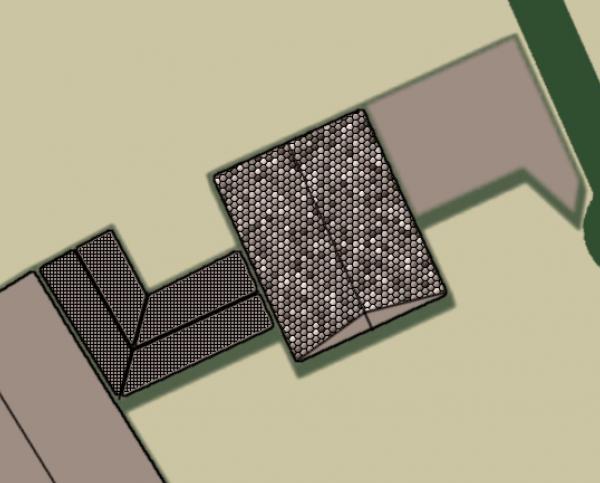
Here are some examples I have done, which work because I played with each of them for 10-15 minutes to figure out a pattern that worked with the angle of the building. I am using filters to apply the textures right now because of speed, but I would ideally like to use real pattern images or a brush.

Hopefully I have been clear on what I am trying to do, but in summary I'd like to find an easy way to apply textures to roughly rectangular areas that align to the angle of the rectangle, rather than to the X-Y axis of the image.
Thanks for any thoughts.
- E
Posts: 65
Threads: 11
Joined: Nov 2020
Reputation:
3
Gimp version:
Operating system(s): Windows Vista or 7, 8, 10 (64-bit)
So, apparently, the answer to this question is: do some hard math, Ernie. Fortunately, it looks like someone has done the hard math already. Here is a tool that can work out the angles for you:
https://www.flickr.com/photos/90104203@N00/5761692756/
Caveats:
1. Some (many?) values are simply not calculable because they involve cosigns of equations that do not always return rational numbers.
2. You will still have to figure the angle that you want to rotate to (I am assuming the Measuring tool will be best for this).
I will follow up on this if I am successful and maybe post some tips if I find them.
- E
Posts: 7,436
Threads: 158
Joined: Oct 2016
Reputation:
1,034
Gimp version:
Operating system(s): Linux
Interesting town generator you are using. I did look at this last night using 'possible' pattern-along path scripts. Not much success with buildings of all different size / shape / orientation.
Those odd angular shapes will be a problem but for the more regular ones a brush and paint as a straight line gets a result. Painfully slow to adjust the brush angle and the aspect ratio to suit different sizes.

For a more regular pattern it might be possible to select buildings with a similar orientation, put the selection as a layer group layer mask and rotate a pattern layer under that in the group. Still a problem with those odd shaped buildings.

Posts: 251
Threads: 26
Joined: Feb 2019
Reputation:
13
Gimp version:
Operating system(s): Windows Vista or 7, 8, 10 (64-bit)
Linux
Just an unsolicited suggestion from the peanut gallery, but shaped gradients (spherical, dimpled) will follow the perimeter of whatever shape they are entered. Following is made with the "four bars" gradient that comes with gimp, but you could make your own in colors and spacings that more closely approximated shingles. What I did was to (after the fact) take a pattern of gravel, use "color to alpha" to remove the body color of the stones, leaving the grid lines only, and then bucket fill with a high threshold level that remaining grid over the top of the shaped gradient. Because the lines of the gradient dominate the image, the lines from the pattern drawn over them, appear subtle in comparison
![[Image: f7KCQk7.gif]](https://i.imgur.com/f7KCQk7.gif)
Again, you'd want to draw your own source gradient to approximate roofing. But if you make a lot of these, then I'm sure you would get good use out of it
FWIW
Posts: 65
Threads: 11
Joined: Nov 2020
Reputation:
3
Gimp version:
Operating system(s): Windows Vista or 7, 8, 10 (64-bit)
(11-17-2021, 12:05 AM)rickk Wrote: Just an unsolicited suggestion from the peanut gallery, but shaped gradients (spherical, dimpled) will follow the perimeter of whatever shape they are entered. Following is made with the "four bars" gradient that comes with gimp, but you could make your own in colors and spacings that more closely approximated shingles. What I did was to (after the fact) take a pattern of gravel, use "color to alpha" to remove the body color of the stones, leaving the grid lines only, and then bucket fill with a high threshold level that remaining grid over the top of the shaped gradient. Because the lines of the gradient dominate the image, the lines from the pattern drawn over them, appear subtle in comparison
![[Image: f7KCQk7.gif]](https://i.imgur.com/f7KCQk7.gif)
Again, you'd want to draw your own source gradient to approximate roofing. But if you make a lot of these, then I'm sure you would get good use out of it
FWIW
Thanks, Rickk. I may try this to provide a framework to lay the patterns on, but it does not solve the alignment problem. Tiles and other roofing generally follow the rule of being parallel with the roof peak or edge (or both in some cases). Getting patterns (or filters) to do that or not matter if they do that is the bigger issue for me.
- E
Posts: 251
Threads: 26
Joined: Feb 2019
Reputation:
13
Gimp version:
Operating system(s): Windows Vista or 7, 8, 10 (64-bit)
Linux
11-17-2021, 06:32 PM
(This post was last modified: 11-17-2021, 06:33 PM by rickk.)
[quote pid='26746' dateline='1637168673']
it does not solve the alignment problem.
[/quote]
By all means, suit yourself...  I was just thinking that with the gradients providing the predominate view while conforming to the building's outlines, that aspect kinda overwhelms the patterns, regardless of their orientation.
The other thing I noticed with bilinear gradients, you can orient them at any angle on the dial by dragging the gradient axis around while plotting the gradient. Such as when creating a pitched roof.
Posts: 65
Threads: 11
Joined: Nov 2020
Reputation:
3
Gimp version:
Operating system(s): Windows Vista or 7, 8, 10 (64-bit)
(11-17-2021, 06:32 PM)rickk Wrote: [quote pid='26746' dateline='1637168673']
it does not solve the alignment problem.
By all means, suit yourself...  I was just thinking that with the gradients providing the predominate view while conforming to the building's outlines, that aspect kinda overwhelms the patterns, regardless of their orientation.
The other thing I noticed with bilinear gradients, you can orient them at any angle on the dial by dragging the gradient axis around while plotting the gradient. Such as when creating a pitched roof.
[/quote]
Okay, if anyone else runs across this problem, there is a solution. RobA over on cartographers guild built a script (all the way back in 2009!) that handles the math for you. Thread: https://www.cartographersguild.com/showt...php?t=4293
Here is my result on 4 buildings. I created the initial bump map by simply selecting the insides of the buildings and ran a black and white gradient on them:

The results:

It took less than a minute to render. If anyone would like the plugin I will attach it here for convenience.
 thatch.zip
 (Size: 4.31 KB / Downloads: 176)
- E
Posts: 251
Threads: 26
Joined: Feb 2019
Reputation:
13
Gimp version:
Operating system(s): Windows Vista or 7, 8, 10 (64-bit)
Linux
That works really well. Good Find!!
|


![[Image: f7KCQk7.gif]](https://i.imgur.com/f7KCQk7.gif)
 I was just thinking that with the gradients providing the predominate view while conforming to the building's outlines, that aspect kinda overwhelms the patterns, regardless of their orientation.