07-16-2024, 11:25 AM
Brand new gimpster here, please be gentle!
I'm using GIMP 2.10.30 on Windows 10 64-bit.
(Irrelevant, but background): I am trying to prepare eight individual photo crops (of the same size), ultimately to drag into a master montage/canvas featuring all eight.
My problem:
I appreciate there will be easier ways of doing this, but as I'm a newbie, I am following Method 2 of this YouTube video as it seemed fairly straightforward to follow:
https://youtu.be/dQSlqcMCKx0?t=221
Unfortunately, when I get to the step where I choose the Scale tool (Tools>Transform>Scale), my background image disappears, and instead transforms into a chequerboard, meaning that I cannot resize the image behind the crop selection (see video), before ultimately making my chosen crop.
The best explanation I could find on gimp-forum.net replicating my issue was this one:
https://www.gimp-forum.net/Thread-Image-...y-to-scale
...but even after trying to follow these instructions it doesn't resolve and I am stuck. Please note that, as per a step of the video, I am deliberately setting the Opacity to 50 per cent so that I can see the background image and manipulate it to the preferred position behind my crop window before making the final crop.
I've spent several hours on this and (without wishing to go into too many details), the photos are of something I need to discuss with my doctor, so I'm anxious to get this over the line.
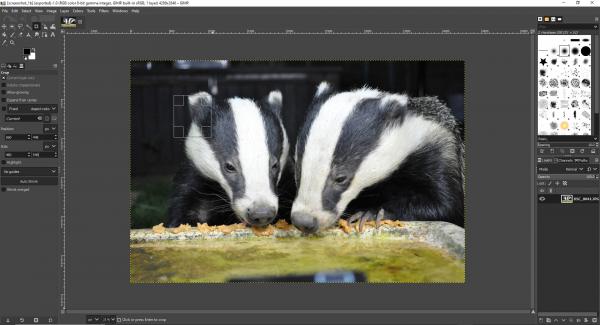
Here are a couple of screen shots: just in case you're scared of the sight of blood, I've changed the photos to two of my regular peanut butter sandwich-loving wild visitors instead!
On the first screenshot (having set the initial Crop window to my chosen 480x540 pixel size), things are going as planned:

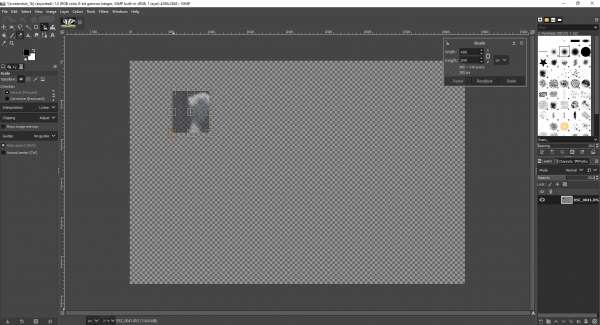
However, on the second (after hitting the Scale Tool), two things occur differently from the YouTube Autobot video tutorial I have described above:
Firstly, the background image disappears
Secondly, the "handles" around the image and the centre square with a "plus sign" inside it appear around the crop selection, and not around the background selection and therefore do not allow me to resize (make smaller) so that my selection can be fitted into the 50 per cent opaque crop window.

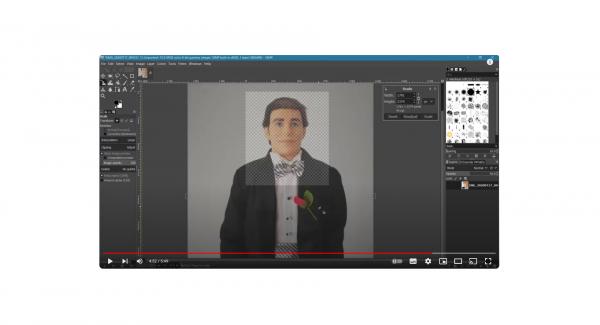
As a reminder, from the video, this (below) is how I would hope to see things: chequerboard crop window, opaqued background image with handles round allowing me to drag and resize

To you guys it will be dead simple, I'm sure, but I'm losing the will to live here! Please dive in and help out, thanks.
I'm using GIMP 2.10.30 on Windows 10 64-bit.
(Irrelevant, but background): I am trying to prepare eight individual photo crops (of the same size), ultimately to drag into a master montage/canvas featuring all eight.
My problem:
I appreciate there will be easier ways of doing this, but as I'm a newbie, I am following Method 2 of this YouTube video as it seemed fairly straightforward to follow:
https://youtu.be/dQSlqcMCKx0?t=221
Unfortunately, when I get to the step where I choose the Scale tool (Tools>Transform>Scale), my background image disappears, and instead transforms into a chequerboard, meaning that I cannot resize the image behind the crop selection (see video), before ultimately making my chosen crop.
The best explanation I could find on gimp-forum.net replicating my issue was this one:
https://www.gimp-forum.net/Thread-Image-...y-to-scale
...but even after trying to follow these instructions it doesn't resolve and I am stuck. Please note that, as per a step of the video, I am deliberately setting the Opacity to 50 per cent so that I can see the background image and manipulate it to the preferred position behind my crop window before making the final crop.
I've spent several hours on this and (without wishing to go into too many details), the photos are of something I need to discuss with my doctor, so I'm anxious to get this over the line.
Here are a couple of screen shots: just in case you're scared of the sight of blood, I've changed the photos to two of my regular peanut butter sandwich-loving wild visitors instead!
On the first screenshot (having set the initial Crop window to my chosen 480x540 pixel size), things are going as planned:
However, on the second (after hitting the Scale Tool), two things occur differently from the YouTube Autobot video tutorial I have described above:
Firstly, the background image disappears
Secondly, the "handles" around the image and the centre square with a "plus sign" inside it appear around the crop selection, and not around the background selection and therefore do not allow me to resize (make smaller) so that my selection can be fitted into the 50 per cent opaque crop window.
As a reminder, from the video, this (below) is how I would hope to see things: chequerboard crop window, opaqued background image with handles round allowing me to drag and resize
To you guys it will be dead simple, I'm sure, but I'm losing the will to live here! Please dive in and help out, thanks.


