11-11-2016, 04:03 AM
(This post was last modified: 11-11-2016, 04:57 AM by Espermaschine.)
Bumpmapping is probably the classic way of bevelling text (the "modern way" is using layereffects).
One thing that always seemed a bit unrefined is that the blurred bumpmap spreads the bevel outside the text boundaries.
But there are ways to take bumpmapping to the next level, and reading the WOW Book just made me remember a few tricks.
1.) For the first example we bumpmap text into a grey (#8080808) layer.
The values im using are 120 for the Azimuth and 30 for the Elevation.
The bumpmap has a Blur of 1px and im using a Depth of 3. We are getting an emboss effect.

2.) Here im using a Depth of 8 and an Ambient of 100. The bumpmap has been blurred 8px.
This is your basic bumpmapping technique.

3.) Now we are getting a bit clever and trim our edge. We are still using the 8px blurred bumpmap, but now we are calling up a selection of the original text, invert it and fill with black, so that we get a hard edge. On top of that we apply another Blur of 1px to smooth things out.
Heres what it looks like:

4.) For a chisel effect, we use our trimmed bumpmap, call up the original text selection and shrink it (i used 3px), then fill with white. This gives the blur an edge.

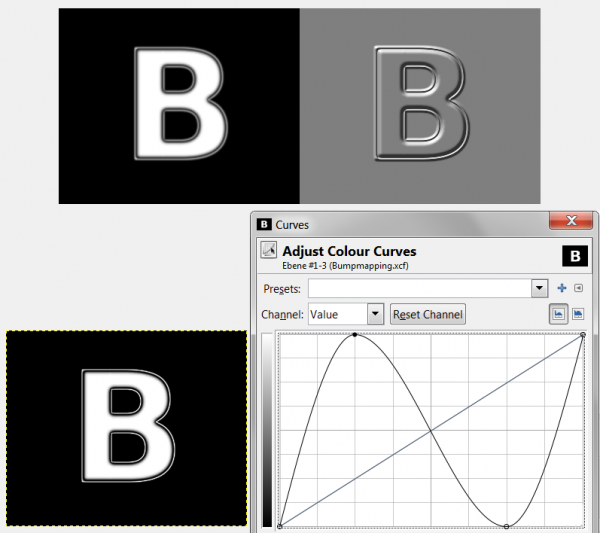
5.) For our final trick we apply a curve to the bumpmap, blur it by 4px to smooth everything out, and get this contoured edge:
One thing that always seemed a bit unrefined is that the blurred bumpmap spreads the bevel outside the text boundaries.
But there are ways to take bumpmapping to the next level, and reading the WOW Book just made me remember a few tricks.
1.) For the first example we bumpmap text into a grey (#8080808) layer.
The values im using are 120 for the Azimuth and 30 for the Elevation.
The bumpmap has a Blur of 1px and im using a Depth of 3. We are getting an emboss effect.
2.) Here im using a Depth of 8 and an Ambient of 100. The bumpmap has been blurred 8px.
This is your basic bumpmapping technique.
3.) Now we are getting a bit clever and trim our edge. We are still using the 8px blurred bumpmap, but now we are calling up a selection of the original text, invert it and fill with black, so that we get a hard edge. On top of that we apply another Blur of 1px to smooth things out.
Heres what it looks like:
4.) For a chisel effect, we use our trimmed bumpmap, call up the original text selection and shrink it (i used 3px), then fill with white. This gives the blur an edge.
5.) For our final trick we apply a curve to the bumpmap, blur it by 4px to smooth everything out, and get this contoured edge:


![[Image: 19.final.png]](http://2.bp.blogspot.com/-AhLQpwQRUVI/Ufl98ql5IlI/AAAAAAAABCE/VVTIjd2Yg-M/s640/19.final.png)