Posts: 127
Threads: 39
Joined: Aug 2017
Reputation:
0
Operating system(s):
- Windows (Vista and later)
- Linux
I've been using GIMP for a while now but still lack deep knowledge of some image editing concepts. This particularly involves the difference between "Perceptual gamma (sRGB) & Linear light" found when selecting the menu item called "Image>Precision". I've been inclined to think that this choice has to do with internal computational alternatives and that what I was really after was the resulting effect that could be seen on the display screen of the image being edited/viewed. However, I had a recent experience where the appearance of the image being viewed when using GIMP for editing was dramatically different from the appearance of the exported image when displayed by some other viewing software.
Consider 3 examples pertaining to a photograph edited by GIMP.
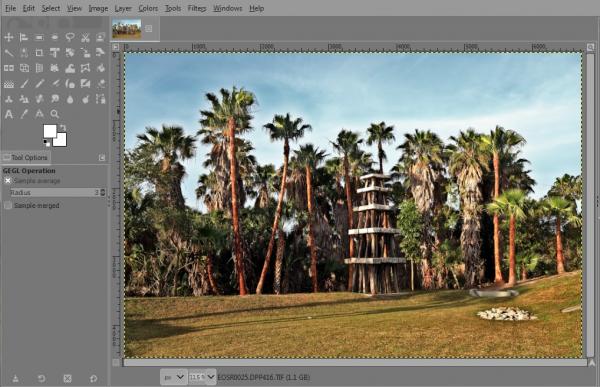
First is a screenshot of a photo edited by GIMP ready for export to a standard image file as follows:

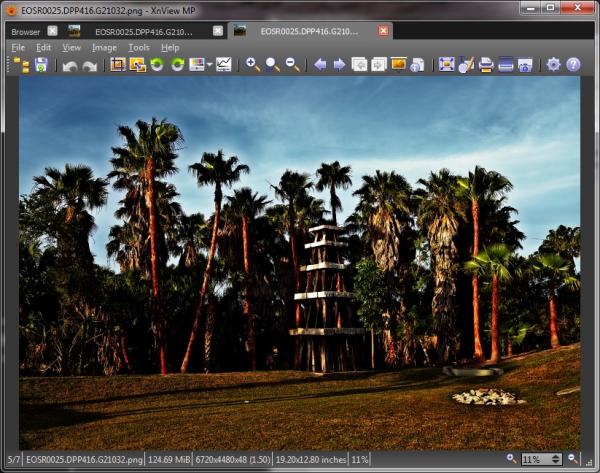
Second is a screenshot of an image (in .png format) created (i.e., exported) by GIMP of the exact same image (i.e., first shown) as follows:

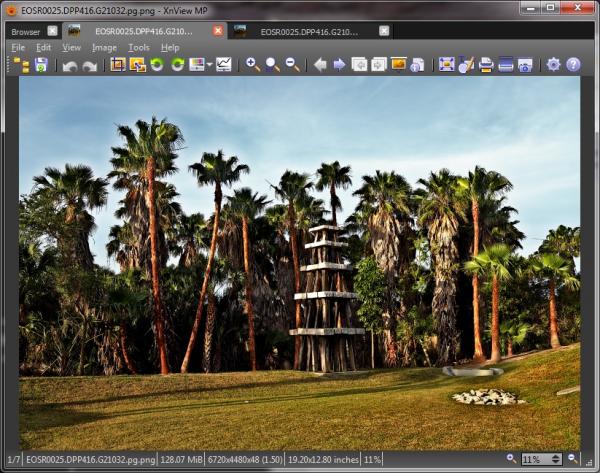
Third is another screenshot of the same image (in .png format) also created (i.e., exported) by GIMP of the exact same image (i.e., first shown) as follows:

The big surprise is the difference between the second and third images shown above (that came from the exact same image as viewed within GIMP). The difference is that "Linear light" was specified under Image>Precision for the first export whereas "Perceptual gamma (sRGB)" was specified for the second export. When that change was made in GIMP there was no perceivable difference in the appearance being displayed within GIMP. Nothing like the first exported image file ever appeared within GIMP.
Posts: 6,449
Threads: 280
Joined: Oct 2016
Reputation:
567
Operating system(s):
Gimp version: 3.00RC2
AFAIK nothing to do with precision, perhaps a color profile was not taken in account (is Canon/DPP using AdobeRGB, for instance?). If I export the same image (8-bit JPEG initially) after promoting it to 32-bit linear, the two exports are identical:
(they are strictly identical, reloaded in Gimp as layers, and put in difference mode, they have no pixel where the difference is not zero).
To the best of my knowledge:
- The precision is how data is stored internally, 8/16/32 bits, integer or floating point
- The benefit of high precision is that you avoid round-off errors, that lead to artifacts such as banding.
- In high precision, the encoded value is directly related to the amount of light a pixel emits, so this representation is "linear".
- In theory, 16-bit integer already avoids most problems, 16-bit floating point is enough for most purposes, but since actual computations are done in 32-bit floating point, using this format is faster because it skips conversions.
- In 8-bit integer, you haven't got many values, and if you are "linear" (middle-gray(*) at 127) you have a surplus of light shades (where our eyes aren't too sensitive to differences) and not enough dark shades (where our eyes are sensitive), so we use a non-linear correction that puts half gray around 187, giving you around 187 dark shades and 69 light ones). This is "gamma-corrected" or "perceptual". This isn't Gimp's invention, this is also how most 8-bit image formats store values (PNG, JPG, and the colormap in GIF).
- In Gimp 2.10 these perceptual values are used only for storage, all computations convert values to 32-bit FP linear, does the math, and convert the result back to perceptual.
- However... there are cases where perceptual is good, and others where it's not.
- Take the gradient/blend tool (
 ), and create a black to white gradient: by default the gradient is "perceptual": middle gray isn't in the middle. The gradient is pretty much mapping the "perceptual" encoding, and the middle gray is at 187/255 along the gradient span. The blend tool has a Blend color space option that you can set to linear. If you do so, the gradient will look wrong, with too much white and not enough black. ), and create a black to white gradient: by default the gradient is "perceptual": middle gray isn't in the middle. The gradient is pretty much mapping the "perceptual" encoding, and the middle gray is at 187/255 along the gradient span. The blend tool has a Blend color space option that you can set to linear. If you do so, the gradient will look wrong, with too much white and not enough black.
- But... change that to a red-to-green gradient, if you work directly on perceptual values, you will get a brown middle, because at that point instead of adding half red and half green, you will be adding a quarter red and a quarter green, resulting in something darker. This is the result you would have with Gimp 2.6.
- So, Gimp works on linear values, but doesn't forget that image editing is a perceptual thing, so many tools are now explicitly perceptual (before they would just appear to be that way, because they worked directly on perceptual values).
(*) to see what half-gray is, create a small black/white checkerboard pattern, will a big image with it, and step back until you can't distinguish the individual squares. By definition this image is sending you half the light of a full white image, this is middle-gray.
Posts: 127
Threads: 39
Joined: Aug 2017
Reputation:
0
Operating system(s):
- Windows (Vista and later)
- Linux
08-28-2022, 05:52 PM
(This post was last modified: 08-28-2022, 06:00 PM by ajax.)
I probably should have pointed out that this picture came from a raw file. Because GIMP can NOT handle raw files it had to be developed using other software. In this case, that was Canon Digital Photo Professional (DPP). I was actually experimenting with the idea of using DPP to perform minimal processing necessary to produce a file that GIMP could open and then do much more refined editing.
One of my reasons for wanting to obtain raw files from the camera is the increased bit depth used to represent colors. A problem I've always recognized when doing this is that the camera can represent color with higher bit depth than the display devices that are used both for developing/editing the photo as well as the devices used by those viewing the resulting image files. The image files in this case are 16bit png format files.
However, keep in mind that all of the images included in my original post were obtained from the same computer/display and they are all from the very same GIMP edited image. How they could be so dramatically different is what I found surprising. I have been developing raw image files for some time now using various different programs for post-processing and have never seen anything like this before this.
With that said, I've now done a little more experimenting. I can now say that the difference in the on-screen appearance (again all with the same screen) varies according to what software is used to display the image files. For example, if I display both of the GIMP produced image files using the built in Windows (7) Photo Viewer the difference in appearance is sufficiently minor that it might go unnoticed. On the other hand if I use the Canon supplied My Image Garden program the difference is at least as dramatic as what I posted. Those screenshots, by the way, were from files displayed using XnView MP.
I think both My Image Garden and XnView MP are designed to handle 16bit format. However, I suspect I should consider myself lucky that Windows Photo Viewer is even able to display 16bit files. Might this help explain my findings?
Another finding that I suspect is relevant. I extracted the metadata from each of the 2 GIMP produced png files to text format using ExifTool and then compared them using Notepad++. The only relevant difference was in the ICC Profile. The first (really dark) one used something called "GIMP built-in Linear", which I've never heard of, whereas the second (lighter) one used what I'd have expected which is an ICC Profile called "GIMP built-in sRGB".
I think this may be a case where I wandered into a swamp without knowing what I was getting into. I somewhat recently started manually/consciously changing the precision to 32bit floating point when doing any kind of editing that might affect color rendering. The idea being to simply avoid the need for GIMP to constantly be doing back and forth conversions while editing with different tools. It seems that GIMP prefers the "Linear light" setting (which I never equated to an ICC Profile) and I had no reason to change it. In the past I think this got changed back to "Perceptual gamma (sRGB)" when I changed back to integer precision (either 8 or 16 bit) after being done editing. It looks like for some reason, that I cannot explain, that must NOT have happened in this case.
Posts: 6,449
Threads: 280
Joined: Oct 2016
Reputation:
567
Operating system(s):
Gimp version: 3.00RC2
08-28-2022, 09:19 PM
(This post was last modified: 08-28-2022, 09:44 PM by Ofnuts.)
(08-28-2022, 05:52 PM)ajax Wrote: I probably should have pointed out that this picture came from a raw file. Because GIMP can NOT handle raw files it had to be developed using other software. In this case, that was Canon Digital Photo Professional (DPP). I was actually experimenting with the idea of using DPP to perform minimal processing necessary to produce a file that GIMP could open and then do much more refined editing.
One of my reasons for wanting to obtain raw files from the camera is the increased bit depth used to represent colors. A problem I've always recognized when doing this is that the camera can represent color with higher bit depth than the display devices that are used both for developing/editing the photo as well as the devices used by those viewing the resulting image files. The image files in this case are 16bit png format files.
Precision is one thing, file format is another.
So I can reproduce you problem... When exporting to PNG, the "Save color profile" option is checked , and when you do this the data is exported as linear, with a color profile that de-linearizes it, but is ignored by some image viewers (because 16-bit PNG isn't that common, so not that tested).
When I do so, the image saved without the color profile is displayed correctly, and the one saved with a linear profile is too dark, as expected.
Other apps may display the file correctly (Gimp, obviously, but also Firefox...).
|


 ), and create a black to white gradient: by default the gradient is "perceptual": middle gray isn't in the middle. The gradient is pretty much mapping the "perceptual" encoding, and the middle gray is at