(05-08-2017, 03:56 AM)eingram25 Wrote: I guess I was expecting skin colored brushes.
Those PS brushes are greyscale and take whatever is the foreground colour. You can mix your own skin tone or use a pre-made palette. You can often find these same place as your brushes.
example
http://palettes.deviantart.com/art/10-Li...-103148090
These go in your palettes folder C:\Users\your-name\palettes and show in the palettes dialogue.
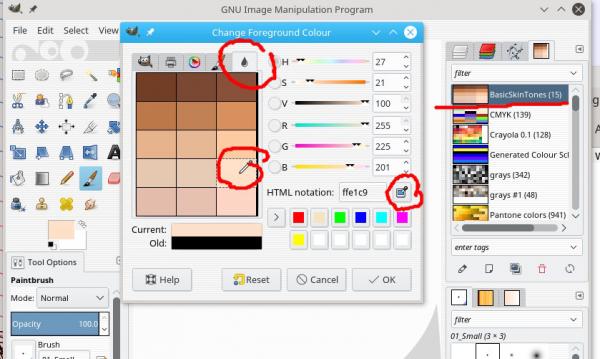
Windows -> Dockable Dialogues -> Palettes and make a Palette active
Then click on the FG swatch to bring up the Change FG dialogue and colour pick a colour.
This screen shot shows the main objects. An active palette, the palettes tab in the Change FG dialogue and the color picker. Edit: you do not actually need the color picker, just click on the color you want.

For the amount of brushes you have at the moment, a resources manager is a little over-kill. Keep categories of brush in sub-folders and use tags
Quote:Now you have intrigued me with the mention of a resource mgr. What do you recommend for that?
However. Resource managers. There are a couple of alternatives, but Ofnuts is comprehensive and relatively easy to implement. see:
http://gimp-tools.sourceforge.net/managementtools.shtml for information
and
http://sourceforge.net/projects/gimp-too...s/scripts/ for the plugin
addonCollectionManager-3.0.py about 29 down.
Using it,
the short version.
Plugin goes in your plugin folder
Make resource folders in your Gimp Profile, for brushes a folder,
brushes_storage (note the underscore)
Zip the category of brushes into a single file and put in the
brushes_storage folder.
After starting Gimp,
right click in the brushes dialogue to bring up the resources menu.
the long version
A video, over long and slow (10 minutes) but covers the subject
http://youtu.be/v0g0qv4YMks (ignore the GimpForums leader, GimpForums is deceased)


![[Image: h9Lmgqk.jpg]](http://i.imgur.com/h9Lmgqk.jpg)
![[Image: d6tXi8w.jpg]](http://i.imgur.com/d6tXi8w.jpg)
![[Image: VCLxI3R.jpg]](http://i.imgur.com/VCLxI3R.jpg)