Posts: 3
Threads: 1
Joined: Nov 2023
Reputation:
0
Operating system(s):
- Windows Vista or 7, 8, 10 (64-bit)
Gimp version: 2.10
 11-07-2023, 10:59 PM
Hi all,
using GIMP 2.10.34 on Win 10
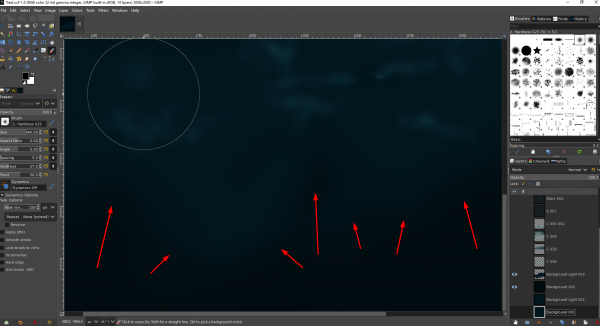
I have been getting annoying wavy lines (I would describe them as, you know those topographical map of mountains, that shows the difference of heights) that actually come from the gradual transparency of a layer after using the Eraser tool. Basically, using the Eraser tool, with a Force of 25% ish and Hardness of 13% ish (actually, whatever these settings are, it does it anyway). Attached is a screenshot of the entire GIMP layout (you will see all the Eraser settings). Only 2 layers active, so basically the one on top was opaque and I'm simply slowly and smoothly erasing it to reveal the layer under. At some point, I do want the top layer to be completely showing the one under it, but I do want a certain "gradient", and that thing happens right at the gradual transparency.
I once had that problem, few weeks back. It was the same problematic result, only, it came from duplicating a text layer and applying a gaussian blur on the layer below, in order to create a glow like effect. A friend of mine told me: check to see if you're in 8 bit Integer precision, and put it higher if it is. I actually was at 8, and I put it at 16 bits and this problem disappeared. So yesterday, I was, wait a minute, I suddenly have this problem but I'm in 32 bit?
So I'm confuse here... Anyone knows what causes this (I mean I know where it comes from) but is this a "normal GIMP" thing I will have to live with? Is there a way to get rid of it once you created it? Or is there a workaround to make sure I wouldn't get this?
Thanx a bunch in advance
Stef

Posts: 1,538
Threads: 71
Joined: May 2021
Reputation:
167
Operating system(s):
Gimp version: 2.10
11-08-2023, 06:24 AM
(This post was last modified: 11-08-2023, 06:25 AM by PixLab.)
(11-07-2023, 10:59 PM)sbalbarbin Wrote: Hi all,
using GIMP 2.10.34 on Win 10
I have been getting annoying wavy lines (I would describe them as, you know those topographical map of mountains, that shows the difference of heights) that actually come from the gradual transparency of a layer after using the Eraser tool. Basically, using the Eraser tool, with a Force of 25% ish and Hardness of 13% ish (actually, whatever these settings are, it does it anyway). Attached is a screenshot of the entire GIMP layout (you will see all the Eraser settings). Only 2 layers active, so basically the one on top was opaque and I'm simply slowly and smoothly erasing it to reveal the layer under. At some point, I do want the top layer to be completely showing the one under it, but I do want a certain "gradient", and that thing happens right at the gradual transparency.
It's called banding or gradient banding 
(11-07-2023, 10:59 PM)sbalbarbin Wrote: I once had that problem, few weeks back. It was the same problematic result, only, it came from duplicating a text layer and applying a gaussian blur on the layer below, in order to create a glow like effect. A friend of mine told me: check to see if you're in 8 bit Integer precision, and put it higher if it is. I actually was at 8, and I put it at 16 bits and this problem disappeared. So yesterday, I was, wait a minute, I suddenly have this problem but I'm in 32 bit?
So I'm confuse here... Anyone knows what causes this (I mean I know where it comes from) but is this a "normal GIMP" thing I will have to live with? Is there a way to get rid of it once you created it? Or is there a workaround to make sure I wouldn't get this?
Thanx a bunch in advance
Stef
There is something important for us to know. > Did you create those images in 32-bit from scratch, or did you import those image and raised them to 32-bit?
If you did import those images, let's say they were JPG, and raised them to 32-bit, this does not mean that GIMP will "replace" the 8-bit pixels with a smoother gradient, they are just raised to 32-bit, which means that from now on everything will be in 32-bit, but if there was banding before even very faint that you did not see, like different lightness, gradient color, or so > your low force/opacity eraser at 32-bit will expose them even more.
2 possible solutions out of my mind right now,
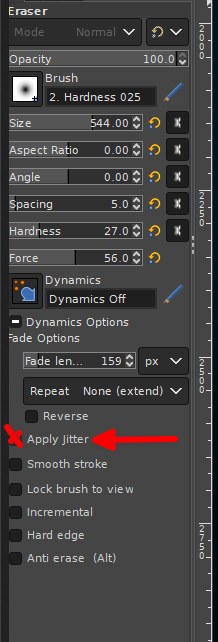
-- Check Apply jitter to your Eraser

-- Use a mask on your layer instead of using the Eraser tool, as this will give you a lot more control
Layer mask concept > https://www.gimp.org/tutorials/Layer_Masks/
Patrice
Posts: 3
Threads: 1
Joined: Nov 2023
Reputation:
0
Operating system(s):
- Windows Vista or 7, 8, 10 (64-bit)
Gimp version: 2.10
Thanx Patrice,
There are layers that are images that I imported (in my project that was set in 32 bit), but the 2 layers that are active in my screenshots are basically new layers that I created (Add Layer) and "Fill Foreground Color" them, so I'm guessing those really should be in 32?
Thanx for the tips, I will try that out tonight!
Best,
Stephane
Posts: 6,408
Threads: 279
Joined: Oct 2016
Reputation:
566
Operating system(s):
Gimp version: 3.00RC1
(11-08-2023, 01:19 PM)sbalbarbin Wrote: Thanx Patrice,
There are layers that are images that I imported (in my project that was set in 32 bit), but the 2 layers that are active in my screenshots are basically new layers that I created (Add Layer) and "Fill Foreground Color" them, so I'm guessing those really should be in 32?
Thanx for the tips, I will try that out tonight!
Best,
Stephane
You display is 8 bits (or 10 bits at most, but I don't know if Gimp 2.10 supports these), so even with 32 bits, you have have "banding". Banding happens because due to a "slow" gradient, the value of pixels abruptly changes along a line. Our vision has evolved to detect such features and we see lines even if the values are close (and due to gamma correction, this is even worse in the dark areas).
If you look at this image, you clearly see the line in the middle, between the #404040 on left and the #414141 on right:
Adding noise (RGB noise, Luminosity noise, or Spread noise ) you can spread the value change a bit to make it less noticeable. For the same purpose ypu can also use the "Dithering" option in the Blend tool.
Posts: 3
Threads: 1
Joined: Nov 2023
Reputation:
0
Operating system(s):
- Windows Vista or 7, 8, 10 (64-bit)
Gimp version: 2.10
(11-08-2023, 06:20 PM)Ofnuts Wrote: (11-08-2023, 01:19 PM)sbalbarbin Wrote: Thanx Patrice,
There are layers that are images that I imported (in my project that was set in 32 bit), but the 2 layers that are active in my screenshots are basically new layers that I created (Add Layer) and "Fill Foreground Color" them, so I'm guessing those really should be in 32?
Thanx for the tips, I will try that out tonight!
Best,
Stephane
You display is 8 bits (or 10 bits at most, but I don't know if Gimp 2.10 supports these), so even with 32 bits, you have have "banding". Banding happens because due to a "slow" gradient, the value of pixels abruptly changes along a line. Our vision has evolved to detect such features and we see lines even if the values are close (and due to gamma correction, this is even worse in the dark areas).
If you look at this image, you clearly see the line in the middle, between the #404040 on left and the #414141 on right:
Adding noise (RGB noise, Luminosity noise, or Spread noise ) you can spread the value change a bit to make it less noticeable. For the same purpose ypu can also use the "Dithering" option in the Blend tool.
Thanx Ofnuts,
I actually wanted to add Noise when I was done anyway, and it sure does the trick. All good, thanx to you both!
Stef
|


