Some concepts
Gimp is a bitmap editor. Bitmap images are made of pixels and the number of pixels determines the amount of detail in the image (which is why the camera/smartphone manufacturers boast the number of megapixels that the camera can produce).
When the image is put on a physical media (displayed on a computer or printed) it becomes necessary to know how to map pixels to physical units. This correspondence is the resolution. It is usually expressed in pixels-per-inch (even in metric countries....), usually noted PPI. You will also find dots-per-inch (DPI) instead of pixels-per-inch[1]. Some resolution values to keep in mind:
In practice, the only cast-in-concrete value is the image size in pixels. The print size can be changed by changing the print resolution as long as the print resolution remains sufficient (see the values above). The print resolution is just metadata, a label attached to the image, and can be changed at will without ill effects (by contrast, scaling the image to change the size in pixels always degrades it somewhat).
Note: the above is true for the usual sizes, up to about A3 (25" on a side). Larger images are usually viewed from farther away, so the print definition can be proportionally smaller (billboard images are printed at 10PPI...), and there is no point in generating gigapixel images. Since the increase in print size is exactly compensated by a decrease in required resolution, this makes the size in pixels constant. For most uses you can make a 12-megapixels image and adjust the physical size by setting the resolution.
Pitfall: a camera doesn't set the resolution of the photos, because a photo has no inherent resolution[2]. So the photo when loaded in Gimp has the default resolution of 72PPI, which makes it look sufficiently big. But it will not be printed at 72PPI and changing the resolution to 300PPI will make it look 4 times smaller.
In Gimp
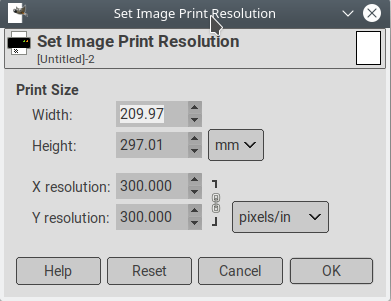
In Gimp the image resolution or the print size can be changed using the Image>Print size dialog:

In this dialog:
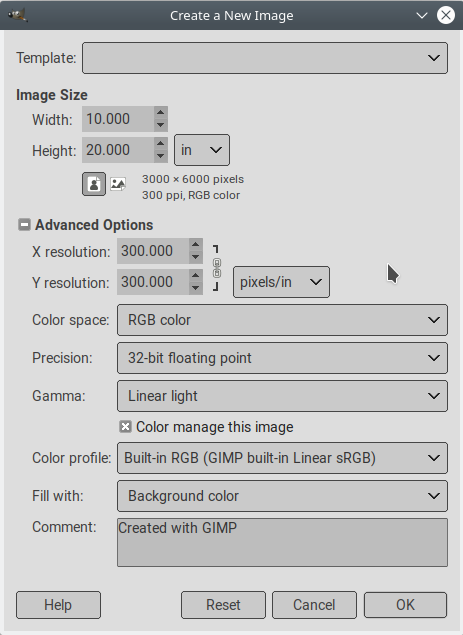
Changing the image size in nice, but it is usually better to start with an adequate size in pixels, so that there is no need to rescale later. The image dimension in physical units, together with the intended resolution can be set using the advanced options in the File>New dialog:

In this dialog:
Despite all this, the image is the wrong size... There are two more pitfalls:
The printer has margins
The printer can rarely print on the whole page, there are unprintable margins (at least one at the bottom on consumer inkjet printers). So the printable area is somewhat smaller than the page. If your image covers the whole page, the print driver (that won't try to determine if your image already includes margins) will possibly shrink it to make it fit the printable area. Some printer drivers have an option to print the image at the given size (but they can still shift it to avoid printing in the margin even if there is nothing to print there in your image). So very often, in practice the provided Letter, Legal or A4 templates may have to be tweaked to fit the available printer.
The display resolution is not the printer resolution
By default, at 100% zoom, Gimp displays the image "dot for dot". In other words, one pixel of the image is exactly one pixel on the screen. The consequence is that the image is displayed with the screen resolution and not the intended print definition. Since the screen usually has a lower resolution than the printer, the image is bigger on the screen than it will be in print.
When an exact size on the screen if required, Gimp can display the image on the screen with the print resolution by un-setting View>Dot for dot. But for this to be accurate Gimp needs an accurate measure of the screen resolution. This can be checked and set in Edit>Preferences>Display.
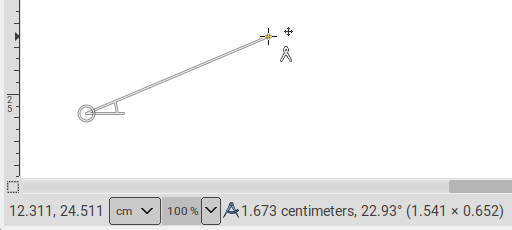
Another solution is to set the measurement unit at the bottom of the image display:

When this is done, these units[3] are used for:
Not all image are bitmaps and another important image type is vector graphics. If all images are eventually rendered as pixels, vector graphics do no contains the pixels, but painting instructions. This makes them size-independent. However, when importing them in Gimp they are converted to a bitmap and this bitmap must have a size. You can set the image size in pixels in the File open dialogs:
[1] DPI and PPI are not exactly the same. In inkjet color printers, a single pixel is made of several color dots, so your 2400DPI printer that makes a pixel from a 8x8 array of dots is really a 300PPI printer...
[2] If you take a close-up picture of an insect, a pixel in your image represents about a thousandth of an inch, but if you take a picture of a mountain range far away a pixel in your image covers several hundred yards of terrain.
[3] The print definition can be abused. For instance if the image is a map/plan, the resolution can be set to the actual relation between pixels and physical objects, and Gimp's Measure tool will produce direct readings.
Gimp is a bitmap editor. Bitmap images are made of pixels and the number of pixels determines the amount of detail in the image (which is why the camera/smartphone manufacturers boast the number of megapixels that the camera can produce).
When the image is put on a physical media (displayed on a computer or printed) it becomes necessary to know how to map pixels to physical units. This correspondence is the resolution. It is usually expressed in pixels-per-inch (even in metric countries....), usually noted PPI. You will also find dots-per-inch (DPI) instead of pixels-per-inch[1]. Some resolution values to keep in mind:
- 72PPI: this is is a default value, often displayed when there is no value given. It more or less corresponds to the resolution of a CRT display of the 80s.
- 90PPI-140PPI: standard laptop displays
- 150PPI: "draft" quality when printing text (used when printing good quality text took more time and more toner)
- 200-240PPI: high resolution displays on computers (Apple Retina, etc...)
- 300PPI: standard printer resolution
- 600PPI: high quality printer resolution.
size in inches = size in pixels ÷ resolution
size in pixels = size in inches × resolution
resolution = size in pixels ÷ size in inches
In practice, the only cast-in-concrete value is the image size in pixels. The print size can be changed by changing the print resolution as long as the print resolution remains sufficient (see the values above). The print resolution is just metadata, a label attached to the image, and can be changed at will without ill effects (by contrast, scaling the image to change the size in pixels always degrades it somewhat).
Note: the above is true for the usual sizes, up to about A3 (25" on a side). Larger images are usually viewed from farther away, so the print definition can be proportionally smaller (billboard images are printed at 10PPI...), and there is no point in generating gigapixel images. Since the increase in print size is exactly compensated by a decrease in required resolution, this makes the size in pixels constant. For most uses you can make a 12-megapixels image and adjust the physical size by setting the resolution.
Pitfall: a camera doesn't set the resolution of the photos, because a photo has no inherent resolution[2]. So the photo when loaded in Gimp has the default resolution of 72PPI, which makes it look sufficiently big. But it will not be printed at 72PPI and changing the resolution to 300PPI will make it look 4 times smaller.
In Gimp
In Gimp the image resolution or the print size can be changed using the Image>Print size dialog:
In this dialog:
- The size in pixels is a given and will not be changed
- Therefore adjusting the resolution also changes the print size and vice-versa
- The physical size may not be a round number due to the inch/mm conversion factor
Changing the image size in nice, but it is usually better to start with an adequate size in pixels, so that there is no need to rescale later. The image dimension in physical units, together with the intended resolution can be set using the advanced options in the File>New dialog:
In this dialog:
- The image size can be entered in pixels or in physical units
- The resolution can be specified, and if the size input is in physical units Gimp will compute the required size in pixels (which is displayed under the size entry fields).
- The size in pixels is always a round number (there are no fractional pixels) so Gimp will adjust the entry to the closest size that corresponds to a round number of pixels.
Despite all this, the image is the wrong size... There are two more pitfalls:
The printer has margins
The printer can rarely print on the whole page, there are unprintable margins (at least one at the bottom on consumer inkjet printers). So the printable area is somewhat smaller than the page. If your image covers the whole page, the print driver (that won't try to determine if your image already includes margins) will possibly shrink it to make it fit the printable area. Some printer drivers have an option to print the image at the given size (but they can still shift it to avoid printing in the margin even if there is nothing to print there in your image). So very often, in practice the provided Letter, Legal or A4 templates may have to be tweaked to fit the available printer.
The display resolution is not the printer resolution
By default, at 100% zoom, Gimp displays the image "dot for dot". In other words, one pixel of the image is exactly one pixel on the screen. The consequence is that the image is displayed with the screen resolution and not the intended print definition. Since the screen usually has a lower resolution than the printer, the image is bigger on the screen than it will be in print.
When an exact size on the screen if required, Gimp can display the image on the screen with the print resolution by un-setting View>Dot for dot. But for this to be accurate Gimp needs an accurate measure of the screen resolution. This can be checked and set in Edit>Preferences>Display.
Another solution is to set the measurement unit at the bottom of the image display:
When this is done, these units[3] are used for:
- The rulers
- The pointer coordinates
- The output of the Measure tool
Not all image are bitmaps and another important image type is vector graphics. If all images are eventually rendered as pixels, vector graphics do no contains the pixels, but painting instructions. This makes them size-independent. However, when importing them in Gimp they are converted to a bitmap and this bitmap must have a size. You can set the image size in pixels in the File open dialogs:
- For PDF and EPS, you can set a print definition or a size in pixels. These two values are related, changing one changes the other. The limit to this is that PDF and EPS can also contain embedded bitmap images and these cannot be scaled at will, so you cannot use a print definition much greater than the one the file was intended for. The default print definition on import is 100PPI, which is often smaller than the real definition of the image (300PPI), so don't forget to increase it when opening images.
- For SVG, you set a scale factor, that determines how much the image is enlarged/shrunk from the size set in the file. The Resolution setting sets the image print definition (so you can set image size and print definition independently).
[1] DPI and PPI are not exactly the same. In inkjet color printers, a single pixel is made of several color dots, so your 2400DPI printer that makes a pixel from a 8x8 array of dots is really a 300PPI printer...
[2] If you take a close-up picture of an insect, a pixel in your image represents about a thousandth of an inch, but if you take a picture of a mountain range far away a pixel in your image covers several hundred yards of terrain.
[3] The print definition can be abused. For instance if the image is a map/plan, the resolution can be set to the actual relation between pixels and physical objects, and Gimp's Measure tool will produce direct readings.


