Posts: 236
Threads: 26
Joined: Mar 2020
Reputation:
29
Operating system(s):
- Windows (Vista and later)
Gimp version: Don't know yet
(07-12-2020, 11:33 PM)Ofnuts Wrote: I find it complicated to use. I don't see much purpose in the "base" and "target". You can make things simpler with one less path. You would have:
1. The source path
2. The "shaper"
3. A rectangle.
The transform maps the rectangle to the shaper. In the nominal use, the rectangle frames the source path. Benefits: the rectangle can be implicit, and can be for instance the bounding box of the source path (max/min x,y of the anchors, or anchors and tangents) or defined by guides, or the selection... See for instance https://www.gimp-forum.net/Thread-ofn-bend-path
What makes the fast algorithm faster?
True. That would be more simple to use, and that would be an advantage. Something similar you can get by using the Shaper as the Target and drawing the Base rectangle around the source path (true, that could be implicit).
But this way it is more flexible. Where the transformed path will be located, is independent of the Shaper. The Base and the Target determine the movement. The Shaper determines the shape.
Also, if you use 4-anchor Base and Target, neither needs to be a rectangle, not even the Base. They may be skew quadrilaterals. So, from a single Shaper you get different effects by changing the forms of the Base and the Target.
But it might be good to make such simpler version. I'll look into it.
The plugin is slow because of the approximation that is needed. If the source path is a Bezier curve of degree 3, the transformation makes it into a curve of degree 9. To draw it with Bezier curves, an approximation must be used. To that end, the plugin uses my own algorithm (that certainly should be much better and faster).
The simple algorithm is fast since it is simple. It does not even try to approximate. If you choose the algorithm by putting the input number =1, it uses the following simple rule: When it sees an arc that should be drawn, it sets the end points exactly right, and it sets the tangent directions at the end points exactly right. But the handle lengths are set simply to be 1/3 of the chord length. If the arc curves only mildly, the result may be good, but it may also be quite wrong. The simple algorithm does not care. I shall make an example picture for you when I have the time.
If you choose the simple algorithm by putting the input number >1, what happens is that the algorithm first subdivides the arc into smaller subarcs, and then it uses the simple rule on the subarcs. So the number of control points grows. Try to put input =8 and see the result.
The slow algorithm ideally gives good approximation with only a small number of control points.
By the way, Inkscape can draw parametric curves as paths. I looked at it once (not the current version, that was some time ago). It seemed to me that it used such simple 1/3 rule or something similar. So, to get accurate results, you must put control points densely. That approximation is a non-trivial problem.
Posts: 236
Threads: 26
Joined: Mar 2020
Reputation:
29
Operating system(s):
- Windows (Vista and later)
Gimp version: Don't know yet
(07-13-2020, 06:15 AM)Ottia Tuota Wrote: The plugin is slow because of the approximation that is needed. If the source path is a Bezier curve of degree 3, the transformation makes it into a curve of degree 9. To draw it with Bezier curves, an approximation must be used. To that end, the plugin uses my own algorithm (that certainly should be much better and faster).
The simple algorithm is fast since it is simple. It does not even try to approximate. If you choose the algorithm by putting the input number =1, it uses the following simple rule: When it sees an arc that should be drawn, it sets the end points exactly right, and it sets the tangent directions at the end points exactly right. But the handle lengths are set simply to be 1/3 of the chord length. If the arc curves only mildly, the result may be good, but it may also be quite wrong. The simple algorithm does not care. I shall make an example picture for you when I have the time.
If you choose the simple algorithm by putting the input number >1, what happens is that the algorithm first subdivides the arc into smaller subarcs, and then it uses the simple rule on the subarcs. So the number of control points grows. Try to put input =8 and see the result.
The slow algorithm ideally gives good approximation with only a small number of control points.
Here is an example picture trying to show what a simple algorithm and the good algorithm do.

The Path to be transformed is the slightly curvy grid. Each arc is a separate stroke with one anchor at each end. The picture shows the transformed path obtained from the simple algorithm with the input numbers 1,2,4, and also from the good algorithm (input number = 0). The Shaper is deliberately chosen to be difficult (large curvatures).
- Algorithm=1: Terribly wrong. Here the simple algorithm adds no new control points. It merely maps the original anchors and then uses the 1/3 rule to construct the handles. No effort done to approximate the right curve. (By the 1/3 rule I mean the rule that handle lengths are set to 1/3 of the chord length.)
- Algorithm=2: Much better but faults are easy to spot. Here the algorithm first makes a subdivision on each segment and only after that uses the 1/3 rule.
- Algorithm=4: Seen in this size already very good but zoomed in one still sees faults. And the cost is that there are still more control points.
- Algorithm=0: The good but slow algorithm.
In addition, the picture shows the cases algorithm=0 and algorithm=4 with the anchors made visible. The point is that the algorithm=4 gives a good result but with unnecessarily many control points. The algorithm=0, on the other hand, gives a good result but with fewer control points (though there are more than in the original Path).
I also made the experiment (not shown in the picture) that I let the plugin draw two of these cases on top of each other: the case algorithm=0 and the case algorithm=4. That way I could compare the results, and I saw that in some spots there were clear discrepancies. Then I did the same with algorithm=0 and algorithm=8, and I saw no differences in the curves, so it is clear that the approximation algorithm (input=0) did very good work. But the path from algorithm=8 was literally covered by anchors. The conclusion: The good and slow algorithm produced a good result even if slowly.
Posts: 236
Threads: 26
Joined: Mar 2020
Reputation:
29
Operating system(s):
- Windows (Vista and later)
Gimp version: Don't know yet
(07-12-2020, 11:33 PM)Ofnuts Wrote: I find it complicated to use. I don't see much purpose in the "base" and "target". You can make things simpler with one less path. You would have:
1. The source path
2. The "shaper"
3. A rectangle.
The transform maps the rectangle to the shaper. In the nominal use, the rectangle frames the source path. Benefits: the rectangle can be implicit, and can be for instance the bounding box of the source path (max/min x,y of the anchors, or anchors and tangents) or defined by guides, or the selection... See for instance https://www.gimp-forum.net/Thread-ofn-bend-path
I made a simplified version of the plugin. The download link is in post #1. There one gets everything in one big .zip file. The new, simplified version is still experimental and is bound to change in near future. I named the new plugin "Map shaped by a Bezier arc quadrilateral (easy)" since I have no better name for it. Note the "(easy)" at the end.
Ofnuts: Will you kindly look at it and give your opinion. I trust your judgement. You know how to write good plugins. I myself tend to make everything too complicated. (I shun depriving anybody of anything, so I offer too many options in my plugins since otherwise I would be depriving the users of choices...)
This version 0.16 is still temporary and will change. There are no Base or Target. The Target is taken internally from the Shaper. To replace the Base I followed the example of ofn-bend-path. The plugin asks for a reference box. I think it as an enclosing box of the path to be transformed. Currently there are two choices:
- Bounding box of anchors of the Path,
- Bounding box of selection.
But I plan to put at least one more (guides), perhaps three(?).
Posts: 6,340
Threads: 272
Joined: Oct 2016
Reputation:
563
Operating system(s):
Gimp version: 2.10
Posts: 7,133
Threads: 155
Joined: Oct 2016
Reputation:
1,003
Operating system(s):
Gimp version: 2.10
I can see that being more attractive to the average user. One reason I still use a very old script to generate path shapes is it's straight-forward dialogue. No need to dig out a crib-sheet to figure out how it works.

A not very informative screenshot.
In use not a great difference between any of the algorithm's except 1 is very fast. A value of 5 does indeed give a lot more control points. No great visual quality difference for this test between algorithms. I think you will find type 1 being the most used.
Posts: 236
Threads: 26
Joined: Mar 2020
Reputation:
29
Operating system(s):
- Windows (Vista and later)
Gimp version: Don't know yet
(07-15-2020, 09:20 AM)rich2005 Wrote: I can see that being more attractive to the average user. One reason I still use a very old script to generate path shapes is it's straight-forward dialogue. No need to dig out a crib-sheet to figure out how it works.
A not very informative screenshot.
In use not a great difference between any of the algorithm's except 1 is very fast. A value of 5 does indeed give a lot more control points. No great visual quality difference for this test between algorithms. I think you will find type 1 being the most used.
Yes, I suppose you are right. The result depends also on how densely the original path has control points. The few fonts I have happened to look at, seem to have excessively many control points.
If algorithm=1 works well, fine. If not, algorithm=2 may be enough. In difficult cases (post #12) algorithm=0 may be good to use. But it is nice to hear that you find it usable.
Posts: 236
Threads: 26
Joined: Mar 2020
Reputation:
29
Operating system(s):
- Windows (Vista and later)
Gimp version: Don't know yet
I updated the plugin to 0.17 (how to get it, see post #1). The changes are in the new "Map shaped by a Bezier arc quadrilateral (easy)". The reference box can now be chosen from 5 alternatives:
- Use bounding box of the source path
- Use bounding box of anchors of the source path
- Use bounding box of selection
- Take reference box from guides
- Take reference box from a path
Numbers 1,2,3 should be clear. Number 4 needs four guides, two horizontal and two vertical.
Number 5 needs a path to be input. It is supposed to be a quadrilateral. Only anchors (four) matter. It need not be rectangular. Actually, this is the old Base in disguise. This way I smuggled the Base back in, though this time into the back row.
What I miss here is the Target. I think it has its own role. At the present the Shaper has two functions: it determines the shape, and it determines the destination. I still think these two had better be separated. For example, consider the drawings in Rich's post (#15). In addition to shaping the text, the plugin tilted it by 45 degrees. I guess the reason is where the four anchors of the Shaper were located: bottom, right, top, left. The user probably would like to control such matters. In this particular case I see three alternative remedies:
- Before applying the plugin, rotate the Shaper by 45 degrees.
- After applying the plugin, rotate the resulting path by 45 degrees.
- Instead of the easy version, use the fuller version and a rectangular Target with sides running horizontal, vertical, horizontal, vertical.
But the fuller version is too complicated for the user. I shall see if I can do something about it. But now it is as it is. Any comments are welcome. This all is a new world to me, and it means constant learning...
Posts: 236
Threads: 26
Joined: Mar 2020
Reputation:
29
Operating system(s):
- Windows (Vista and later)
Gimp version: Don't know yet
I updated the plugin file to version 0.18. There are now two versions of the new plugin: "easy" and "advanced". Ideally there should be only one and the latter would be hidden behind a button "Advanced options". But I don't know how to do it.
I am still working on the advanced one and there will be changes, so please don't pay any attention to it for now. But I decided to publish the easy version already since it solves the difficulty I noticed in the post by Rich (see posts #15, #17). Thanks Rich! Now horizontals can be kept horizontal, despite of the Shaper.
The easy version got two changes:
- I dropped the option to take the reference box from a path. That is now only in the advanced version.
- The plugin can (and as the default does), after transforming the path, rotate it to keep horizontals horizontal.
To be more precise, what is turned to horizontal, is the part in the transformed path corresponding to the bottom edge of the reference box. This makes sense now that the reference box always has originally the bottom edge horizontal (since I dropped the path option), so it is natural to maintain horizontality of the bottom edge.
To demonstrate, here is a picture:

Other settings were the defaults.
The new version 0.18 is found in the same place, see post #1. Please tell me if there are any problems. Or if the plugin could be made to work more reasonably...
Posts: 236
Threads: 26
Joined: Mar 2020
Reputation:
29
Operating system(s):
- Windows (Vista and later)
Gimp version: Don't know yet
Now version 0.19. How to find it, see post #1. What is new:
- I changed the default for the algorithm to 4. That is perhaps more user-friendly since it is faster. But the number of generated control points will be large. Setting the algorithm to 0 is still the best (but slow).
- I developed the advanced version of the newest plugin further, and I hope it is now close to final. I show two examples in this post below.
- In the course of the work, as a by-product, I made two small plugins to take a path and fit it inside a given triangle or a given convex quadrangle. I shall make a separate post where I explain those two, but you can already try them. They are simple enough.
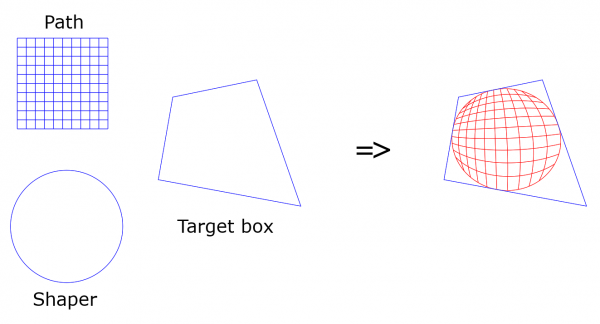
Now I explain a little about the advanced version. The following two pictures show what I think is the central way to use the plugin. The path to be transformed is the grid. First picture:

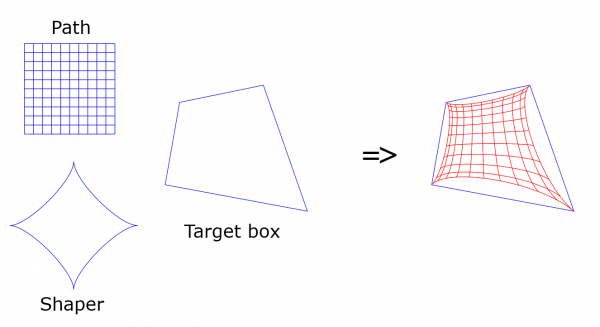
Second picture:

These pictures were made using the default settings. This requires three paths as input:
- The source path (in these examples it is the grid).
- The Shaper (the circle and the astroid-like figure). It defines the "shape" of the transformation.
- The Target box (the 4-anchor path). It determines where the transformed path will be located. To control how that is done, in the GUI there are three options behind the button "How do you want to apply the Target box?"
On the right you see the results: The source path is deformed, moved over to the Target box, and fitted into the Target box. In the circle case, the Target box even becomes a tangent box.
There are some options but I don't explain those here now. I tried to make the GUI clear enough. Please ask if needed.
Some points I mention here: The Target box (quadrangle) must be convex. The Shaper is a general path with four anchors (a curvy quadrilateral). But occasionally there will be an error message telling that in the case you tried, you must in the GUI do: In the question " How do you want to apply the Target box?" choose Option 3: Use only the bottom edge. That means that the Target box cannot be used as a box but only the bottom edge is taken into account.
The plugin uses a Reference box. You need not bother about it if you just let it be at the default value. The Reference box can be thought to have function similar to the baseline of a text. The plugin gives 5 options to choose from. If you take option 5 (a path), it must be a convex quadrangle, and you have to choose the path with the widget. I believe that the default (the bounding box of the source path) will usually be the best choice. But if you ever need to use a box which has sides not horizontal and vertical, or which is not rectangular, then you can try a path with option 5.
So, that was what I think as the central way to use the plugin (=default values). I stop here. If you want further info, please make questions. Also, any suggestions are very welcome. And please tell if the plugin acts strangely.
Posts: 236
Threads: 26
Joined: Mar 2020
Reputation:
29
Operating system(s):
- Windows (Vista and later)
Gimp version: Don't know yet
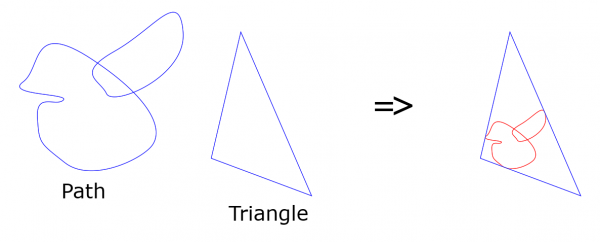
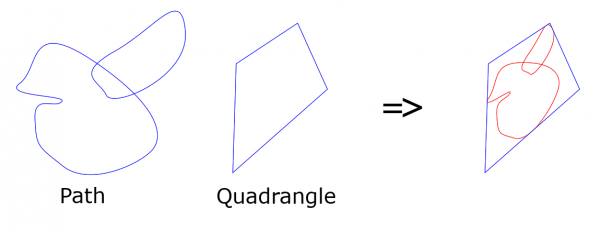
Now a couple of words and two pictures about the two small plugins "Fit a path in a triangle" and "Fit a path in a convex quadrangle". These arouse just as by-products. I have no idea if anybody will find them useful.
The first plugin:

The plugin performs a transformation called dilation to place and fit the given path in the given triangle. Dilation means translation plus scaling. So, no rotation or distortion. This plugin involves no approximation since the mapping is affine, so it can be made just by mapping control points.
The second plugin:

The transformation done here is what mathematicians call a projective transformation. I believe other people coming from different backgrounds may call it a perspective transformation. It is, I believe, almost the same as Gimp's tool perspective transform (but then I don't know what that one actually does).
As you see from the picture, the path is fitted in the given quadrangle, but in the process it is clearly distorted.
Looking at the picture you are likely to notice that the accomplished fitting is not the only possible. An infinite number of different fittings could be done when distortion is allowed. The plugin implements just one particular choice. Imagine the bounding box of the path drawn there; it is that box which is deformed into the shape of the quadrangle, and the path is deformed along with it.
(To make the plugin more general, to allow the user to choose from those infinitely many other possibilities, would mean complicating things again... I might be doing that next.)
Also, when applied to Bézier curves, the latter plugin necessarily does approximation; that is why this plugin offers choice of the algorithm. But please note that the plugin is not perfect and the fitting may not be exact with the default algorithm (=4). You may set the algorithm number higher or set it to 0 (slow). Even then nothing is guaranteed.
|


