12-05-2021, 09:32 AM
Here is an experimental plugin. It is still at a preliminary stage and produces sometimes bad results. But I decided to publish it now since I think it may be useful as it is. And I am interested to hear any suggestions.
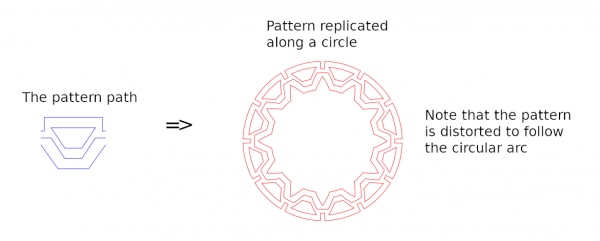
The plugin takes a path and replicates it along a circle:

So far the plugin works well for straight-edge paths (with some limitations) but you can try it with curved paths too.
With the plugin you can easily make the circular figures (but now as paths) in the following old thread:
https://www.gimp-forum.net/Thread-How-to...le-meander?
You can download the plugin from
http://kmarkku.arkku.net/Path_replicate_...aster.html
Unzip the .zip file and place the one file it contains (replicate_path_along_circle.py) in your user's plug-ins folder. Then (re)start Gimp. Make a new image, and there a Pattern path like above. In Gimp's menu, go to the Paths dock, right-click the pattern path, and follow the links
Tools > Replicate > Replicate path along circle
and click. That opens the GUI of the plugin. I explain now the inputs.
Paths
In addition to the "Pattern path" (the path to be replicated) the plugin asks for a "Base path". It is a path with a single stroke. The stroke must be open so that it has two ends. Those end points are used as reference points: they are mapped precisely onto the circle. Example:

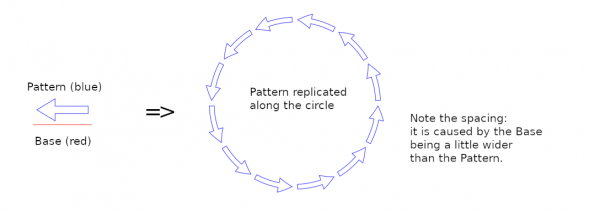
The Pattern is the blue arrow. Below it the red 2-anchor line is the "Base". You can imagine that the Base and the Pattern are transformed together: the end points of the Base are mapped onto the circle and the Pattern follows along. The result, using default values, is on the right. (The transformed Base is not shown here but the plugin does allow it to be drawn too. The same goes for the circle.)
Replication
To control the replication process there is a list of parameters:

The meaning of "Number of copies" and "Radial scaling" should be obvious. The latter does not change the circle but it scales the transformed pattern radially.
Distortion method
The plugin distorts the pattern to accommodate to the circular arc. There are three choices for how the distortion is done. The most natural is the default "polar coordinates" and probably that is all you will need. You can try the "exponential" method. It has the advantage to be conformal when radial scaling is 1, and that property may be useful sometimes (and for a mathematician this is the most natural choice!). The third choice is "no distortion" which causes the pattern to be copied as such (if radial scaling is 1).
If you use distortion you are safest when you apply the plugin only to straight-edge paths. Curved paths may cause unpleasant surprises; see below. If you choose "no distortion", however, curved paths should cause no problems.
Other drawings
With the last two inputs
Above I talked about the Base path as if it were only a 2-anchor path and nothing else. But all that is required of it is that it has a single stroke and that the stroke has two ends. Those end points are used as reference points. But between the end points the stroke may be anything, and sometimes you can use it as a part of the drawing; for that reason there is the option to draw the transformed Base. Or maybe you just want to see where the reference points are mapped to.
Known limitations
The current plugin may give bad results in distortions at least if:
Joining strokes
Look at the first picture. The resulting path consists of 12 sectors, and each sector is made of 4 short strokes, three open and one closed. But clearly the open short strokes could be joined to longer strokes, going round the whole figure. The plugin does not do this. But if you want to do the joinings, my plugin in
https://www.gimp-forum.net/Thread-Joinin...-of-a-path
seems to work well with its default values. And so does Ofnuts' plugin Edit > Join strokes contained in ofn-path-edits. In the first picture I created the pattern path by means of a grid and "snap to grid". That way the strokes were easily joined in the result.
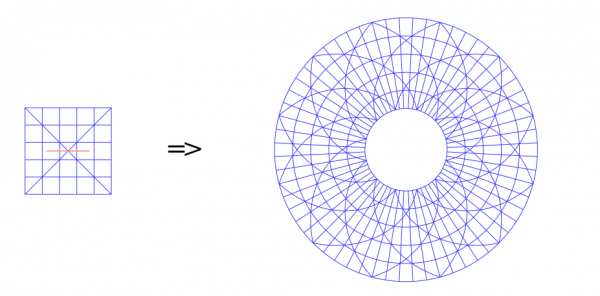
Finally, a little playing. The Base is the red line in the middle, precisely half of the width of the grid:

The plugin takes a path and replicates it along a circle:
So far the plugin works well for straight-edge paths (with some limitations) but you can try it with curved paths too.
With the plugin you can easily make the circular figures (but now as paths) in the following old thread:
https://www.gimp-forum.net/Thread-How-to...le-meander?
You can download the plugin from
http://kmarkku.arkku.net/Path_replicate_...aster.html
Unzip the .zip file and place the one file it contains (replicate_path_along_circle.py) in your user's plug-ins folder. Then (re)start Gimp. Make a new image, and there a Pattern path like above. In Gimp's menu, go to the Paths dock, right-click the pattern path, and follow the links
Tools > Replicate > Replicate path along circle
and click. That opens the GUI of the plugin. I explain now the inputs.
Paths
In addition to the "Pattern path" (the path to be replicated) the plugin asks for a "Base path". It is a path with a single stroke. The stroke must be open so that it has two ends. Those end points are used as reference points: they are mapped precisely onto the circle. Example:
The Pattern is the blue arrow. Below it the red 2-anchor line is the "Base". You can imagine that the Base and the Pattern are transformed together: the end points of the Base are mapped onto the circle and the Pattern follows along. The result, using default values, is on the right. (The transformed Base is not shown here but the plugin does allow it to be drawn too. The same goes for the circle.)
Replication
To control the replication process there is a list of parameters:
- Circle center x
- Circle center y
- Circle radius
- Sector start
- Sector angle
- Number of copies
- Radial scaling
The meaning of "Number of copies" and "Radial scaling" should be obvious. The latter does not change the circle but it scales the transformed pattern radially.
Distortion method
The plugin distorts the pattern to accommodate to the circular arc. There are three choices for how the distortion is done. The most natural is the default "polar coordinates" and probably that is all you will need. You can try the "exponential" method. It has the advantage to be conformal when radial scaling is 1, and that property may be useful sometimes (and for a mathematician this is the most natural choice!). The third choice is "no distortion" which causes the pattern to be copied as such (if radial scaling is 1).
If you use distortion you are safest when you apply the plugin only to straight-edge paths. Curved paths may cause unpleasant surprises; see below. If you choose "no distortion", however, curved paths should cause no problems.
Other drawings
With the last two inputs
- Apply to the base path too?
- Draw the circle?
Above I talked about the Base path as if it were only a 2-anchor path and nothing else. But all that is required of it is that it has a single stroke and that the stroke has two ends. Those end points are used as reference points. But between the end points the stroke may be anything, and sometimes you can use it as a part of the drawing; for that reason there is the option to draw the transformed Base. Or maybe you just want to see where the reference points are mapped to.
Known limitations
The current plugin may give bad results in distortions at least if:
- The path has strongly bending or very long arcs, or inflection points. The remedy is to add anchors at strategic points.
- The path is much wider than the base. Sometimes this is disastrous but not always - see the last picture below.
- The ratio (Sector angle)/(Number of copies) is large. The plugin allows 120 degrees at most, and occasionally even that is a little too much.
Joining strokes
Look at the first picture. The resulting path consists of 12 sectors, and each sector is made of 4 short strokes, three open and one closed. But clearly the open short strokes could be joined to longer strokes, going round the whole figure. The plugin does not do this. But if you want to do the joinings, my plugin in
https://www.gimp-forum.net/Thread-Joinin...-of-a-path
seems to work well with its default values. And so does Ofnuts' plugin Edit > Join strokes contained in ofn-path-edits. In the first picture I created the pattern path by means of a grid and "snap to grid". That way the strokes were easily joined in the result.
Finally, a little playing. The Base is the red line in the middle, precisely half of the width of the grid:


![[Image: BcLyxa1.png]](https://i.imgur.com/BcLyxa1.png)