On CGI (logos, text), the smooth edges are produced with anti-aliasing pixels. These pixels have a color which is a mix of the background color and the subject color.
The usual (and suboptimal) technique
When you use the color selector or the fuzzy selector, these anti-aliasing pixels are either selected fully or not at all, depending on threshold. If you then bluntly Delete, you either get a halo with the color of the removed background (Threshold 15) or a jagged edge (Threshold 100) or both:
A better solution
A much better solution is to replace the background color by transparency, in proportion of its contribution to the color mix. In Gimp there are two ways to achieve this:

Both methods replace the pixel by the most transparent pixel, which, put over the removed color, re-produces the initial color:
In 2.10, the Color erase paint and blend modes do exactly what is required, while the Color to alpha tool has changed a bit and its result is not always exactly what is needed for reconstructing with alpha-lock and Behind modes as explained below.
For instance, using Color-to-alpha to remove the red gives this:
You will notice that in the 2.8 results, there are darker pixels that are due to Gimp 2.8 working on gamma-corrected values (the result is still vastly better than the jagged edges you get with simpler methods). Gimp 2.10 works in "linear light" and has no such problems.
Refinements
In the general case, the subject may have parts that are close to the color of the background. So if you apply the technique above these parts become transparent (or partially transparent). Avoiding this is simple:
Changing the color of the subject
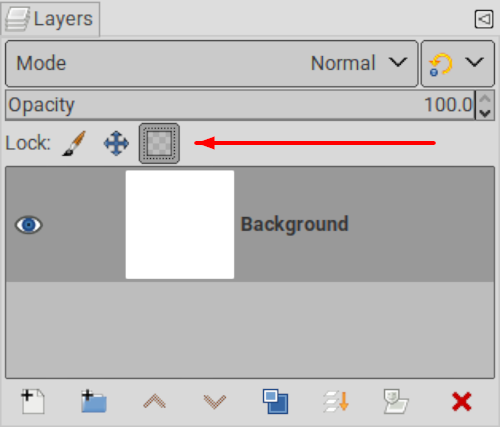
At that point you may want to also change the color of the subject. But you cannot just apply paint because you have to keep these semi-transparent pixels. Enters the "alpha-lock":

When it is set, the alpha channel of the layer is locked, in other words, the opacity of the pixels cannot be changed, and painting over them will only change their color and leave their opacity as it is, which is exactly what we want. So, to change the subject color, we just
Replacing the background is as easy as removing the old one as above, and then painting a new one, isn't it? Of course, the devil is in the details. How do we paint the partially transparent anti-aliasing pixels, or more accurately, how do we recreate the appropriate color mix in each of them?
A first solution lies in the definition of what color-to-alpha does: once you have removed the background you can recreate the initial image by putting behind it a layer filled with the removed color. So replacing the background is merely using another background layer.
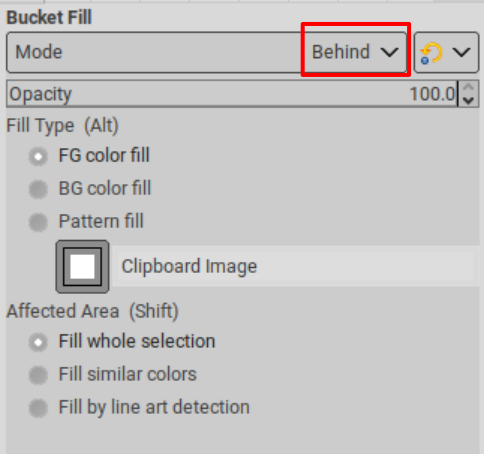
A second solution that doesn't involve an extra layer is to paint the layer using the Behind mode.

As its name indicates, if you consider layers as sheets of glass, this is equivalent to painting the underside of your layer: you don't see that color where the top side of the layer is opaque, you only see it through the (partially) transparent pixels. In other words, it does the opposite of Color erase: it replace transparency with a color, in proportion to the transparency. The nice thing is that you usually won't need a selection to apply it, since it will only apply where necessary, which is where Color Erase created the transparency.
The usual (and suboptimal) technique
When you use the color selector or the fuzzy selector, these anti-aliasing pixels are either selected fully or not at all, depending on threshold. If you then bluntly Delete, you either get a halo with the color of the removed background (Threshold 15) or a jagged edge (Threshold 100) or both:
A better solution
A much better solution is to replace the background color by transparency, in proportion of its contribution to the color mix. In Gimp there are two ways to achieve this:
- Colors > Color to alpha
- Color erase mode, as a paint tool mode, or since Gimp 2.10 as a layer blend mode.
Both methods replace the pixel by the most transparent pixel, which, put over the removed color, re-produces the initial color:
- If you remove red from purple, you get a semi transparent blue, because semi-transparent blue over red produces purple.
- If you remove white from gray, you get a very transparent black pixel and not a not-so-transparent dark gray pixel, because among several solutions Gimp picks the most transparent one.
In 2.10, the Color erase paint and blend modes do exactly what is required, while the Color to alpha tool has changed a bit and its result is not always exactly what is needed for reconstructing with alpha-lock and Behind modes as explained below.
For instance, using Color-to-alpha to remove the red gives this:
You will notice that in the 2.8 results, there are darker pixels that are due to Gimp 2.8 working on gamma-corrected values (the result is still vastly better than the jagged edges you get with simpler methods). Gimp 2.10 works in "linear light" and has no such problems.
Refinements
In the general case, the subject may have parts that are close to the color of the background. So if you apply the technique above these parts become transparent (or partially transparent). Avoiding this is simple:
- Use the wand to select the background. The usual threshold (15) is fine.
- Select ➤ Grow the selection so that it covers the anti-aliasing pixels. On a clean image (PNG, with no JPG history) you don't need to grow by more than one pixel. If the image is dirty (JPEG artifacts), growing the selection by two or three pixels can be necessary.
- Apply color-to-alpha (2.8), or bucket-fill the selection in Color erase mode, in both cases using the color to erase. The pixels inside the subject, being excluded from the selection, won't be altered. Color to alpha/Color erase will be applied to the background and the edge pixels, where it matters.
- JPEG doesn't support transparency
- GIF supports binary transparency (all opaque or all transparent) so your semi-transparent edge pixels are going to be altered. You can use Layer ➤ Transparency ➤ Semi-flatten to fill the transparency of these edge pixels with a new color (the color of the background on which the GIF will be used).
- PNG has full support for partial transparency and is currently the preferred format.
- WEBP is a new Google-sponsored format that can be lossy or lossless, and supports partial transparency. Gimp 2.10 supports it, but you have to ensure that it is supported where you want to use it (it is supported by all recent browsers, but some servers (including this forum's own software) don't consider it an image format).
Changing the color of the subject
At that point you may want to also change the color of the subject. But you cannot just apply paint because you have to keep these semi-transparent pixels. Enters the "alpha-lock":
When it is set, the alpha channel of the layer is locked, in other words, the opacity of the pixels cannot be changed, and painting over them will only change their color and leave their opacity as it is, which is exactly what we want. So, to change the subject color, we just
- remove the selection (Select ➤ None), since the alpha-lock will do the work (a selection is even harmful in this case),
- set the alpha-lock,
- fill the layer, letting alpha-lock preserve the pixels opacity. This "fill" can be the bucket-fill of course, but can also be anything that paints the layer: for instance the Paintbrush, Gradient or Clone tools, or a noise-rendering filter such as Plasma.
Replacing the background is as easy as removing the old one as above, and then painting a new one, isn't it? Of course, the devil is in the details. How do we paint the partially transparent anti-aliasing pixels, or more accurately, how do we recreate the appropriate color mix in each of them?
A first solution lies in the definition of what color-to-alpha does: once you have removed the background you can recreate the initial image by putting behind it a layer filled with the removed color. So replacing the background is merely using another background layer.
A second solution that doesn't involve an extra layer is to paint the layer using the Behind mode.
As its name indicates, if you consider layers as sheets of glass, this is equivalent to painting the underside of your layer: you don't see that color where the top side of the layer is opaque, you only see it through the (partially) transparent pixels. In other words, it does the opposite of Color erase: it replace transparency with a color, in proportion to the transparency. The nice thing is that you usually won't need a selection to apply it, since it will only apply where necessary, which is where Color Erase created the transparency.


