You will need to lay 2 eggs, not one... but two!
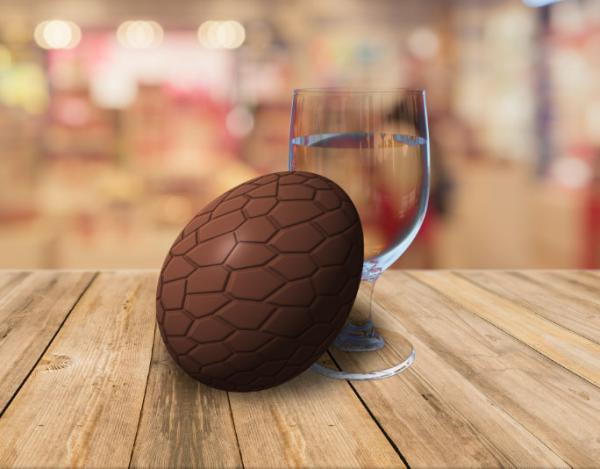
The first egg will be your map, the second one will be your colored egg with already a 3D shadowy effect.
No worries, once you did laid your first egg, you just apply the 2 filters used on the first egg to the second one.
GIMP will keep the setting of these two filters you've used on the first egg, so it's just a click on the OK button for the second egg.
Having said all that let's lay some eggs.
1) Create a base map
White background
New transparent layer,
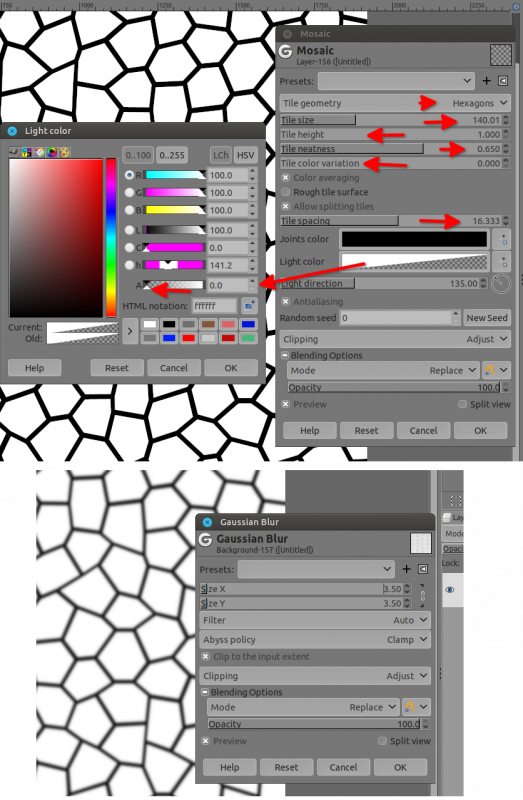
Filters ➤ Distorts ➤ Mosaic
Hexagons /
Tile size and Tile spacing will depend of your image's size (here it's 1920x1920) /
Tiles height and color variations at the minimum
Light color ➤ Click on it and make it transparent with the "A"(alpha) slider or input zero
Merge down that layer and name it "Map"
Then Filters ➤ Blur ➤ Gaussian blur... (again, blur will depend of your image size, here 3.5 for 1920x1920)
2) Prepare your chocolate
New transparent layer "choco"
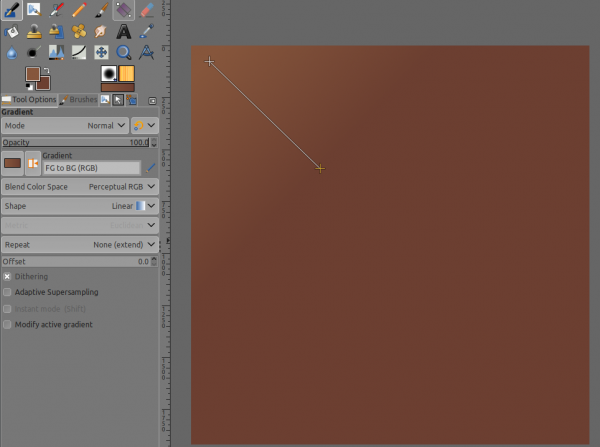
Set your FG #86563c / BG #6c3f31 colors (I took it from https://www.schemecolor.com/hot-chocolate.php )
Gradient tool and did something like below
3) Lay your first egg (and the second one at the same time)
Select the "map" layer
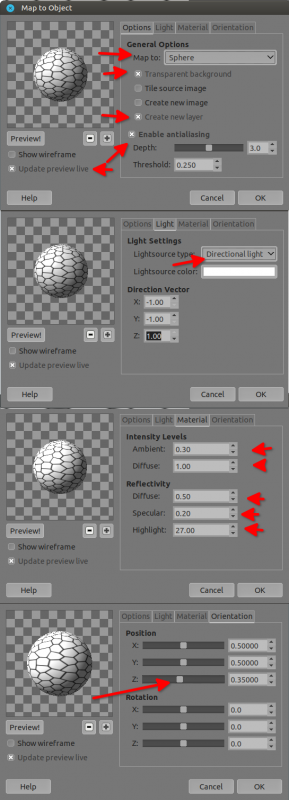
Filters ➤ Map ➤ Map Object... first tab make transparent background / sphere /new layer... (just look the screenshot below and don't zoom too much at the tab Orientation)
Select the "choco" layer
Just do a Ctrl+F or go to Filters ➤ Repeat "Map Object"
Select the "map" layer
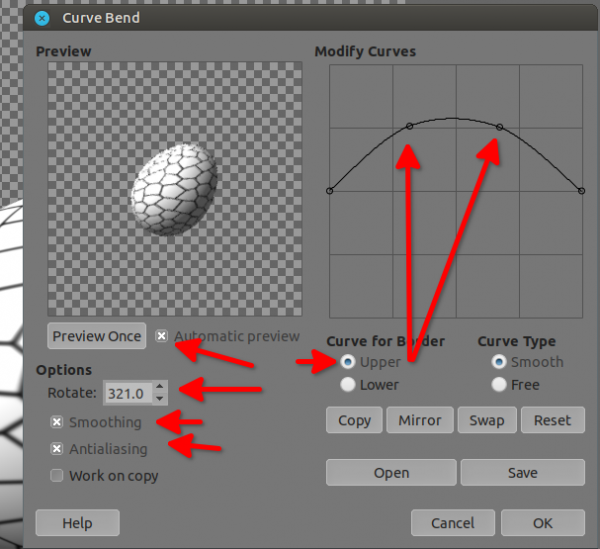
Then Filters ➤ Distorts ➤ Curve bend... see below (use only Upper), I did Rotate for the purpose of this tuto to show you that you can rotate, but if you don't want don't do.
Right click on it Layer to image size
Select "choco" layer
Again just do a Ctrl+F or go to Filters ➤ "Repeat "Curve bend"
Right click on it Layer to Image size
Congratulation you've perfectly laid your two eggs...
4) Getting almost there:
Because of the sphere transformation, in the center of the egg it's more blurred than on the edge, this is absolutely normal, but we do need to compensate or we will have a feeling of a more focused edges or back of the egg than the front.
keep only the "map" layer visible
Right click on that layer in the stack
Alpha to selection
Select ➤ Save to channel don't forget this step, then go to select back your layer.
Select ➤ Invert
Select ➤ Grow... this also will depend about your image size, here I did grow about 170 px
Select ➤ feather... same as above, it depends about your image size, here I did 22 px.
Then go to the Channels tab.
Right click on "Selection Mask copy" (that's the selection you saved to channel) -> Intersect with selection
Go back to Layers tab and Select your egg layer!
Filters ➤ Blur ➤ Gaussian blur... low setting, it's just to "equalize" the side blur with the bulgy front.
Select None
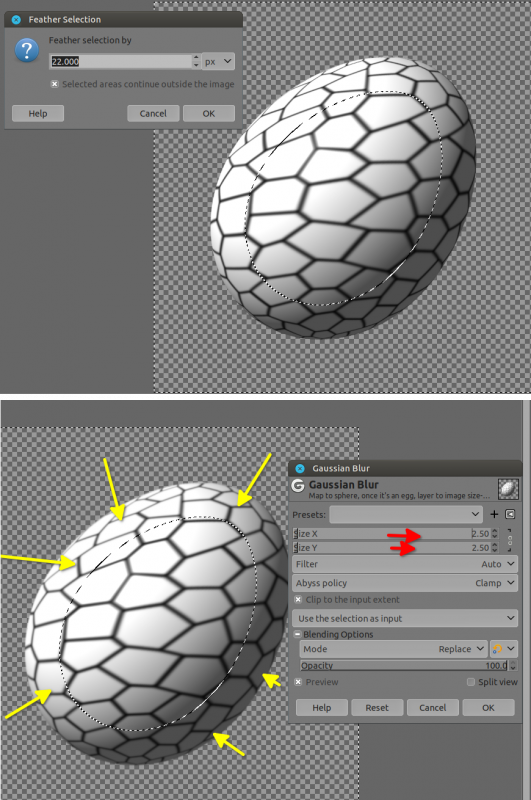
Note: Using intersection this way (non feathered selection intersecting a feathered selection) GIMP can have a feathered selection on one side (here inner side) and a not feathered selection on the other side (outer side) in the very same selection.
To continue below (I can't put more images in the same post)
5) Lay your chocolate egg
Only "choco" layer is visible and selected
Filters ➤ Map ➤ Bump map... in the aux select your map
then play with sliders like below
Note: "Ambient lighting factor is quite important, it will give a "smoother" carving inside the carving
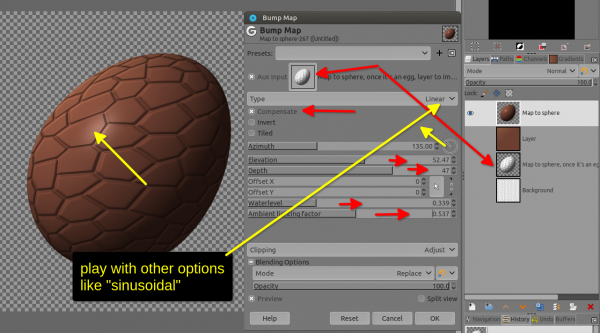
6) Shadow...
One advice (you take it, or you leave it): don't use Filters ➤ Light and Shadow ➤ Drop Shadow... that's wrong... it flattens behind the egg
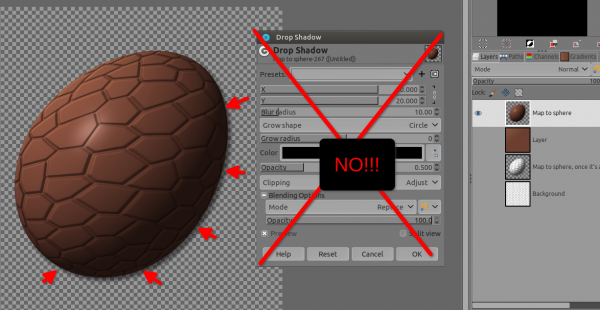
Instead, do an alpha to selection on one of the egg ➤ then new layer ➤ fill with black and squeeze it down ➤ then blur and play with transparency, put below "choco", fine tune your squeezing as you wish
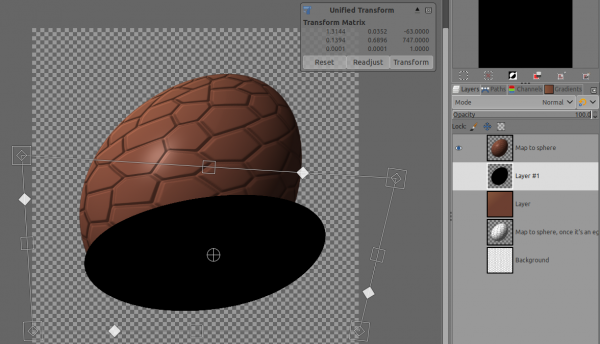
Now you can drink with your egg
The first egg will be your map, the second one will be your colored egg with already a 3D shadowy effect.
No worries, once you did laid your first egg, you just apply the 2 filters used on the first egg to the second one.
GIMP will keep the setting of these two filters you've used on the first egg, so it's just a click on the OK button for the second egg.
Having said all that let's lay some eggs.
1) Create a base map
White background
New transparent layer,
Filters ➤ Distorts ➤ Mosaic
Hexagons /
Tile size and Tile spacing will depend of your image's size (here it's 1920x1920) /
Tiles height and color variations at the minimum
Light color ➤ Click on it and make it transparent with the "A"(alpha) slider or input zero
Merge down that layer and name it "Map"
Then Filters ➤ Blur ➤ Gaussian blur... (again, blur will depend of your image size, here 3.5 for 1920x1920)
2) Prepare your chocolate
New transparent layer "choco"
Set your FG #86563c / BG #6c3f31 colors (I took it from https://www.schemecolor.com/hot-chocolate.php )
Gradient tool and did something like below
3) Lay your first egg (and the second one at the same time)
Select the "map" layer
Filters ➤ Map ➤ Map Object... first tab make transparent background / sphere /new layer... (just look the screenshot below and don't zoom too much at the tab Orientation)
Select the "choco" layer
Just do a Ctrl+F or go to Filters ➤ Repeat "Map Object"
Select the "map" layer
Then Filters ➤ Distorts ➤ Curve bend... see below (use only Upper), I did Rotate for the purpose of this tuto to show you that you can rotate, but if you don't want don't do.
Right click on it Layer to image size
Select "choco" layer
Again just do a Ctrl+F or go to Filters ➤ "Repeat "Curve bend"
Right click on it Layer to Image size
Congratulation you've perfectly laid your two eggs...
4) Getting almost there:
Because of the sphere transformation, in the center of the egg it's more blurred than on the edge, this is absolutely normal, but we do need to compensate or we will have a feeling of a more focused edges or back of the egg than the front.
keep only the "map" layer visible
Right click on that layer in the stack
Alpha to selection
Select ➤ Save to channel don't forget this step, then go to select back your layer.
Select ➤ Invert
Select ➤ Grow... this also will depend about your image size, here I did grow about 170 px
Select ➤ feather... same as above, it depends about your image size, here I did 22 px.
Then go to the Channels tab.
Right click on "Selection Mask copy" (that's the selection you saved to channel) -> Intersect with selection
Go back to Layers tab and Select your egg layer!
Filters ➤ Blur ➤ Gaussian blur... low setting, it's just to "equalize" the side blur with the bulgy front.
Select None
Note: Using intersection this way (non feathered selection intersecting a feathered selection) GIMP can have a feathered selection on one side (here inner side) and a not feathered selection on the other side (outer side) in the very same selection.
To continue below (I can't put more images in the same post)
5) Lay your chocolate egg
Only "choco" layer is visible and selected
Filters ➤ Map ➤ Bump map... in the aux select your map
then play with sliders like below
Note: "Ambient lighting factor is quite important, it will give a "smoother" carving inside the carving
6) Shadow...
One advice (you take it, or you leave it): don't use Filters ➤ Light and Shadow ➤ Drop Shadow... that's wrong... it flattens behind the egg
Instead, do an alpha to selection on one of the egg ➤ then new layer ➤ fill with black and squeeze it down ➤ then blur and play with transparency, put below "choco", fine tune your squeezing as you wish
Now you can drink with your egg


