Posts: 3
Threads: 1
Joined: Jul 2021
Reputation:
0
Gimp version:
Operating system(s): Windows Vista or 7, 8, 10 (64-bit)
I had an artist make me a drawing in pencil. She scanned it in and created a png file of it in photoshop. I opened it in Gimp and accepted the default conversion. When it opens, it looks like it should on the screen. But when i print it out, it prints in shades of blue instead of grey. When i open it in windows picture manager and print it on the same printer, it prints properly (shades of grey). Is there something else i need to do to get Gimp to print it appropriately? My apologies, as I am very new to Gimp.
TIA!
Posts: 7,838
Threads: 166
Joined: Oct 2016
Reputation:
1,078
Gimp version:
Operating system(s): Linux
07-10-2021, 06:53 PM
(This post was last modified: 07-10-2021, 07:55 PM by rich2005.
Edit Reason: typo
)
Possibly a profile issue.
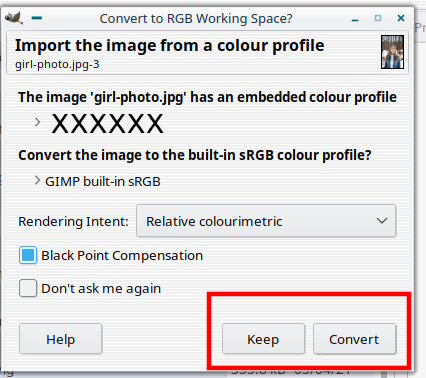
When you open the scan in Gimp you see something like this ? Which one do you consider default quote: I opened it in Gimp and accepted the default conversion.

Do you Keep or Convert ? Which ever one you use try the other one.
Alternative:
A foolproof way (unless the printer has run out of black ink or you want some coloured parts) is convert the image to grayscale
Use Image -> Mode -> Greyscale
Edit:
I once had a Canon inkjet printer that refused to use black ink when printing from Gimp. Black can theoretically mix from cyan + magenta + yellow but in practice with the Canon, came out a shade of brown.
However something else to check.
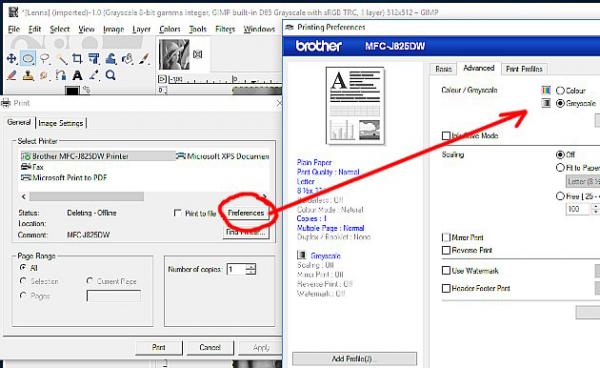
The Gimp Windows Print plugin is only a front end for your printer software.

Have a look in the Print set up for Preferences which takes you to your printer interface and there might be a greyscale setting somewhere.
Posts: 3
Threads: 1
Joined: Jul 2021
Reputation:
0
Gimp version:
Operating system(s): Windows Vista or 7, 8, 10 (64-bit)
(07-10-2021, 06:53 PM)rich2005 Wrote: Possibly a profile issue.
When you open the scan in Gimp you see something like this ? Which one do you consider default quote: I opened it in Gimp and accepted the default conversion.
Do you Keep or Convert ? Which ever one you use try the other one.
Alternative:
A foolproof way (unless the printer has run out of black ink or you want some coloured parts) is convert the image to grayscale
Use Image -> Mode -> Greyscale
Edit:
I once had a Canon inkjet printer that refused to use black ink when printing from Gimp. Black can theoretically mix from cyan + magenta + yellow but in practice with the Canon, came out a shade of brown.
However something else to check.
The Gimp Windows Print plugin is only a front end for your printer software.
Have a look in the Print set up for Preferences which takes you to your printer interface and there might be a greyscale setting somewhere.
I'm sorry. It only asks me to "convert" when i open the JPG file (but i do click convert). The JPG prints in blue as well. The PNG file does not ask me to convert when i open it. I'm using the PNG file for what i need to do. I tried your suggestion of changing the image to greyscale, however once that is done, you can't add anything with color to the image even on it's own layer. I need to add little red hearts to the image. So that won't work.
After your comment about your cannon printer not printing black, i opened another file in Gimp that has black in it, and it prints fine. It seems to be just this file (in either extension). So I'm thinking it must have something to do with how she created the files, but i'm not sure. She takes her sketch, and scans it which produces a JPG. She takes the JPG into Photoshop, makes the background transparent and then saves it as a PNG. Can you think of anything she might be doing which would cause this only for Gimp?
Also, since we're talking about how the file is made, let me ask you something else. When I look at all my other files that I've purchased with transparent backgrounds, has the nice clear subject/image sitting on top of the checkerboard "transparent" layer. When i open her PNG file, it looks like the subject/image is behind the checkerboard transparent layer, if you know what I mean. Is that how Photoshop does it's transparent "backgrounds?" It doesn't make sense to me... if it's laying in front of/over the "image" then it's not the background, right?? LOL. But i digress....
Posts: 1,063
Threads: 88
Joined: Aug 2018
Reputation:
83
Gimp version:
Operating system(s): Windows Vista or 7, 8, 10 (64-bit)
Try converting the image to Grayscale according to Rich2205's tip, and then return it to RGB mode, so you can add your red hearts.
1- Change to grayscale: Image -> Mode -> Greyscale;
2- Return to RGB: Image ->Mode -> RGB;
3- Add the colored part - Red hearts.
Posts: 7,838
Threads: 166
Joined: Oct 2016
Reputation:
1,078
Gimp version:
Operating system(s): Linux
07-11-2021, 09:14 AM
(This post was last modified: 07-11-2021, 10:59 AM by rich2005.)
Quote: I'm using the PNG file for what i need to do..
That's fine, png supports transparency, jpgs generally do not although photoshop can use a non-standard format with a 'clipping path', however for a line drawing I do not think you will have one of those. In photoshop I think it goes like: jpeg -> select background -> invert -> paste into transparent layer -> save as png..
If the (RGB - colour printing) image appears black in Gimp but prints blue that usually means the printer has run out of yellow ink  However assuming plenty ink / ink nozzles not blocked. :
Quote:all my other files that I've purchased with transparent backgrounds, has the nice clear subject/image sitting on top of the checkerboard "transparent" layer. When i open her PNG file, it looks like the subject/image is behind the checkerboard transparent layer, if you know what I mean.
I do know what you mean. The image in photoshop was semi-transparent before exporting to a png. What you can try:
1. Open png image
2. Duplicate layer Layer -> Duplicate Layer
3. Put the layer into 'Merge' mode (optional)
4. Layer -> New from Visible to combine.
5. Desaturate to remove any remnants of colour from the original scan.
The image is still RGB and you can add your colour embelishments.
All that in a 30 second demo. This stared off from a jpg scan to 50% opacity png. From that point: https://i.imgur.com/3oWOz0e.mp4
Posts: 3
Threads: 1
Joined: Jul 2021
Reputation:
0
Gimp version:
Operating system(s): Windows Vista or 7, 8, 10 (64-bit)
(07-11-2021, 03:04 AM)Krikor Wrote: Try converting the image to Grayscale according to Rich2205's tip, and then return it to RGB mode, so you can add your red hearts.
1- Change to grayscale: Image -> Mode -> Greyscale;
2- Return to RGB: Image ->Mode -> RGB;
3- Add the colored part - Red hearts.
Converting you greyscale doesn't help. It still prints blue. I just took the original file and applied greyscale and printed.
Posts: 1,538
Threads: 71
Joined: May 2021
Reputation:
168
Gimp version:
Operating system(s): Linux
07-11-2021, 03:46 PM
(This post was last modified: 07-11-2021, 03:47 PM by PixLab.)
(07-10-2021, 09:25 PM)her24gl Wrote: Also, since we're talking about how the file is made, let me ask you something else. When I look at all my other files that I've purchased with transparent backgrounds, has the nice clear subject/image sitting on top of the checkerboard "transparent" layer. When i open her PNG file, it looks like the subject/image is behind the checkerboard transparent layer, if you know what I mean. Is that how Photoshop does it's transparent "backgrounds?" It doesn't make sense to me... if it's laying in front of/over the "image" then it's not the background, right?? LOL. But i digress....
Interesting, it seems that she did not use a layer mask as a primary element to remove the background, but something like "Blend if" or the removal of a "color range" or a method which affect the entire image like a "color to alpha" alike.
If she scanned the doc with a "yellowish" background as scan result, she could have use a method mentioned above as it's an extremely fast method (it takes just few seconds) to remove a cast color and make it transparent. => her method is only a supposition, as a matter of fact without any doc (png or PSD) to share with us, It's all supposition and theory only about her method!
But yellow is opposite of blue, remove yellow you got blue...
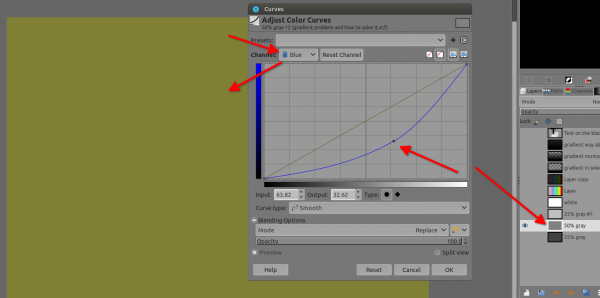
Example on a 50% gray layer using a curve in the blue channel (Color > Curves...), instead of being gray when I reduce the blue, image become yellow (remove blue, you got yellow)

as a workaround, try to play with those setting to add yellow and neutralize the blue
But in all case this does NOT answer your printing problem with GIMP,
Your other software are printing without any problem, something is going wrong somewhere, maybe just a setting problem between GIMP and your printer.
|


 However assuming plenty ink / ink nozzles not blocked. :