(05-15-2021, 03:11 PM)rich2005 Wrote: I do not think the procedure as described is valid with Gimp 2.10 Default layer modes.
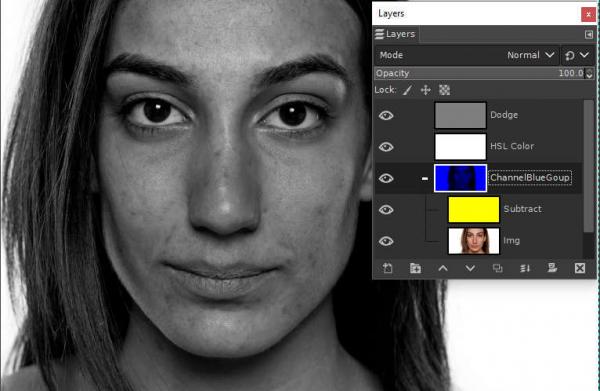
However, on the basis that the idea is to highlight blemishes so that the base color layer is improved using the heal tool, this is the closest I can get using Gimp 2.10 default layer modes. It is the (red + green = yellow) layer in Linear burn which makes the difference. Dodge is still dodge, although you can tweak the grey colour . White is HSL color mode.
The whole thing is a bit flaky. Best bet use the legacy modes while they still exist.
rich2005, as per your post #6 everything led to believe that the replacement mode for the old
Color mode would be
HSL Color; although this makes the steps in Pat David's tutorial not reproducible in Gimp 2.10.
About using the
Linear Burn mode as an alternative, it seemed to me outside the original idea of the tutorial, which was to
subtract the yellow from the image, generating an image similar to the one obtained when working with the blue channel only.
Using the
Linear Burn mode instead generated a
yellowish image.
I tried working directly with the
blue channel, and the result in terms of visualized image was satisfactory,
but it was impossible to use the healing brush and see the changes happening at the same time. At this point the blue toned layer was the layer being edited and not the color image.

>>What caught my attention was that
Color Mode was desaturating the layers below it (the layer in color mode), but with
HSL Color mode I was desaturating only the layer below (yellow).<<
So I experimented with working with
layer groups and voilà!
Using a layer group, I could use all layers with the expected modes (white layer with HSL Color mode) and practically reproduce Pat David's tutorial.

Maybe someone can create a script for Gimp 2.10 based on this presentation of mine.
rich2005, thanks for the help!


