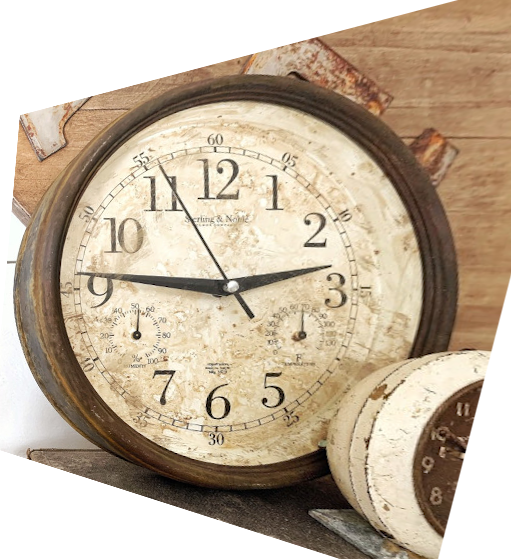
Here is a new plugin to perform Perspective transform (=projective transformation for a mathematician), based on two 4-anchor paths. To get it, go to
http://kmarkku.arkku.net/Miscellaneous_p...aster.html
edit: http://kmarkku.arkku.net/Perspective_tra...aster.html (url changed - rich)
move to the bottom row and click the Download button. You get a .zip file. Unzip it and put the sole file it contains (perspective_transform.py) to your user's plug-ins folder and restart Gimp. The plugin will be in Gimp's menu at Filters > Distorts > Perspective transform > ...
The plugin transforms the active layer. It asks for two paths, Source and Target. Both are supposed to be 4-anchor paths. The transformation will send the anchors of the Source onto the anchors of the Target. So, if you have a picture and in it you have some four specific points A,B,C,D that you would like to move to some other points P,Q,R,S, then:
The plugin also contains options to draw two special lines connected with infinities, provided that they intersect the image area. I say nothing about those here. You can just ignore them.
Example: I use the picture by Denzjos, which was what lead to this plugin; see https://www.gimp-forum.net/Thread-fix-distorted-round

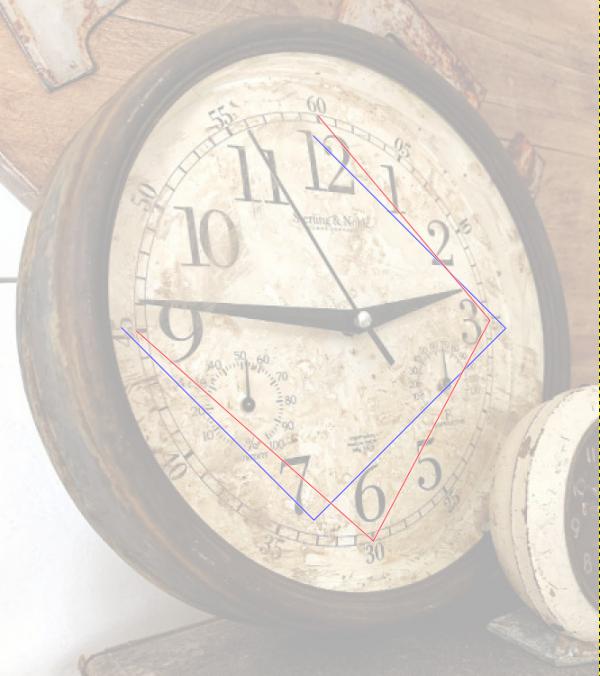
The following picture tries to show the paths Source (red) and Target (blue) that I used. (The clock is dimmed just to show the paths better)

The Source path (red) is chosen from the hours 12,3,6,9 on the dial and left unclosed. The Target path (blue) has its anchors at the corners of a square tilted by 45 degrees. I made it as follows:

That's that. I attach here also the xcf file in case you wish to look at it more closely:
 clock.xcf (Size: 1.35 MB / Downloads: 468)
The plugin was quite a rushed job. I mostly just copied pieces of code from an unpublished work. If you have problems with the plugin, please be kind enough to tell me. And you will certainly find points that could be made better. My knowledge about Gimp is rather rudimentary, so please make suggestions.
http://kmarkku.arkku.net/Miscellaneous_p...aster.html
edit: http://kmarkku.arkku.net/Perspective_tra...aster.html (url changed - rich)
move to the bottom row and click the Download button. You get a .zip file. Unzip it and put the sole file it contains (perspective_transform.py) to your user's plug-ins folder and restart Gimp. The plugin will be in Gimp's menu at Filters > Distorts > Perspective transform > ...
The plugin transforms the active layer. It asks for two paths, Source and Target. Both are supposed to be 4-anchor paths. The transformation will send the anchors of the Source onto the anchors of the Target. So, if you have a picture and in it you have some four specific points A,B,C,D that you would like to move to some other points P,Q,R,S, then:
- Create the Source path so that it has A,B,C,D as its anchors. Don't make it closed.
- Create the Target path so that it has P,Q,R,S as its anchors. Don't make it closed. Ensure that the ordering of P,Q,R,S in the Target path corresponds to the ordering of A,B,C,D in the Source path (excepting possible reversal).
- Make sure that the layer you want to transform is the active one.
- Open the plugin's GUI.
- If you want to retain the original layer as it is, so that the plugin will work on a copy, click the bottom entry (Keep the original layer?) to set it to Yes.
- Run the plugin.
- If the plugin runs ok and produces some result but it is somehow wrong, repeat but this time click the entry Use the target reversed? to Yes.
- If still not happy, look at the example case below.
- If the result is ok, you may wish to do Image > Fit Canvas to Layers.
The plugin also contains options to draw two special lines connected with infinities, provided that they intersect the image area. I say nothing about those here. You can just ignore them.
Example: I use the picture by Denzjos, which was what lead to this plugin; see https://www.gimp-forum.net/Thread-fix-distorted-round
The following picture tries to show the paths Source (red) and Target (blue) that I used. (The clock is dimmed just to show the paths better)
The Source path (red) is chosen from the hours 12,3,6,9 on the dial and left unclosed. The Target path (blue) has its anchors at the corners of a square tilted by 45 degrees. I made it as follows:
- Make a square selection.
- Do Selection to path. Rename the path to Target.
- Dismiss the selection.
- Rotate the Target by 45 degrees.
- Move and scale the Target so that it is close to the Source. (Not necessary.)
- Delete one edge from the Target, so that it is open at the same side as the Source.
That's that. I attach here also the xcf file in case you wish to look at it more closely:
 clock.xcf (Size: 1.35 MB / Downloads: 468)
The plugin was quite a rushed job. I mostly just copied pieces of code from an unpublished work. If you have problems with the plugin, please be kind enough to tell me. And you will certainly find points that could be made better. My knowledge about Gimp is rather rudimentary, so please make suggestions.


![[Image: tnMYEo4.gif]](https://i.imgur.com/tnMYEo4.gif)