03-25-2021, 08:02 AM
I got the idea to try to implement warping of paths, similar to Gimp's tool Warp Transform on images. I show now what I managed to make. Not quite similar but close.
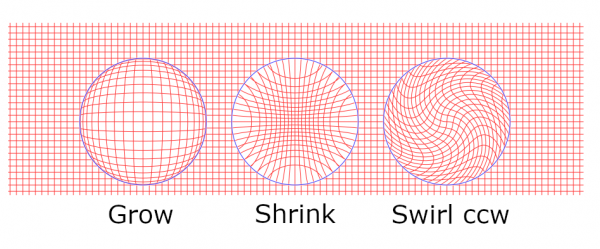
See the picture below. The grid is actually the path that I warp. I use this path in this example since it shows the effects best. The warping is done inside a given circle, so that it is a local operation. The plugin has three modes of action: Grow, Shrink, and Swirl (counter-clockwise or clockwise). The picture shows an example of each, applied to the grid path:

The blue circles do not belong to the transformed path; they are here just to show the circles of action. The circle is input by the user as a 2-anchors path (meaning either a diameter or the center and one point on the circle).
The plugin has two parameters: Smoothing and Strength. Smoothing controls what happens at the edge of the circle. If Smoothing = 0, there will be sharp bends like in the picture above. When Smoothing > 0, the bends are rounded. The rounding happens inside the circle. The other parameter, Strength, controls the amount of the warping effect.
In the above picture Smoothing=0 and and Strength=1 (the defaults).
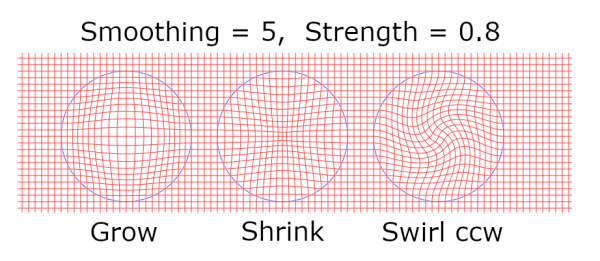
Here are the same examples as above but with Smoothing = 5 and Strength = 0.8 (recall that the blue circles do not belong to the path):

Good values for Smoothing are 0..10 but you can go higher. Strength accepts values 0..1.
Strength seems to work similarly to the Strength parameter in Gimp's Warp Transform tool. But Smoothing is nothing like the Hardness parameter in Warp Transfrom. And the figure on the left in the first picture (Grow) is something that the Warp Transform cannot produce. The effects of Grow in my plugin and in Warp Transform are very different even though with some parameter values they come rather close. But of course I have no idea what the formulas behind the Warp Transform are.
It appeared that while the warpings on the grid are quite pretty (to my eye at least), trying something more practical needs some care to get acceptable results. Here I tried a text. Left to right: Grow, Shrink, Swirl(cw), all with some smoothing (and now without the blue circles):

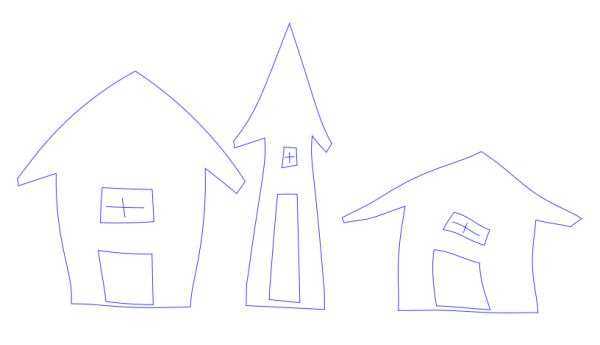
Another one. These three houses were made from the same straight-edged figure with Copy, Scale, and Warp:

The plugin has one serious drawback: It is based on my own rickety approximation algorithm that I have used before. I really wish I had something better. If you want fast work, you get either a lousy result or a vast number of control points. If you want good work with few control points, you have to wait with patience. This cannot be helped for the time being.
To get the plugin, go to
http://kmarkku.arkku.net/Path_warp_files...aster.html
scroll to the bottom, and click the download button. You get a zip file. Unzip it and place the one file it contains (warp_path.py) in your user's plug-ins folder. Then (re)start Gimp.
To invoke the plugins, go to the Paths tab, right-click some path and follow the links
Tools > Warping > ...
If you find strange behaviour by the plugin, please tell me.
See the picture below. The grid is actually the path that I warp. I use this path in this example since it shows the effects best. The warping is done inside a given circle, so that it is a local operation. The plugin has three modes of action: Grow, Shrink, and Swirl (counter-clockwise or clockwise). The picture shows an example of each, applied to the grid path:
The blue circles do not belong to the transformed path; they are here just to show the circles of action. The circle is input by the user as a 2-anchors path (meaning either a diameter or the center and one point on the circle).
The plugin has two parameters: Smoothing and Strength. Smoothing controls what happens at the edge of the circle. If Smoothing = 0, there will be sharp bends like in the picture above. When Smoothing > 0, the bends are rounded. The rounding happens inside the circle. The other parameter, Strength, controls the amount of the warping effect.
In the above picture Smoothing=0 and and Strength=1 (the defaults).
Here are the same examples as above but with Smoothing = 5 and Strength = 0.8 (recall that the blue circles do not belong to the path):
Good values for Smoothing are 0..10 but you can go higher. Strength accepts values 0..1.
Strength seems to work similarly to the Strength parameter in Gimp's Warp Transform tool. But Smoothing is nothing like the Hardness parameter in Warp Transfrom. And the figure on the left in the first picture (Grow) is something that the Warp Transform cannot produce. The effects of Grow in my plugin and in Warp Transform are very different even though with some parameter values they come rather close. But of course I have no idea what the formulas behind the Warp Transform are.
It appeared that while the warpings on the grid are quite pretty (to my eye at least), trying something more practical needs some care to get acceptable results. Here I tried a text. Left to right: Grow, Shrink, Swirl(cw), all with some smoothing (and now without the blue circles):
Another one. These three houses were made from the same straight-edged figure with Copy, Scale, and Warp:
The plugin has one serious drawback: It is based on my own rickety approximation algorithm that I have used before. I really wish I had something better. If you want fast work, you get either a lousy result or a vast number of control points. If you want good work with few control points, you have to wait with patience. This cannot be helped for the time being.
To get the plugin, go to
http://kmarkku.arkku.net/Path_warp_files...aster.html
scroll to the bottom, and click the download button. You get a zip file. Unzip it and place the one file it contains (warp_path.py) in your user's plug-ins folder. Then (re)start Gimp.
To invoke the plugins, go to the Paths tab, right-click some path and follow the links
Tools > Warping > ...
If you find strange behaviour by the plugin, please tell me.


