Posts: 571
Threads: 130
Joined: Nov 2019
Reputation:
4
06-12-2022, 11:49 AM
(This post was last modified: 06-12-2022, 11:51 AM by meetdilip.)
Last day to showcase one of the logos I made, I downloaded a PSD from Freepik and tried to use it through GIMP.
I think the process is as simple as adding the logo somewhere. But I am not sure how to do that properly using the GIMP dev version.
https://www.freepik.com/free-psd/modern-...848888.htm
The above is the link to the PSD I tried to use. Whatever I try to do, the logo never gets " seated " properly in the property.
I don't mind this one either
https://www.freepik.com/free-psd/station...694033.htm
Posts: 7,277
Threads: 156
Joined: Oct 2016
Reputation:
1,014
Gimp version:
Operating system(s): Linux
Not going to sign up to freepik just for a 'free' download. Can you post the template on dropbox or similar.
Posts: 571
Threads: 130
Joined: Nov 2019
Reputation:
4
06-12-2022, 02:09 PM
(This post was last modified: 06-12-2022, 02:12 PM by meetdilip.)
Sure, the last I checked, I was able to download without signing up.
Added to Google Drive
https://drive.google.com/file/d/1__mncjK...sp=sharing
Posts: 7,277
Threads: 156
Joined: Oct 2016
Reputation:
1,014
Gimp version:
Operating system(s): Linux
06-12-2022, 03:02 PM
(This post was last modified: 06-12-2022, 03:17 PM by rich2005.
Edit Reason: typo
)
That one is straightforward. You do need the layers dock a decent size for templates so all the layers / groups show.
Find the section you want. Say the Notebook group.
It says place your design here. (I would ignore the photoshop Double click to edit)
You can clear the layer of the existing logo by selecting the layer (not the mask) and clear/delete
Import your own logo as a layer and move into position.
something like this: https://i.imgur.com/CFPSKxm.mp4
Gimp dev version ? Why ? hate the interface, the developers must be demented.
Posts: 571
Threads: 130
Joined: Nov 2019
Reputation:
4
06-12-2022, 03:32 PM
(This post was last modified: 06-12-2022, 03:42 PM by meetdilip.)
I used the last announced version of GIMP beta on Windows 10. Now on Ubuntu so not able to share the version now. I did follow the method used in the video above.
But I tried on a mockup that was not facing the monitor
![[Image: w82pVwj.png]](https://i.imgur.com/w82pVwj.png)
And I was having trouble making the logo vertical to the property.
This time I got lucky even without the PSD
![[Image: 3FQjxNd.png]](https://i.imgur.com/3FQjxNd.png)
I still need to improve my skills to make the logo sit properly on the paper / property.
This time, I got lucky. Skipped PSD and worked on the PNG
![[Image: 08QCwEg.png]](https://i.imgur.com/08QCwEg.png)
Posts: 1,538
Threads: 71
Joined: May 2021
Reputation:
167
Gimp version:
Operating system(s): Linux
06-13-2022, 06:28 AM
(This post was last modified: 06-13-2022, 07:11 AM by PixLab.)
(06-12-2022, 01:56 PM)rich2005 Wrote: Not going to sign up to freepik just for a 'free' download. Can you post the template on dropbox or similar.
I did not need to sign up 
I clicked on the green button download, then a div/popup appeared and below "Premium" another green "download" ➤ this one downloaded
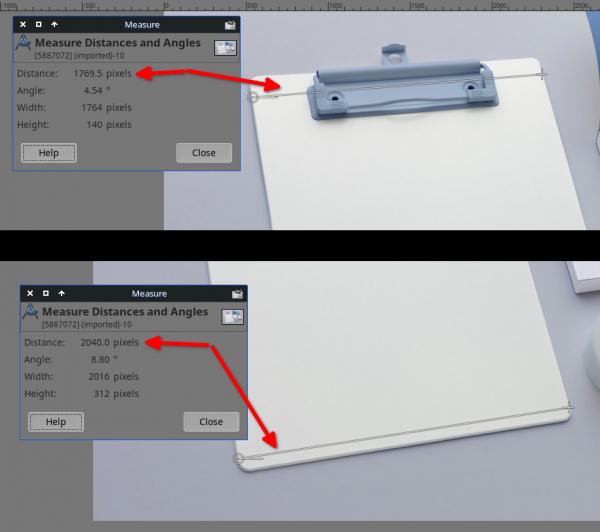
@meetdilip, careful about the "3D isometric" effect, I did not calculate the ratio, but when you put your logo it should be smaller/narrower at the top, and wider at the bottom, with a slight angle variation ~5 or 6 degrees perspective to the right, it seems to be quite consistent on all other book, note books and so on the template (I did measure them as well)

Posts: 7,277
Threads: 156
Joined: Oct 2016
Reputation:
1,014
Gimp version:
Operating system(s): Linux
Quote:..I did not need to sign up
I clicked on the green button download, then a div/popup appeared and below "Premium" another green "download" ➤ this one downloaded
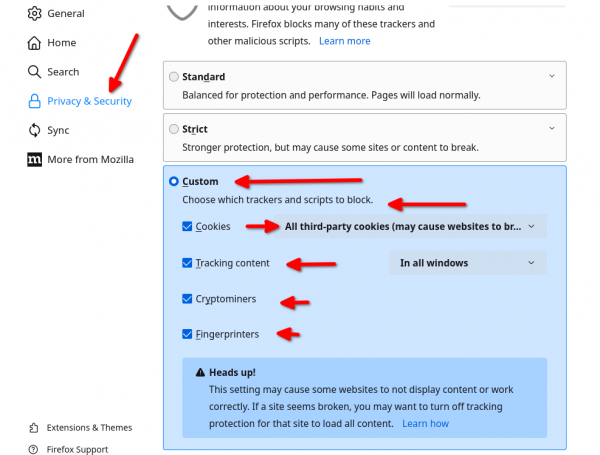
Well I get this, https://i.imgur.com/s6yODol.mp4 where the green button requires a log in. Best guess, google is handling your log-ins. I sometimes get a "Want Google to keep this login" pop-up (I decline) What happens if you clear out all your cookies ?
Posts: 1,538
Threads: 71
Joined: May 2021
Reputation:
167
Gimp version:
Operating system(s): Linux
(06-13-2022, 07:34 AM)rich2005 Wrote: Quote:..I did not need to sign up
I clicked on the green button download, then a div/popup appeared and below "Premium" another green "download" ➤ this one downloaded
Well I get this, https://i.imgur.com/s6yODol.mp4 where the green button requires a log in. Best guess, google is handling your log-ins. I sometimes get a "Want Google to keep this login" pop-up (I decline) What happens if you clear out all your cookies ?
Oh, I see, I did not get this one.
Indeed, I would try to delete this website's cookies.
Maybe my Firefox setting combined with Ublock Origin from Raymond Hill https://addons.mozilla.org/en-US/firefox...ck-origin/ that helped?

Posts: 6,514
Threads: 284
Joined: Oct 2016
Reputation:
572
Gimp version:
Operating system(s): Linux
(06-13-2022, 06:28 AM)PixLab Wrote: (06-12-2022, 01:56 PM)rich2005 Wrote: Not going to sign up to freepik just for a 'free' download. Can you post the template on dropbox or similar.
I did not need to sign up 
I clicked on the green button download, then a div/popup appeared and below "Premium" another green "download" ➤ this one downloaded
@meetdilip, careful about the "3D isometric" effect, I did not calculate the ratio, but when you put your logo it should be smaller/narrower at the top, and wider at the bottom, with a slight angle variation ~5 or 6 degrees perspective to the right, it seems to be quite consistent on all other book, note books and so on the template (I did measure them as well)
Yes, In fact the proper way to position the logo is to create a transparent layer with the assumed aspect ratio of the target (the clipboard is likely 9x12.5), and position/size the logo on it.
Then you use the perspective tool on that layer and drag the 4 corner handles to the 4 corners of the target.
Posts: 1,218
Threads: 182
Joined: Sep 2018
Reputation:
121
Gimp version:
Operating system(s): Windows (Vista and later)
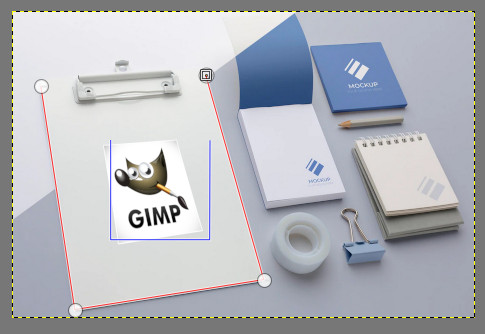
This Is what I did :
load mockup drawing
load the drawing to place on the clipboard as new layer
make a path on the clipboard / here red (4 points)
make a path on the drawing (or around the layer boundary layer) / here blue (4 points - same direction as the first path / use a new path layer, here Wilber)
set the mockup layer active / red
set set Wilber path active / blue
use the Ottia Tuota plugin : filters / distorts / perspective transform / perpective transform - 4 points to 4 points
in the plugin : set Wilber as source / set mockup as target
scale the Wilber layer
done

|


![[Image: w82pVwj.png]](https://i.imgur.com/w82pVwj.png)
![[Image: 3FQjxNd.png]](https://i.imgur.com/3FQjxNd.png)
![[Image: 08QCwEg.png]](https://i.imgur.com/08QCwEg.png)
