Paths Basics
This is a short introduction to paths (also known as "vectors") as Gimp uses them.
Bézier Curves
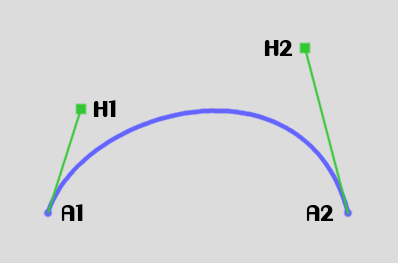
In the sixties, Pierre Bézier was looking for a way to generate smooth curves in Computer-Aided Graphics and eventually settled on curves that have since been named after him. There are many types of Bézier curves but Gimp, as most graphics programs, uses the "cubic" ones. These are simple curves defined by:
If we bring H1 closer to A1 and drag H2 further from A2:
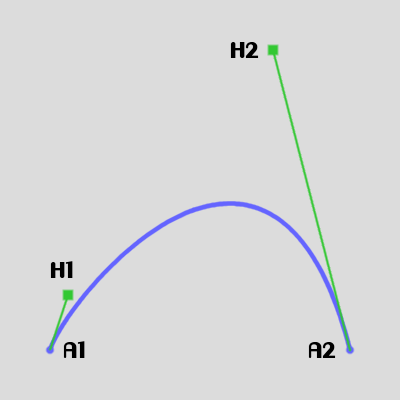
The closer the handle is to the anchor, the less influence it has on the shape of the whole curve. The limit is when the handle coincides with the anchor: in that case there is no tangent defined, and the general direction of the curve near the anchor is determined by the other handle. When there are no tangents defined at both ends, the curve becomes the straight line between the two anchors. In Gimp's path editor, anchors are usually created without handles, or, more accurately, with handles over the anchors, so a sequence of points creates a polygon, until you start dragging the handles out of the anchors.
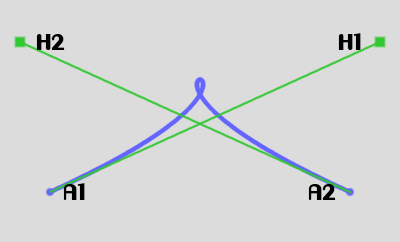
We can even have loops and cusps:
Some nice properties of Bézier curves
The Bézier curves have a few properties worth remembering:
(*) The perspective transform isn't an affine transform, and in some cases, the two methods above would yield slightly different results, but in practice this still works most of the time, especially with paths obtained by Layer>Text to path.
Strokes
As elegant as they are, Bézier curves are not powerful enough to describe real-life curves such as the outline of characters. So more arbitrary curves are implemented by stringing together Bézier curves, the ending anchor of a curve also being the starting anchor of the next:
Each anchor becomes associated with two handles, one for the curve that ends on it (the "backward" handle) and one for the curve that starts from it (the "forward" handle). If these handles are aligned (A2) the curve remains smooth, but cusps can be obtained with handles on the same side (A3), and loops are obtained by interchanging the handles (or rotating them both by half a turn around the anchor)(A4).
In practice the stroke is defined and handled as a series of triplets of points, each triplet being made of the backward handle, the anchor, and the forward handle:
When doing so, the first and last anchor have one extra handle (backward for the first, forward for the last). These handles have a purpose: if you connect two strokes, the line between the two strokes is the Bézier curve controlled by these handles. Likewise, if you cut a stroke by Ctrl-Shift-clicking a segment to delete it, the new final anchors of the two resulting strokes keep the handles that controlled the removed segment.
Open and closed strokes
A similar principle is used to "close" strokes. When the stroke is marked "closed" (and this is just a supplemental closure indicator, Gimp doesn't add any point), an additional Bézier curve is generated from the last anchor to the first, under the control of these extra handles.
In Gimp, you mark the stroke as "closed" by connecting the first and last anchors.
Once the stroke is closed it is impossible to distinguish the actual first and last anchors, and in the picture above, the stroke could just as well start on A3 and end on A2. It is however possible to force Gimp to consider two anchors as the first and the last:
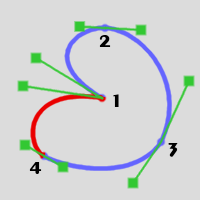
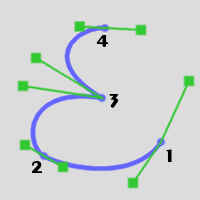
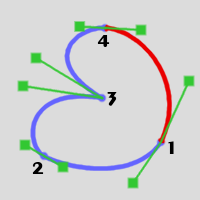
Sometimes, the direction of the stroke is important. The stroke 1-to-4 above has the very same shape as the stroke obtained from the same triplets, ordered 4-to-1. But there are cases where the direction counts, for instance:
But there are scripts available to help with this.
Paths
Strokes are powerful, but have a restriction: they are continuous lines. So, a single stroke is not powerful enough to describe complex curves such as the one needed to describe text. Enter the paths, that are nothing more than a bunch of strokes taken together. For instance, the word "hobbit" is made of 10 strokes:
Path handling in Gimp
This is a short introduction to paths (also known as "vectors") as Gimp uses them.
Bézier Curves
In the sixties, Pierre Bézier was looking for a way to generate smooth curves in Computer-Aided Graphics and eventually settled on curves that have since been named after him. There are many types of Bézier curves but Gimp, as most graphics programs, uses the "cubic" ones. These are simple curves defined by:
- Two points called the "anchors" (A1 and A2, below) that are the starting and ending point of the curve.
- Two control points called the "handles" (H1 and H2, below), that indicate:
- Using the line between the anchor and the handle: the general direction of the curve near the corresponding anchor. For the mathematically-oriented this line is the tangent of the curve on the anchor.
- Using the distance between the anchor and the handle: how much the curve follows the direction of the handle.
- Using the line between the anchor and the handle: the general direction of the curve near the corresponding anchor. For the mathematically-oriented this line is the tangent of the curve on the anchor.
If we bring H1 closer to A1 and drag H2 further from A2:
The closer the handle is to the anchor, the less influence it has on the shape of the whole curve. The limit is when the handle coincides with the anchor: in that case there is no tangent defined, and the general direction of the curve near the anchor is determined by the other handle. When there are no tangents defined at both ends, the curve becomes the straight line between the two anchors. In Gimp's path editor, anchors are usually created without handles, or, more accurately, with handles over the anchors, so a sequence of points creates a polygon, until you start dragging the handles out of the anchors.
We can even have loops and cusps:
Some nice properties of Bézier curves
The Bézier curves have a few properties worth remembering:
- The whole curve is always inside the convex polygon defined by the two anchors and the two handles.
- They are "compatible" with the simpler geometric transforms (a.k.a. "affine transforms") which are those that are found in Gimp's toolbox: shear, rotation, scale, flip(*). Which means that these two sequence of actions are equivalent:
- "stroke" the curve to create a bitmap layer
- use a transform tool on the layer
- "stroke" the curve to create a bitmap layer
- and
- use a transform tool on the curve (in "Path" mode)
- "stroke" the curve to create a bitmap layer
- use a transform tool on the curve (in "Path" mode)
- but of course the curve obtained with the second method will be sharper.
(*) The perspective transform isn't an affine transform, and in some cases, the two methods above would yield slightly different results, but in practice this still works most of the time, especially with paths obtained by Layer>Text to path.
Strokes
As elegant as they are, Bézier curves are not powerful enough to describe real-life curves such as the outline of characters. So more arbitrary curves are implemented by stringing together Bézier curves, the ending anchor of a curve also being the starting anchor of the next:
Each anchor becomes associated with two handles, one for the curve that ends on it (the "backward" handle) and one for the curve that starts from it (the "forward" handle). If these handles are aligned (A2) the curve remains smooth, but cusps can be obtained with handles on the same side (A3), and loops are obtained by interchanging the handles (or rotating them both by half a turn around the anchor)(A4).
In practice the stroke is defined and handled as a series of triplets of points, each triplet being made of the backward handle, the anchor, and the forward handle:
When doing so, the first and last anchor have one extra handle (backward for the first, forward for the last). These handles have a purpose: if you connect two strokes, the line between the two strokes is the Bézier curve controlled by these handles. Likewise, if you cut a stroke by Ctrl-Shift-clicking a segment to delete it, the new final anchors of the two resulting strokes keep the handles that controlled the removed segment.
Open and closed strokes
A similar principle is used to "close" strokes. When the stroke is marked "closed" (and this is just a supplemental closure indicator, Gimp doesn't add any point), an additional Bézier curve is generated from the last anchor to the first, under the control of these extra handles.
In Gimp, you mark the stroke as "closed" by connecting the first and last anchors.
Once the stroke is closed it is impossible to distinguish the actual first and last anchors, and in the picture above, the stroke could just as well start on A3 and end on A2. It is however possible to force Gimp to consider two anchors as the first and the last:
- Given a stroke like this (the red part is the Bézier curve generated by the closure):
- Open the stroke by deleting the segment between the two target anchors (2 and 3). These two anchors becomes the start and end of the open stroke. The handles are preserved:
- Now, reconnect these anchors. The Bézier curve is regenerated, so the stroke shape is the same as initially, but the start and end anchors are the ones delimiting the temporarily deleted segment.
- This technique can be generalized to have the stroke start on any point. Just add an anchor on the path by Control-licking the path where you want the stroke to start. Then use the technique above, removing and adding a segment that ends on that new anchor.
Sometimes, the direction of the stroke is important. The stroke 1-to-4 above has the very same shape as the stroke obtained from the same triplets, ordered 4-to-1. But there are cases where the direction counts, for instance:
- Using the "Text-along-path" function
- Rendering the stroke by painting it with a gradient
But there are scripts available to help with this.
Paths
Strokes are powerful, but have a restriction: they are continuous lines. So, a single stroke is not powerful enough to describe complex curves such as the one needed to describe text. Enter the paths, that are nothing more than a bunch of strokes taken together. For instance, the word "hobbit" is made of 10 strokes:
- One singe stroke for the 'h'.
- Two strokes for the "o", the outer outline and the inner hole.
- Two strokes for each "b", the outer outline and the inside for the loops.
- Two strokes for the 'i', one for the body and one for the dot (a.k.a. "tittle").
- One singe stroke for the 't'.
Path handling in Gimp
- Gimp processes the path as a whole, there is no way to restrict its action to specific strokes.
- The path is associated to the canvas, not to a specific layer.
- A path can have points that lie outside of the canvas
- Coordinates of anchors and handles are not restricted to integer pixels. Sub-pixel paths are possible
- Selection from paths where strokes are not disjoint follows an 'even-odd' rule. Starting un-selected from a border, the selection state changes each time it crosses a line. This is neither and intersection nor a union, but a rule that creates the expected selection on text (unless characters overlap).


