06-09-2020, 05:08 PM
When you apply the Möbius map plugin, it sometimes tells that it "hit an infinity" and stops without result. That means that it tried to calculate a value of the Möbius function which turned out to be infinite.
Infinities belong naturally to the framework where the Möbius map lives. As I said before, the Möbius map really is a transformation on the extended plane. Mathematically, there is one "point at infinity", and it is nothing special. It is treated just as any one point among all the other, "normal" points.
But when we are drawing something concretely on the screen, infinities are a problem, as are any very distant points. Given a Möbius map, there are normally two special points: the "pole" and the "inverse pole".
The pole is sent to infinity, and the plugin cannot handle such value. So, if the pole happens to be contained in the input path (the path to be transformed) or perhaps somewhere too close, the plugin gives up, telling that it hit the infinity.
Whether the plugin fails or not, the user may be curious to see where the pole and the inverse pole are located. The plugin can be told to mark them on the screen if they happen to be in the window. The "marking" means that the plugin creates two one-anchor paths (if any). To see them in Gimp you must click them to active after the plugin has finished, failed or not.
The plugin I talked about in the previous post allows no way to decide where the pole (or the inverse pole) will be. Or, to be precise, of course they are determined by the choice of the Base and the Target, but I don't believe it is possible in practice to guess before-hand where the poles will be. That is just a matter of luck, and if the pole happens to be somewhere where it causes the plugin to fail, that is bad luck.
For this reason I made three special forms of the plugin which allow control on the poles. I talk now only of the one that allows setting the pole where the user wants it. It is in Gimp's menu in the Paths tab at
Tools > Transformations > Moebius map with control of the poles > Moebius: Set the pole
It takes as input four paths:

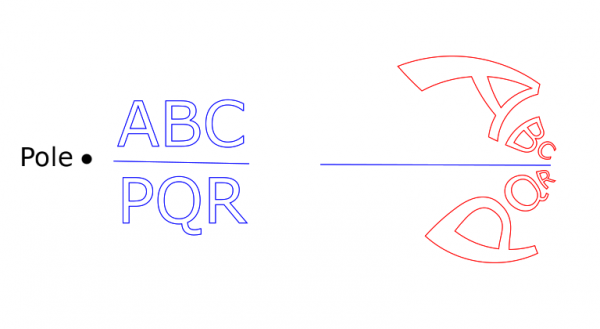
The Pole is where the black dot on the left is. (I put the dot there just to show the location.) Recall that that point would be sent to infinity. Therefore, the points close to the Pole are affected strongly by the transformation. This should explain the result on the right (red). It is as if the letters 'A' and 'P' were the most repelled by the Pole. It is as if the Möbius function would like to throw 'A' and 'P' to somewhere very far away. The other letters are not so close to the pole, hence the effect on them is smaller.
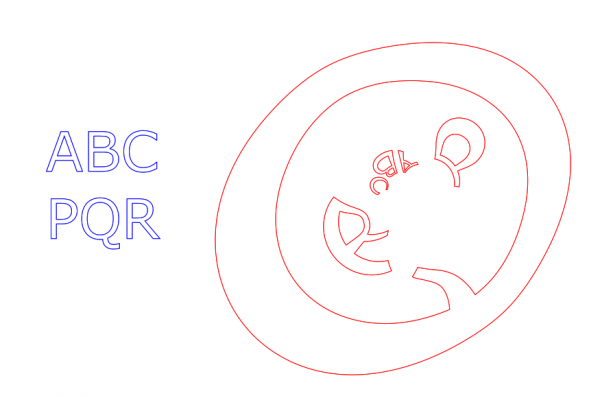
In the next picture I put the Pole right in the middle of the letter 'Q', just to try something wild. (The Pole is not marked this time, and the Base and the Target are set to unvisible.)

So the Pole is inside the 'Q'. Note that as the result the 'Q' is turned inside out! Even more, the whole plane is turned inside out: Everything that was outside the 'Q', is now crammed inside it, including the other letters. And even more, what was previously inside the 'Q' is now outside it and is stretched to fill the rest of the plane (though we cannot see this effect since there were originally no drawings inside the 'Q').
And all this is done conformally! All angles are preserved. Isn't the Möbius function wonderful!
Infinities belong naturally to the framework where the Möbius map lives. As I said before, the Möbius map really is a transformation on the extended plane. Mathematically, there is one "point at infinity", and it is nothing special. It is treated just as any one point among all the other, "normal" points.
But when we are drawing something concretely on the screen, infinities are a problem, as are any very distant points. Given a Möbius map, there are normally two special points: the "pole" and the "inverse pole".
- The pole is the point which the Möbius function sends to infinity (M(z)=infinite).
- The inverse pole is the point to which the infinite point is sent by the Möbius function. (The term "inverse pole" I took from the Wikipedia page, and I don't know any better name for it. The inverse pole is the pole of the inverse Möbius map.)
The pole is sent to infinity, and the plugin cannot handle such value. So, if the pole happens to be contained in the input path (the path to be transformed) or perhaps somewhere too close, the plugin gives up, telling that it hit the infinity.
Whether the plugin fails or not, the user may be curious to see where the pole and the inverse pole are located. The plugin can be told to mark them on the screen if they happen to be in the window. The "marking" means that the plugin creates two one-anchor paths (if any). To see them in Gimp you must click them to active after the plugin has finished, failed or not.
The plugin I talked about in the previous post allows no way to decide where the pole (or the inverse pole) will be. Or, to be precise, of course they are determined by the choice of the Base and the Target, but I don't believe it is possible in practice to guess before-hand where the poles will be. That is just a matter of luck, and if the pole happens to be somewhere where it causes the plugin to fail, that is bad luck.
For this reason I made three special forms of the plugin which allow control on the poles. I talk now only of the one that allows setting the pole where the user wants it. It is in Gimp's menu in the Paths tab at
Tools > Transformations > Moebius map with control of the poles > Moebius: Set the pole
It takes as input four paths:
- The Path to be transformed
- The Base, a path with 2 anchors
- The Target, a path with 2 anchors
- The Pole, a path with one anchor
The Pole is where the black dot on the left is. (I put the dot there just to show the location.) Recall that that point would be sent to infinity. Therefore, the points close to the Pole are affected strongly by the transformation. This should explain the result on the right (red). It is as if the letters 'A' and 'P' were the most repelled by the Pole. It is as if the Möbius function would like to throw 'A' and 'P' to somewhere very far away. The other letters are not so close to the pole, hence the effect on them is smaller.
In the next picture I put the Pole right in the middle of the letter 'Q', just to try something wild. (The Pole is not marked this time, and the Base and the Target are set to unvisible.)
So the Pole is inside the 'Q'. Note that as the result the 'Q' is turned inside out! Even more, the whole plane is turned inside out: Everything that was outside the 'Q', is now crammed inside it, including the other letters. And even more, what was previously inside the 'Q' is now outside it and is stretched to fill the rest of the plane (though we cannot see this effect since there were originally no drawings inside the 'Q').
And all this is done conformally! All angles are preserved. Isn't the Möbius function wonderful!


