Thread Rating:
  • 0 Vote(s) - 0 Average
  • 1
  • 2
  • 3
  • 4
  • 5
Background removal
#1
Hello yet again,

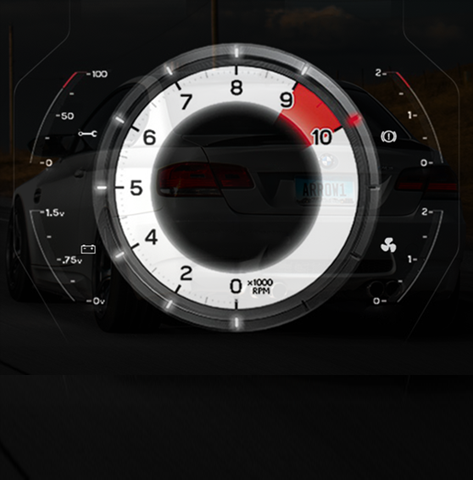
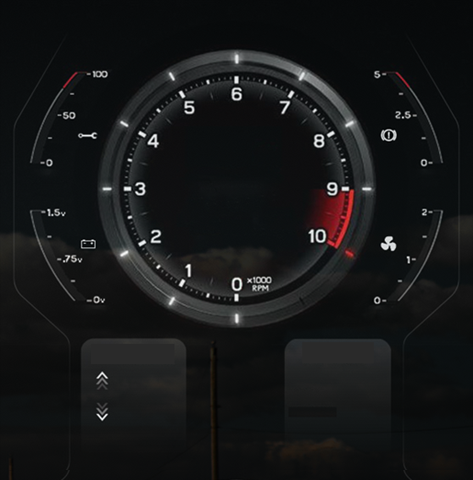
I have learned a LOT by experimenting and watching tutorials but my next problem maybe impossible to solve with an automated tool. I am trying to remove the background of the following 2 images leaving only the dials and the numbers on the outer ring and also remove the center hole.

I tried an auto background tool, change color by selection, changing chroma, but too much gets removed. Unless the experts here can help my last option is to use the free selection tool to remove the background by hand.

Thanks!


Reply
#2
Here is what I was able to do with select free and select ellipse


Reply
#3
More work with selection ellipse and that should do it!

   
Reply
#4
(03-15-2024, 09:36 PM)rinaldop Wrote: Hello yet again,
I am trying to remove the background of the following 2 images leaving only the dials and the numbers on the outer ring and also remove the center hole.

The first one: No a "simple filter solution", though, and certainly not the best solution

Duplicate the original, on the duplicated go to Colors ➤ Desaturate ➤ Mono Mixer..., lower the green channel


Then go to the Channel dialog and drag any channel down (don't forget to select the channel back, because the one you have dragged down will be un-selected ➤ Select it back)


Go back to the layers' dialog select the top layer and add a mask with those setting (mask from channel)


Then Select the original layer below, Colors ➤ Levels... move those 2 tiny sliders (triangle) until the clouds disappear


Then select the Mask (click on it) and straighten the blacks at the bottom of the Curves Colors ➤ Curves to mostly give back the red color


Not perfect but from there you should be able to work on the "Visible"
Patrice
Reply
#5
The second one: This one is even worse, the BMW is very-very visible, and has an intrinsically background on the dials, you will have to use a brush to fine tune... at one point...

Anyway, let's give it a try, Duplicate, on the top one layer Colors ➤ Desaturate ➤ Desaturate in Value (HSV) mode


Then Colors ➤ Levels... and put the layer in "Pin Light" mode


Then Layer ➤ New From Visible, a new layer appear called Visible, make a vertical curve > Colors ➤ Curves... with the top right node (the whites)


Then put that layer in the middle in Addition Mode


Then you can take a smooth edge brush to paint black on the inner edges


In the end, I think it's better to draw those dials from scratch, with the Symmetry Painting tool it would be a piece of cake to make the dial Wink
Patrice
Reply
#6
@rinaldop  I might be on the wrong track here but are all the images in as good alignment as the two you posted ?

If they are I might try:
Load the images as layers
Make the selection then invert the selection
Use the attached Multiple-Layer-Actions.scm to cut 
Trim to size Image -> Crop to content.

Plenty scripts/ plugins to export the layers to individual png files
As a note, The background(s), not wonderful, there are (ghost) image(s) there. Don't know what to do about that Wink

anyway as an animation: https://i.imgur.com/JUHTpny.mp4


Attached Files
.zip   Multiple-Layer-Actions.zip (Size: 2.65 KB / Downloads: 204)
Reply


Forum Jump: