Thread Rating:
  • 0 Vote(s) - 0 Average
  • 1
  • 2
  • 3
  • 4
  • 5
Gfig star size issue
#1
I am using Gfix to create stars.

When I click and drag to size the star it creates multiple stars instead.

On a related note, when I change the number of points; it creates multiple stars in that pattern instead.

If I click and drag quickly and use a very short movement, I can get one star created but they are all then of the same size.

The star points is stuck at a five pointed star right now. 

Any help with this issue? 

Thanks...
Reply
#2
Is this the gfig plugin ?

It is ancient, comes from another era. Since you are using MacOS ( or is it Windows ? ) it might be a bug or it might be a misunderstanding of how it works.

When on a shape option that is in force until something else is picked and it has some peculiarities
There is no left - middle - right - mouse button. All work exactly the same.
For the star shape, the number of sides does not come into effect until the next star is drawn. However the properties are instant, for example change the fill is immediate and comes into effect when the next star is draw. A peculiar mix that you need to understand.
Changing size by dragging is not the usual mouse click and drag. That is why a new star is created. It is the move option + click-and -drag


A 40 second animation for moving control points. https://i.imgur.com/UtA5jth.mp4

If it is a bug you can report it https://gitlab.gnome.org/GNOME/gimp/-/issues but I suspect it might 'just getting used to a new tool'
Other options for drawing stars. None that are so immediate, there are plugins to create shaped  paths, some will even stroke and fill at the same time. Do they work in MacOS ? (maybe)
Reply
#3
Don't use Gfig to create star (or any polygons)
Use the symmetry tool instead, way faster, way accurate, you chose your brush, and it's way better! and it's just 2 mouse click...

If the "Symmetry painting tool is not open go to : Windows > Dockable Dialogs > Symmetry Painting

Then select "mandala" (look setting in the screen shot), make 1 dot with the brush, then HOLD dowwn "Shift" and make another dot on top of the one in the screen shot


result
   
Reply
#4
Path script to draw all kind of geometric shapes : https://www.gimpscripts.net/2020/09/arak...-gimp.html
   
   
Reply
#5
@ioski907

Alternative methods are fine, I can supply several, but make sure you go back and read the post answering the question, which is manipulating gfig.

If you want suggestions give the OS you use most and ask.
Reply
#6
(08-08-2021, 10:46 AM)rich2005 Wrote: @ioski907

Alternative methods are fine, I can supply several, but make sure you go back and read the post answering the question, which is manipulating gfig.

If you want suggestions give the OS you use most and ask.

Thank you to everyone for all the helpful suggestions and rich2005 for the great video snippets. 
I am using the gfig plugin on the latest MacOS and current GIMP. 

I use Windows and MacOS both, but maybe Windows has the edge since I am not doing Xcode stuff much these days. 

I tried this on my Windows 10 (latest) laptop as well. 
I paid a bit more attention this time.  

The Gfig plugin worked as expected.  I could create individual stars, resize, move, etc..
Then, I started to mess with the foreground and fill colors. 
At this point, it exhibited the same behavior as previously on the Mac. 
At one point the plugin crashed. 

Giving it more thought, this same pattern may have happened on the Mac too. 
Except the crash part. 

I used GIMP's "reset all filters" option, but the gfig plugin remained in the previous state.

I'll proceed to trying the alternative methods suggested. 

Thanks again to all that responded and for your help.

ioski907
Reply
#7
I would certainly try the shape-paths.scm script that denzjos pointed out.

Goes in your scripts folder. It is the one use I use when I want a good clean path. Much better than putting a selection to a path.  It is very hands on but you can duplicate paths, move them and fill or stroke the path from the  Edit menu.

I will throw in another, which is closer to the gfig setup. A plugin,  arakne-path-shape-creator8.py Two folders + one file go in your plug-ins folder:  locales, 
shapesImg,  arakne-path-shape-creator8.py which needs to be executable.

Certainly works in Windows and linux,  might / might not work in MacOS or might be as flaky as gfig. Just tried it in an old VM looks like this: https://i.imgur.com/ZB99NTa.jpg
hint, make selection, invoke the plugin Filters -> Path -> path shape creator


Attached Files
.zip   arakne-path-shap-creator8-fixed.zip (Size: 69.64 KB / Downloads: 343)
Reply
#8
Okay, here's where more newbie-ness will be apparent with GIMP.
But, also may provide a clue to what I'm doing wrong, have set wrong, etc...

The script suggested by denzjos works!  :-) 

When I try the Symmetry painting tool (mandala), my initial click (before holding the shift key);
immediately three symmetric dots are created.   


If I increase the number of points in the mandala parameters to say 6, then 6 symmetric dots are created.  

If I subsequently hold the shift key down and click for the second time. 
In this 6 point example, a nice snowflake looking graphic is created. 


So, somewhere I have a setting doing this??   
Maybe, this would also explain why gfig was essentially doing the same thing?? 

My workaround right now is to set the mandala number or points parameter to ONE.
Then selecting the paint tools STAR pattern. 

Of course, I have gone that route because, it's working for what I want.

However, I like to know what I'm doing wrong and correct... ;-0
Reply
#9
Quote:However, I like to know what I'm doing wrong and correct... ;-0

Oh..practice makes perfect. It is probably drawing those straight lines.

Quote:If I subsequently hold the shift key down and click for the second time.

You are already on the start point, just hold shift down and click on end point.

Notes: The symmetry tool axis are moved with the sliders, also the move tool shift-click and drag.
Fill the shape in with bucket fill ? got to be a better way. (Edit: I suppose a select outside the star, then invert selection, then fill selection.)

The inevitable animation. Used a black background to make easier to see. Do all your work on transparent layers. https://i.imgur.com/NejB5zg.mp4 might help.
Reply
#10
(08-08-2021, 07:23 PM)ioski907 Wrote: If I subsequently hold the shift key down and click for the second time.
In this 6 point example, a nice snowflake looking graphic is created.
So, somewhere I have a setting doing this??
Maybe, this would also explain why gfig was essentially doing the same thing??
However, I like to know what I'm doing wrong and correct... ;-0

This is because on your second dab/point you did not click on a point created by the "mandala" = you did not closed the draw, you clicked to create a new point instead of clicking on an existing point Wink look at the rich2005's video, Rich is making its first point, > mandala create 7 points > Rich goes down to dab on an already existing point (not to create a new one)
Nice snowflake BTW

(08-08-2021, 07:55 PM)rich2005 Wrote: Fill the shape in with bucket fill ? got to be a better way. (Edit: I suppose a select outside the star, then invert selection, then fill selection.)

The inevitable animation. Used a black background to make easier to see. Do all your work on transparent layers.  https://i.imgur.com/NejB5zg.mp4  might help.
Indeed it's an option.

@ioski907 assuming you made your star on a blank new transparent layer
to remove the line inside the star you're at only 3 mouse clicks
1 - right click on that layer > Alpha to selection,
2 - then menu Select > Remove Holes
3 - then Edit > Clear (or just hit that "Delete key" of your keyboard on Windows/Linux)

Once it's done, From there
- or you fill the star with a color,
- or you keep the transparency with the thin edge
- or you go to Edit > Stroke Selection > with whatever you want at the size you want to get a thicker border with the color you like

Now you can deselect (Select > None)
(there are few more options as fast, but writing them might confuse you as they involve a different approach > still with the symmetry tool**)

6 branches star mandala
(tip: let say you keep that "Shift" down from your first dab/point and keep it always down even when you move the mouse for the next dab/point and so)
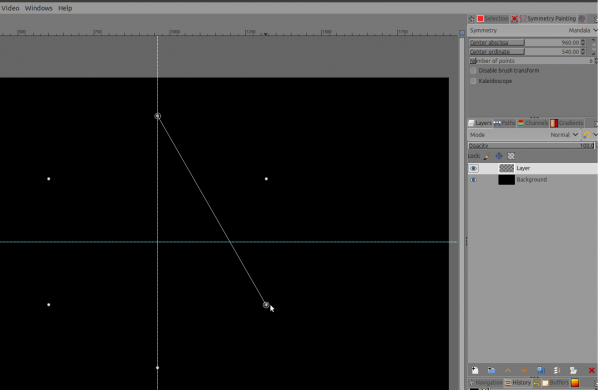
   

Addendum
To understand what the key modifier "Shift" do with the brush tool (and some other tools)
in a "normal" mode brush (symmetry > none)
New layer:
Hit that "Shift" down and stay on it, then put 4 dabs/point while Shift is down (make a square)
Then delete that layer or untick the layer"eye"  
New Layer:
and do the same but this time keep the "Shift" down only for the first and second dab/point, release "Shift" key between second and third dab/point, and Hit the Shift key down between the third dab and the fourth Wink
yes the "Shift key down" make straight line between your very-LAST point and the future one
Now try with Ctrl+Shift (yes it moves by 15 degrees) and because your 6 branches stars has 60 degrees angle at the tips, it allows you to perfectly align as 15 is a multiple of 60 and to draw like the screen shot you need 30 degrees...

**It's a year or so I want to make a tutorial on YT about that(or any polygons) with the possibility to also chose the length of the branches > still using the symmetry (with just 3 more clicks).
I'm more than motivated now as I feel there is a need Wink
Reply


Forum Jump: