Posts: 1,223
Threads: 182
Joined: Sep 2018
Reputation:
122
Gimp version:
Operating system(s): Windows (Vista and later)
09-22-2023, 03:43 PM
(This post was last modified: 09-22-2023, 04:19 PM by denzjos.)
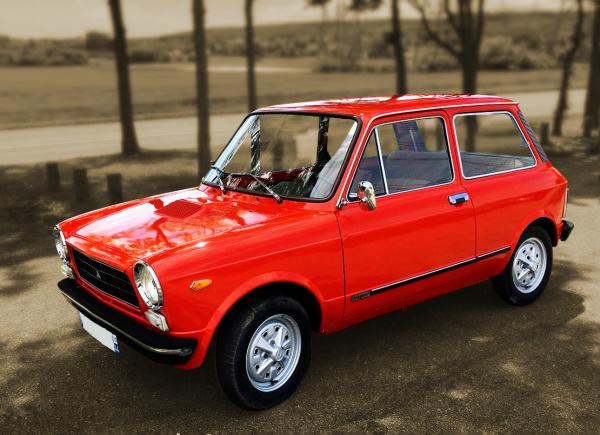
(09-22-2023, 03:09 PM)Ofnuts Wrote: (09-22-2023, 09:13 AM)denzjos Wrote: @Ofnuts, I had used different colors on a path on the car roof,
Uh? What do you use the path for? How is it related to a color?
What I mean : I stroked that path with different colours on the car roof, 
Ofnuts, I used the HSL color mode and the result is now much better. I also corrected the front window. Thanks for the tip.

Posts: 6,564
Threads: 286
Joined: Oct 2016
Reputation:
578
Gimp version:
Operating system(s): Linux
You don't need to stroke the path? You just use it as a selection so that when you paint with the brush you don't bleed over the background. And if the reflection is far from the edges, you don't even need a selection.
Posts: 1,223
Threads: 182
Joined: Sep 2018
Reputation:
122
Gimp version:
Operating system(s): Windows (Vista and later)
That was before you gave me the HSL tip. Completely forgot to use the HSL color with this problem. The last photo was corrected with the pencil. I used the color picker to get the right color from the car.
Posts: 1,058
Threads: 87
Joined: Aug 2018
Reputation:
83
Gimp version:
Operating system(s): Windows Vista or 7, 8, 10 (64-bit)
 09-29-2023, 01:29 AM
In order to reproduce this tutorial I downloaded the image from the initial post.
However I couldn't find where @Ofnuts found the value h=240 for the car color!? 
As much as I walked the Color Picker Tool around the car, I generally found average values of H=165 (HSV) / H=180 (CIE LCh).
Which brings me to another question: How do I choose the part of the car where I will collect the HUE?
Another question is whether the mode to be used to correct the car's color is " LCh color" as read in the first post:
Quote:"Fixed by sampling the car color, and painting over the pot reflection in "Lch color" mode."
Or " HSL mode", as later instructed to denzjos in subsequent posts.
Another thing that caught my attention was the background color used by denzjos in his edition.
Considering that the color of the car is a very red hue, wouldn't the color around 180º of that hue be something close to cyan?
Thank you for your attention!
.....
Samj Portable - Gimp 2.10.28 - Win-10 /64.
Posts: 6,564
Threads: 286
Joined: Oct 2016
Reputation:
578
Gimp version:
Operating system(s): Linux
(09-29-2023, 01:29 AM)Krikor Wrote: In order to reproduce this tutorial I downloaded the image from the initial post.
However I couldn't find where @Ofnuts found the value h=240 for the car color!? 
As much as I walked the Color Picker Tool around the car, I generally found average values of H=165 (HSV) / H=180 (CIE LCh).
Which brings me to another question: How do I choose the part of the car where I will collect the HUE?
Another question is whether the mode to be used to correct the car's color is "LCh color" as read in the first post:
Quote:"Fixed by sampling the car color, and painting over the pot reflection in "Lch color" mode."
Or "HSL mode", as later instructed to denzjos in subsequent posts.
Another thing that caught my attention was the background color used by denzjos in his edition.
Considering that the color of the car is a very red hue, wouldn't the color around 180º of that hue be something close to cyan?
Thank you for your attention!
Possibly because you looked under the wrong street lamp:
You try to find a part of the car where there are no reflections and not too much shadow. For the A112, the doors look like a good spot.
There is no HSL paint mode. There is a HSL Color. LCH Color and HSL Color are quite close, they both transfer the Color (hue/saturation) of the paint tool or layer, keeping the original Luminosity/Lightness. For photo I tend to prefer LCh. Here LCh works better:
Denzjos uses the color he wants, because at that point the choice is artistic and not technical. I must say that in my case it was a nice coincidence. But a subdue H320 background (car is H40) isn't that bad:
Posts: 1,058
Threads: 87
Joined: Aug 2018
Reputation:
83
Gimp version:
Operating system(s): Windows Vista or 7, 8, 10 (64-bit)
 09-30-2023, 07:13 AM
(09-29-2023, 03:49 PM)Ofnuts Wrote: (09-29-2023, 01:29 AM)Krikor Wrote: In order [...]
As much as I walked the Color Picker Tool around the car, I generally found average values of H=165 (HSV) / H=180 (CIE LCh).
Which brings me to another question: How do I choose the part of the car where I will collect the HUE?
Possibly because you looked under the wrong street lamp:
You try to find a part of the car where there are no reflections and not too much shadow. For the A112, the doors look like a good spot.
There is no HSL paint mode. There is a HSL Color. LCH Color and HSL Color are quite close, they both transfer the Color (hue/saturation) of the paint tool or layer, keeping the original Luminosity/Lightness. For photo I tend to prefer LCh. Here LCh works better:
Denzjos uses the color he wants, because at that point the choice is artistic and not technical. I must say that in my case it was a nice coincidence. But a subdue H320 background (car is H40) isn't that bad:
Hi,
I was definitely not looking for the most suitable place to collect the car's HUE value.
I believe I had correctly spelled "modo de cor HSL (HSL color mode)", but the translator somehow changed it without me noticing.
Thanks for the clarifications!
.....
Samj Portable - Gimp 2.10.28 - Win-10 /64.
Posts: 1,538
Threads: 71
Joined: May 2021
Reputation:
167
Gimp version:
Operating system(s): Linux
10-02-2023, 12:48 PM
(This post was last modified: 10-02-2023, 12:49 PM by PixLab.)
Just reading what you guys did and seeing these images > https://www.gimp-forum.net/attachment.php?aid=10399
Now I see the blue pot everywhere... I mean like e v e r y w h e r e... even on the first pictures on top of the thread where I did not "see" this blue before ( and even on the windshield, I'm traumatized with that image I did link  )
Patrice
Posts: 6,564
Threads: 286
Joined: Oct 2016
Reputation:
578
Gimp version:
Operating system(s): Linux
What is not the subject is often more important than the subject itself. Checking the background before taking the shot becomes second nature.
Since this is a monthly gathering of old cars I went for another shooting session yesterday, but this time I fitted the lens with a polarizing filter. This removes a lot of nasty reflections and saves a lot of time later.
Posts: 1,538
Threads: 71
Joined: May 2021
Reputation:
167
Gimp version:
Operating system(s): Linux
10-03-2023, 01:36 AM
(This post was last modified: 10-03-2023, 02:03 AM by PixLab.)
(10-02-2023, 08:12 PM)Ofnuts Wrote: What is not the subject is often more important than the subject itself. Checking the background before taking the shot becomes second nature.
Since this is a monthly gathering of old cars I went for another shooting session yesterday, but this time I fitted the lens with a polarizing filter. This removes a lot of nasty reflections and saves a lot of time later.
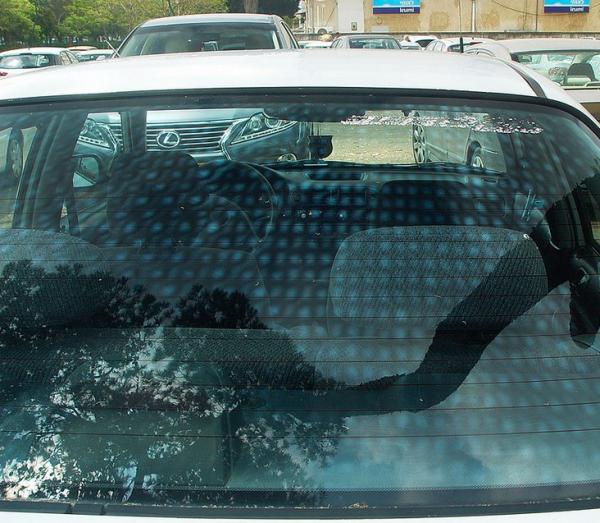
Yes very useful, there is one caveat, though, Polarized + Polarized can show tempering patterns on glasses especially the back car window when they are also polarized, more care about angle of view is needed 
( full original image comparison > https://upload.wikimedia.org/wikipedia/c...zation.jpg )

Patrice
Posts: 6,564
Threads: 286
Joined: Oct 2016
Reputation:
578
Gimp version:
Operating system(s): Linux
(10-03-2023, 01:36 AM)PixLab Wrote: (10-02-2023, 08:12 PM)Ofnuts Wrote: What is not the subject is often more important than the subject itself. Checking the background before taking the shot becomes second nature.
Since this is a monthly gathering of old cars I went for another shooting session yesterday, but this time I fitted the lens with a polarizing filter. This removes a lot of nasty reflections and saves a lot of time later.
Yes very useful, there is one caveat, though, Polarized + Polarized can show tempering patterns on glasses especially the back car window when they are also polarized, more care about angle of view is needed 
( full original image comparison > https://upload.wikimedia.org/wikipedia/c...zation.jpg )
The pattern is already there in the filter-less photo. It becomes more visible because the filter removes the bright sky that hides it.
|


 )
)
