05-27-2021, 12:19 PM
(This post was last modified: 05-27-2021, 01:05 PM by Ottia Tuota.)
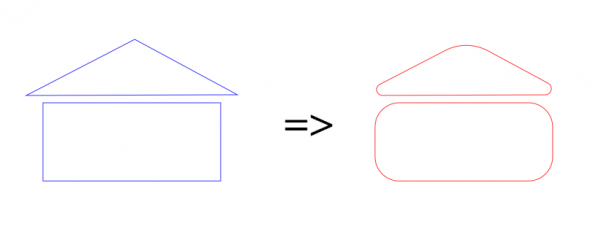
I made a plugin to round path corners. (Again I can't help wondering if I am just re-inventing the wheel. But at least it is a new wheel.) The plugin assumes that the path consists of straight line segments. Example: With default input values the plugin did this:
To get the plugin, go to
http://kmarkku.arkku.net/Path_modify_fil...aster.html
scroll to the bottom, and click the right download button. You get a zip file. Unzip it and place the one file it contains (round_path_corners.py) in your user's plug-ins folder. Then (re)start Gimp. To use the plugin: in the Paths tab, right-click a path and follow the links Tools > Modify path > Round corners.
I explain a little about the inputs.
The first input is "Where to set arc ends". It offers two choices: the default is "Use fixed distance from vertices", and the other one I skip now entirely. The value for 'distance' is input in the next field. The picture shows the meaning of "distance":
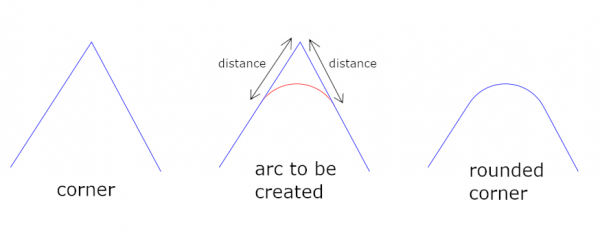
(One fact may cause surprises: In the code it is prohibited that the arc ends could go past the midpoints of the corner legs. The purpose is to avoid that two neighbouring arcs might get mixed up with each other.)
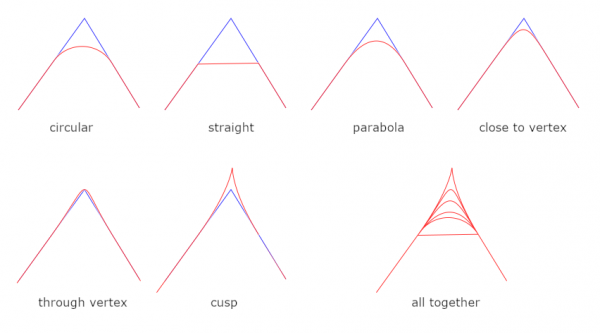
The next input allows the user to choose the shape of the arc. The list of the built-in shapes is:
In addition, there is a customizable shape about which I talk in a subsequent post; it takes one parameter which is the next input, and I say nothing about that now. The built-in shapes are shown in pictures:
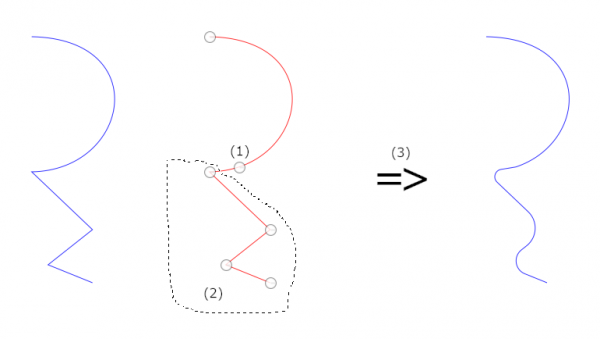
Finally, the last input is "How to use the selection?" which allows the user to make roundings only in some part of the path, keeping the rest untouched (just about). About this I give one example. Suppose you have a path as on the left below. You want to round the corners but want to preserve the long arc. Running the plugin as such would lose the arc (the plugin assumes that the path consists of straight edges and ignores all curvatures). You can protect the long arc as follows: (1) Create a new anchor; (2) make a selection; (3) call the plugin with "Round the corners only inside the selection." The result may be close to what you want, hopefully. (Or maybe not. Some manual tweaking may be needed.)
Writing the plugin had complications, as always, and I am not sure that I got everything right. Please tell me if you find the plugin doing anything unruly.
I explain now a little about how the plugin makes the rounding arcs. (I hesitate posting this since hardly anybody wants to read such details, but I think that maybe, just maybe, somebody somewhere will find it useful. And it is easy just to skip it.)
The plugin uses two different algorithms:
Algorithm 1
The algorithm to draw circular arcs is based on the well-known idea. But it is here in a disguise: Instead of a center and central angle, it takes as input a tangent triangle.
Algorithm 2
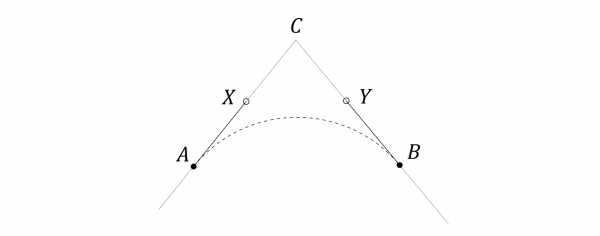
The algorithm customizable with one parameter takes as input one parameter (in addition to the corner and the distance from the vertex). Look at the picture below. It shows how the control points are chosen by the algorithm. First, |AC| = |BC| = distance (the input value). The arc should be drawn from A to B. It is done by control points A,X,Y,B where X and Y are chosen from the legs so that |AX|/|AC| = |BY|/|BC| = parameter. So that is the definition the algorithm uses.
In the GUI of the plugin you may wonder what the numbers in the list of built-in shapes mean:
straight (0)
parabola (2/3)
close to vertex (1)
through vertex (4/3)
cusp (2)
They are the preset parameter values; they are hard-coded in the built-in cases, and with those parameter values the algorithm draws a straight line, a parabola, and so on.
But in addition to these preset values, you may use any custom value: choose the option "one-parametric custom shape" and input some value for the parameter (default is 0.5). For instance, you may want to try arcs flatter than circular but not quite straight; try then parameter=0.3, for example. Any float number can be used, even negative (but not in fractional form unfortunately).
Another example:
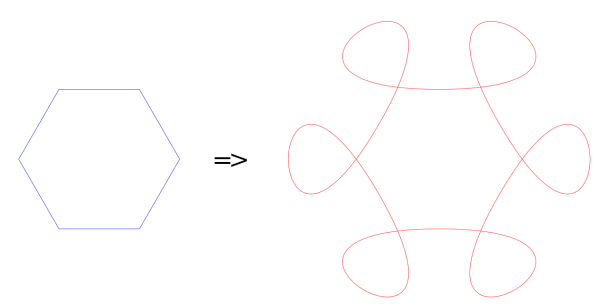
Here the plugin was applied to the hexagon with "Use midpoints of edges" and custom shape with parameter = 6.
Some random thoughts: I am thinking that it might be nice to have more flexibility in determining the shape of the arcs. But on the other hand I think that it would not be worth the trouble. It would mean more parameters and would therefore be difficult to grasp and difficult to use. But if a good scenario for such function could be designed (flexible, versatile, simple, easy to grasp and control - is it possible?) then I think it would be easily added into the plugin. I already had a two-parametric custom shape there. But I dropped it. Too difficult, too little gain.
To get the plugin, go to
http://kmarkku.arkku.net/Path_modify_fil...aster.html
scroll to the bottom, and click the right download button. You get a zip file. Unzip it and place the one file it contains (round_path_corners.py) in your user's plug-ins folder. Then (re)start Gimp. To use the plugin: in the Paths tab, right-click a path and follow the links Tools > Modify path > Round corners.
I explain a little about the inputs.
The first input is "Where to set arc ends". It offers two choices: the default is "Use fixed distance from vertices", and the other one I skip now entirely. The value for 'distance' is input in the next field. The picture shows the meaning of "distance":
(One fact may cause surprises: In the code it is prohibited that the arc ends could go past the midpoints of the corner legs. The purpose is to avoid that two neighbouring arcs might get mixed up with each other.)
The next input allows the user to choose the shape of the arc. The list of the built-in shapes is:
- circular
- straight
- parabola
- close to vertex
- through vertex
- cusp
In addition, there is a customizable shape about which I talk in a subsequent post; it takes one parameter which is the next input, and I say nothing about that now. The built-in shapes are shown in pictures:
Finally, the last input is "How to use the selection?" which allows the user to make roundings only in some part of the path, keeping the rest untouched (just about). About this I give one example. Suppose you have a path as on the left below. You want to round the corners but want to preserve the long arc. Running the plugin as such would lose the arc (the plugin assumes that the path consists of straight edges and ignores all curvatures). You can protect the long arc as follows: (1) Create a new anchor; (2) make a selection; (3) call the plugin with "Round the corners only inside the selection." The result may be close to what you want, hopefully. (Or maybe not. Some manual tweaking may be needed.)
Writing the plugin had complications, as always, and I am not sure that I got everything right. Please tell me if you find the plugin doing anything unruly.
I explain now a little about how the plugin makes the rounding arcs. (I hesitate posting this since hardly anybody wants to read such details, but I think that maybe, just maybe, somebody somewhere will find it useful. And it is easy just to skip it.)
The plugin uses two different algorithms:
- An algorithm to make circular arcs.
- An algorithm customizable with one parameter (this handles all other cases except the circular arcs).
Algorithm 1
The algorithm to draw circular arcs is based on the well-known idea. But it is here in a disguise: Instead of a center and central angle, it takes as input a tangent triangle.
Algorithm 2
The algorithm customizable with one parameter takes as input one parameter (in addition to the corner and the distance from the vertex). Look at the picture below. It shows how the control points are chosen by the algorithm. First, |AC| = |BC| = distance (the input value). The arc should be drawn from A to B. It is done by control points A,X,Y,B where X and Y are chosen from the legs so that |AX|/|AC| = |BY|/|BC| = parameter. So that is the definition the algorithm uses.
In the GUI of the plugin you may wonder what the numbers in the list of built-in shapes mean:
straight (0)
parabola (2/3)
close to vertex (1)
through vertex (4/3)
cusp (2)
They are the preset parameter values; they are hard-coded in the built-in cases, and with those parameter values the algorithm draws a straight line, a parabola, and so on.
But in addition to these preset values, you may use any custom value: choose the option "one-parametric custom shape" and input some value for the parameter (default is 0.5). For instance, you may want to try arcs flatter than circular but not quite straight; try then parameter=0.3, for example. Any float number can be used, even negative (but not in fractional form unfortunately).
Another example:
Here the plugin was applied to the hexagon with "Use midpoints of edges" and custom shape with parameter = 6.
Some random thoughts: I am thinking that it might be nice to have more flexibility in determining the shape of the arcs. But on the other hand I think that it would not be worth the trouble. It would mean more parameters and would therefore be difficult to grasp and difficult to use. But if a good scenario for such function could be designed (flexible, versatile, simple, easy to grasp and control - is it possible?) then I think it would be easily added into the plugin. I already had a two-parametric custom shape there. But I dropped it. Too difficult, too little gain.


