Thread Rating:
  • 0 Vote(s) - 0 Average
  • 1
  • 2
  • 3
  • 4
  • 5
bump mapping
#1
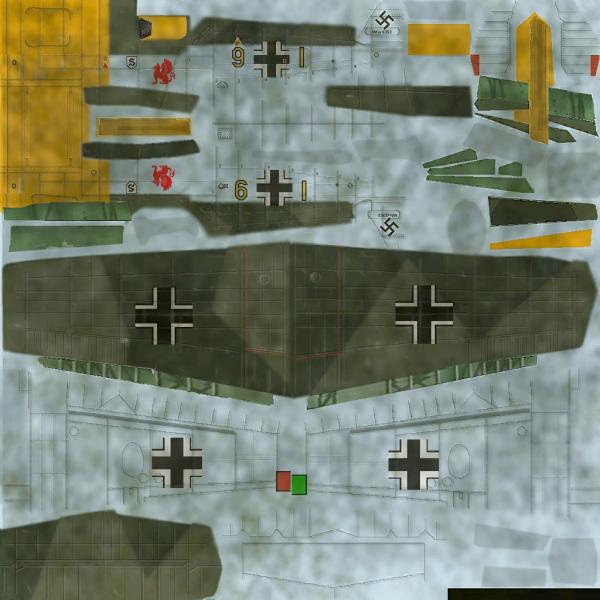
I am trying to bump map an aircraft skin which is on 2 dds files (can convert to png or whatever) which has obviously quite a few colors and occupies most of a non white/single color background. It also only has the one layer available. So far all the tutorials I have looked at including http://www.tankedup-imaging.com/gimp/bumpmap2.html haven't helped; or I am not that good at understanding!
 I need a step by step tutorial if possible.


Reply
#2
I do quite a lot of bump mapping, but I don't quite understand what you are trying to bump map.  That image you posted looks like a composite.  Ideally to bump map you need a black and white image.  Do you have an xcf or psd of the file with separate layers?

Also, bump mapping is a destructive process.  What is a better idea is to fill a layer with 50% gray, hex code #808080, then run the bump map on that gray layer.  If you choose a layer mode like overlay or soft light and put the layer on top, it has a bump effect and is non destructive:

   
A 50% gray bump mapped to the image.

   
That layer in 'Overlay' over the original image.

Again, this is not ideal.  You really need a black and white height map do do this correctly

Gimp 2.10 is a little different from 2.8.

When you select map->bump map, then you have to select the image and the layer to bump map.
   
The bump map results are on whatever layer is active.  As I said before, I recommend using a 50% gray layer in 'overlay' or 'soft light'
Reply
#3
Thanks for that. I'll have a try. Basically some other are doing this to make things like the rivets and other likely raised parts of the aircraft to stand out a bit; obviously not to the extreme. All I have to work on is the texture dds file supplied by the original designer so no chance of getting any layers which is part of the problem. The idea is to add another dds file to the texures with an extended name which is recognized by a shader.ini in the sim.

Some of what I am talking about can be seen at http://www.sim-outhouse.com/sohforums/sh...d-textures

and post 362 here  http://www.sim-outhouse.com/sohforums/sh...ing/page15
Reply
#4
I am no expert on these games things but I think you need to use the texture file that come with the dds model.

Using the Gimp dds plugin gets
1. A main surface image: https://i.imgur.com/DcSkJRY.jpg
2. Some sort of semi-transparent texture overlay image: https://i.imgur.com/EARBI0u.jpg
3. Then bump map the first using the second: https://i.imgur.com/J2Xk7WQ.jpg Probably have to use high values for Elevation and Depth also try Waterlevel. Do not be afraid to zoom in. Main thing with Gimp is experiment.
4. Comparison of before and after: https://i.imgur.com/t6OMVRv.jpg
Reply
#5
You need a way to separate the different elements into different layers. If you can't do that, then really the best way is to make your own texture from the very start. The bump mapping itself is really simple: the active layer receives the results of the bump map from a selected layer.
Reply
#6
I I like your result rich2005, but I must still be doing something wrong.
1.Have original layer
2. added new layer (on top) with soft light 50% opacity grey
3. Then opened bump map and set elev 60 depth 30
4. Merged down
5. exported as a png and then changed that with paint.net to a dds file

So far I see 0 difference so I assume I did some step wrong

           
Reply
#7
(07-10-2018, 04:55 PM)jaca44 Wrote: 1.Have original layer
2. added new layer (on top) with soft light 50% opacity grey

No, as far as I know, you need a layer, like the one you posted plus a texture layer to use in the bump map. If you only have that one file then it is going to be a lot of work to add all the detail.

Is there a link to the original set of dds files? Can  you can provide it.
Reply
#8
(07-10-2018, 05:04 PM)rich2005 Wrote:
(07-10-2018, 04:55 PM)jaca44 Wrote: 1.Have original layer
2. added new layer (on top) with soft light 50% opacity grey

No, as far as I know, you need a layer, like the one you posted plus a texture layer to use in the bump map. If you only have that one file then it is going to be a lot of work to add all the detail.

Is there a link to the original set of dds files? Can  you can provide it.

(07-10-2018, 06:18 PM)jaca44 Wrote:
(07-10-2018, 05:04 PM)rich2005 Wrote:
(07-10-2018, 04:55 PM)jaca44 Wrote: 1.Have original layer
2. added new layer (on top) with soft light 50% opacity grey

No, as far as I know, you need a layer, like the one you posted plus a texture layer to use in the bump map. If you only have that one file then it is going to be a lot of work to add all the detail.

Is there a link to the original set of dds files? Can  you can provide it.

Do you want a dds ior a png or similar. PM me an email and I'll send it to you. I could make a duplicate layer?
Reply
#9
Thanks, have your dds file but it is as before, if that is all you have then about the best you will get is as mholders post.

I have seen these before, never keep a copy and the files I used for examples just downloaded from some site.

Did you not get something like this screenshot? Normally I use linux but this in Win10 Gimp 2.10.4

screenshot: https://i.imgur.com/tljyDPX.jpg Anything like that texture dds available?

I see you are using paint-dot-net. You do know there is a Gimp dds filter? The attached is the latest for Gimp 2.10 Unzip and put in your Gimp profile C:\Users\your-name\AppData\Roaming\GIMP\2.10\

Opens & Exports as well. You will know about the settings more than me. https://i.imgur.com/IRSzPD8.jpg

best of luck.


Attached Files
.zip   dds-gimp-plugin-64bit.zip (Size: 149.32 KB / Downloads: 218)
Reply
#10
What I am not getting now, but I did before, is the "semi-transparent texture overlay image: https://i.imgur.com/EARBI0u.jpg" as yours above; ie I am not getting the overlay but only a separate layer which I don't seem to be able to overlay, or at least I can't see that. I can merge but then I don't see it.

The dds file I sent you was the original as from the aircraft texture folder.
Reply


Forum Jump: