Go to the Curves, Filters > Curves...
When the Curves window is opened, click on the color you want to change in the image

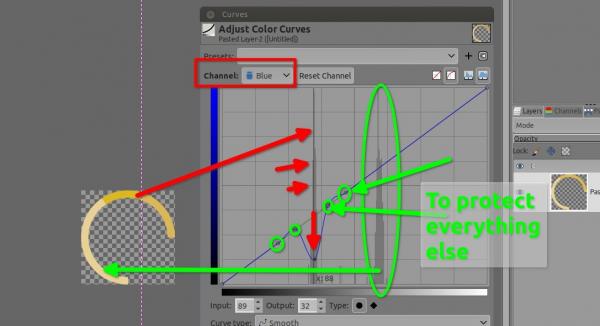
A vertical black line will appear in the curves as you can see above, it's your color sample. That's the one we will manipulate
But BEFORE > go to the blue channel to put control points around that vertical line ➤ on the oblique line like I did to protect other parts of the curve (in green in the screen below)

Then you can put a control points on that vertical black line on any channel (here I chose blue because opposite of blue is yellow), you can go in the red channel or green channel as well... (the sample color will be there as well, no need to re-sample.
BUT do NOT change the curve in the VALUE channel (or a very slight change)
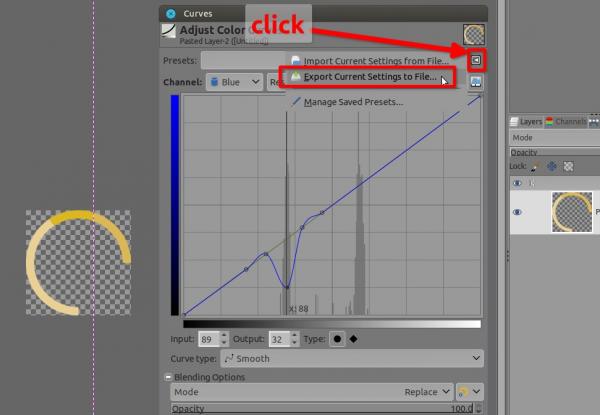
Once it's done and happy, do not click the OK button to apply filter, but instead click on that triangle in the top right window (screenshot below), a menu will appear ➤ Export current setting to file click on it, give a name, if you are using Microsoft Windows you might need to put an extension like .txt because Microsoft might not allow to save a file without extension.

Then now you can close all (don't apply the curve to that sample image) and go to File > BIMP and in BIMP use Add > Color correction, then just check change color curve from settings file, and select the folder to fetch the file you just saved, click OK, then do your things as usual

When the Curves window is opened, click on the color you want to change in the image
A vertical black line will appear in the curves as you can see above, it's your color sample. That's the one we will manipulate
But BEFORE > go to the blue channel to put control points around that vertical line ➤ on the oblique line like I did to protect other parts of the curve (in green in the screen below)
Then you can put a control points on that vertical black line on any channel (here I chose blue because opposite of blue is yellow), you can go in the red channel or green channel as well... (the sample color will be there as well, no need to re-sample.
BUT do NOT change the curve in the VALUE channel (or a very slight change)

Once it's done and happy, do not click the OK button to apply filter, but instead click on that triangle in the top right window (screenshot below), a menu will appear ➤ Export current setting to file click on it, give a name, if you are using Microsoft Windows you might need to put an extension like .txt because Microsoft might not allow to save a file without extension.
Then now you can close all (don't apply the curve to that sample image) and go to File > BIMP and in BIMP use Add > Color correction, then just check change color curve from settings file, and select the folder to fetch the file you just saved, click OK, then do your things as usual
Patrice


