| Welcome, Guest |
You have to register before you can post on our site.
|
| Forum Statistics |
» Members: 5,136
» Latest member: connag
» Forum threads: 7,814
» Forum posts: 42,444
Full Statistics
|
| Latest Threads |
Odd problem with GIMP 3.0...
Forum: General questions
Last Post: rich2005
5 hours ago
» Replies: 3
» Views: 172
|
remove graffiti
Forum: Other graphics software
Last Post: denzjos
9 hours ago
» Replies: 2
» Views: 88
|
Merging a still image and...
Forum: General questions
Last Post: rich2005
02-20-2026, 08:35 AM
» Replies: 5
» Views: 345
|
Color picker doesn't refl...
Forum: General questions
Last Post: Scallact
02-19-2026, 06:03 PM
» Replies: 4
» Views: 398
|
Resize image too blurry (...
Forum: General questions
Last Post: rich2005
02-19-2026, 11:30 AM
» Replies: 6
» Views: 370
|
How to change mouse wheel...
Forum: General questions
Last Post: zeuspaul
02-19-2026, 07:56 AM
» Replies: 7
» Views: 15,176
|
Why is the Move tool movi...
Forum: Tutorials and tips
Last Post: kkt
02-18-2026, 09:11 PM
» Replies: 1
» Views: 4,502
|
New contact sheet plugin ...
Forum: Extending the GIMP
Last Post: chuckhenrich
02-18-2026, 02:00 PM
» Replies: 0
» Views: 176
|
Wavelet-decompose doing m...
Forum: General questions
Last Post: rich2005
02-16-2026, 08:33 AM
» Replies: 8
» Views: 5,021
|
Can't load RAW files
Forum: General questions
Last Post: rich2005
02-15-2026, 10:45 AM
» Replies: 4
» Views: 365
|
|
|
| Set layer color based on other layers |
|
Posted by: Hellcolik - 03-27-2021, 12:04 PM - Forum: General questions
- Replies (3)
|
 |
Hello, this is my first post here ; I'm wondering what are the limits of Gimp without using external python scripts.
I have two layers in a project:
- the back layer is a picture on which I applied a Gaussian blur filter ;
- the front layer in only a text.
I would like the text layer to change depending on where it is above the back layer. For instance, I would like to order it : "to set the color of this pixel of yours, look at the color of the pixels on the layer behind you, centered at the same location, take the negative of that color and apply it to yourself".
What are the tools/menus I need to be familiar with in order to perform such a task? I would be able to do this with a python script however, I only want to use Gimp.
Thanks in advance, I'm looking forward to reading your answers.
|

|
|
| How to prevent GIMP from rearranging colour map? |
|
Posted by: Malvineous - 03-26-2021, 11:12 AM - Forum: General questions
- Replies (2)
|
 |
Hi all,
I have a 256-colour indexed image I generated with a program I am working on. I want to load it in GIMP, modify a few pixels, and then save it again.
However when I do this, GIMP rearranges the colour map, swapping entries 0 and 1. When I read the image back with my program, these two colours appear wrong as they are supposed to match an existing external palette.
If I use the "Colors | Map | Rearrange Colormap" option to swap entries 0 and 1 to put them back in their original order, when I save the file and reload it I find that GIMP has put them back the wrong way around.
If I load and save the file with the colours the wrong way around GIMP leaves them alone!
I cannot work out how to get GIMP to save the file without rearranging the palette.
Am I doing something wrong? I'm using GIMP 2.10.22 and this is the file I am trying to edit. Entry 0 is meant to be black and entry 1 is meant to be dark blue, which is shown when the image is first loaded, but it seems impossible to save the image like this, with black as 0 and blue as 1.
Any suggestions would be appreciated!
|

|
|
| Warping a path |
|
Posted by: Ottia Tuota - 03-25-2021, 08:02 AM - Forum: Extending the GIMP
- Replies (6)
|
 |
I got the idea to try to implement warping of paths, similar to Gimp's tool Warp Transform on images. I show now what I managed to make. Not quite similar but close.
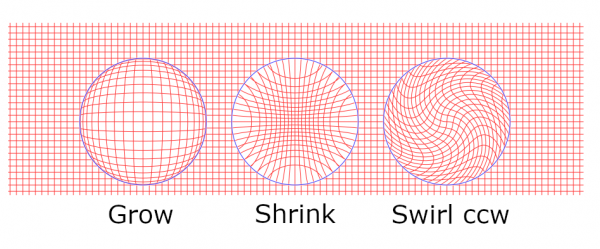
See the picture below. The grid is actually the path that I warp. I use this path in this example since it shows the effects best. The warping is done inside a given circle, so that it is a local operation. The plugin has three modes of action: Grow, Shrink, and Swirl (counter-clockwise or clockwise). The picture shows an example of each, applied to the grid path:

The blue circles do not belong to the transformed path; they are here just to show the circles of action. The circle is input by the user as a 2-anchors path (meaning either a diameter or the center and one point on the circle).
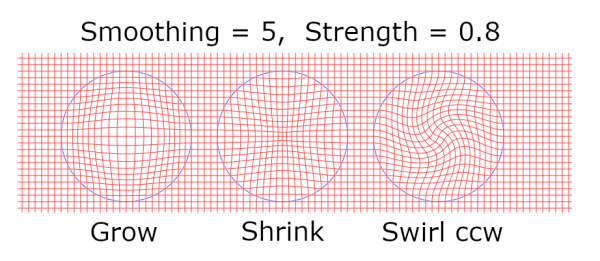
The plugin has two parameters: Smoothing and Strength. Smoothing controls what happens at the edge of the circle. If Smoothing = 0, there will be sharp bends like in the picture above. When Smoothing > 0, the bends are rounded. The rounding happens inside the circle. The other parameter, Strength, controls the amount of the warping effect.
In the above picture Smoothing=0 and and Strength=1 (the defaults).
Here are the same examples as above but with Smoothing = 5 and Strength = 0.8 (recall that the blue circles do not belong to the path):

Good values for Smoothing are 0..10 but you can go higher. Strength accepts values 0..1.
Strength seems to work similarly to the Strength parameter in Gimp's Warp Transform tool. But Smoothing is nothing like the Hardness parameter in Warp Transfrom. And the figure on the left in the first picture (Grow) is something that the Warp Transform cannot produce. The effects of Grow in my plugin and in Warp Transform are very different even though with some parameter values they come rather close. But of course I have no idea what the formulas behind the Warp Transform are.
It appeared that while the warpings on the grid are quite pretty (to my eye at least), trying something more practical needs some care to get acceptable results. Here I tried a text. Left to right: Grow, Shrink, Swirl(cw), all with some smoothing (and now without the blue circles):

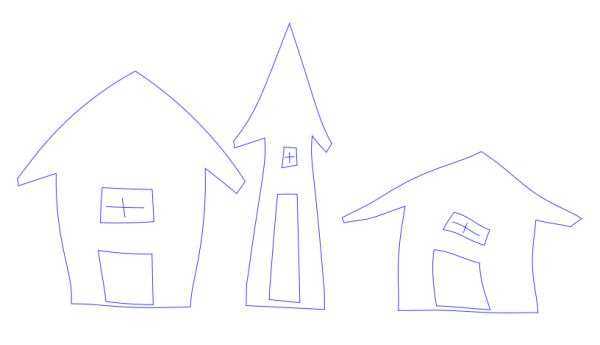
Another one. These three houses were made from the same straight-edged figure with Copy, Scale, and Warp:

The plugin has one serious drawback: It is based on my own rickety approximation algorithm that I have used before. I really wish I had something better. If you want fast work, you get either a lousy result or a vast number of control points. If you want good work with few control points, you have to wait with patience. This cannot be helped for the time being.
To get the plugin, go to
http://kmarkku.arkku.net/Path_warp_files...aster.html
scroll to the bottom, and click the download button. You get a zip file. Unzip it and place the one file it contains (warp_path.py) in your user's plug-ins folder. Then (re)start Gimp.
To invoke the plugins, go to the Paths tab, right-click some path and follow the links
Tools > Warping > ...
If you find strange behaviour by the plugin, please tell me.
|

|
|
| gimpfu view-display-filters? |
|
Posted by: Anonymous - 03-24-2021, 05:53 PM - Forum: Scripting questions
- Replies (1)
|
 |
Hello, I'm trying to automate the addition of a contrast filter in GIMP, but I'm stuck.
Today I learned to make a GIMP plugin following a Youtube tutorial, and I started to modify it to do my task. The problem is that the only gimpfu function with "contrast" anywhere is pdb.gimp_drawable_brightness_contrast(drawable, brightness, contrast), which does not produce the same effect, but rather something like a photo filter.
I searched the python procedure examiner (i don't know if I translated that properly), and there's not a single function with "filter" in its name. The deepest function-like name I found was the one in the title, through testing in the shortcut configuration panel.
Can anybody help me? Thank you
|

|
|
| popup cards |
|
Posted by: denzjos - 03-24-2021, 05:37 PM - Forum: Other graphics software
- Replies (2)
|
 |
Popup cards, every time a surprise when open one. To make such a card, OAcard can help you :https://caa1211.github.io/webOAcard/. One can save a design to work further another time (.oa file) or one can save the design as png file. One can load the png file in gimp to create a piece of art.
[attachment=5786]
The gimp .OA file
[attachment=5787]
|

|
|
|