| Welcome, Guest |
You have to register before you can post on our site.
|
| Forum Statistics |
» Members: 5,261
» Latest member: geka
» Forum threads: 7,886
» Forum posts: 42,800
Full Statistics
|
|
|
| Red eye removal |
|
Posted by: Ofnuts - 01-31-2018, 10:13 PM - Forum: Tutorials and tips
- Replies (5)
|
 |
Editing in a photo is fraught with peril, in the good cases the subject looks weird, in the bad case s/he looks dead. But using the camera flash often makes it necessary to edit the picture to fix these awful red eyes, which is why I tried with much interest a technique alluded to on Pixls.us, for a new RawTherapee plugin:
Quote:
- compute the average of the G and B tones
- if the R tone is 1.5 times greater than that average, replace the R with the GB average value.
Fortunately, there is a Gimp equivalent:
- Make a selection on the eyes. It can/ should include the iris, but avoid skin tones. Feather a bit
- Make a new layer from that: Ctrl-C, Ctr-V, Ctrl-Shift N. Let's call it "Eyes".
- Make a copy of "Eyes", call it "Red 75%", start Color>Component>Channel mixer, set to "Monochrome", set Red to 75%, and Green and Blue to 0
- Make a second copy of Eyes, call if G+B/2, start Color>Component>Channel mixer, set to "Monochrome", set Red to 0%, and Green and Blue to 50%
- Make sure that all layers are invisible except these last two, with "G+B/2" over "Red 75%" and set G+B/2 to "Grain extract". The result should be eyes with a white disk where the red pupil was (with a dark spot where the white spot is).
- Open the Channels list, and drag one of the R, G or B channels to the "main" list to copy it.
- Back to the Layers list, make a last copy of "Eyes", call it "Correction", start Color>Component>Channel mixer, reset "Monochrome", set the Red channel to R=0%, G=50%, B=50%.
- Make all layers invisible except the original picture and "Correction"
- Right-click "Correction", and "Layer>Add layer mask". Initialize to "Channel" and pick the channel you copied at step 6. You should now have a fixed image.
- At that point, you are editing the layer mask of "Correction" so you can tweak the amount of correction by playing with Levels or Curves (the most radical being thresholding the mask around 200, but this can make the fix limits a bit more visible).
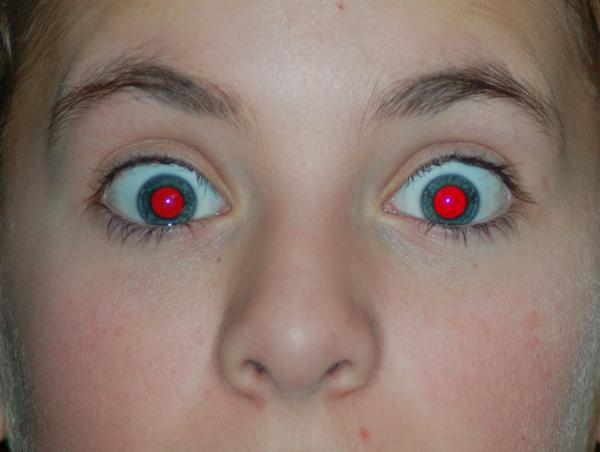
Before:

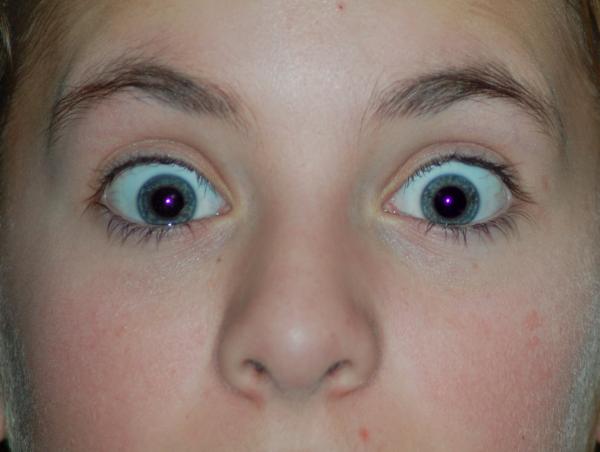
After:

The layers ("Visible" is extra, it is actually the result of step 5 (and what is copied to a Channel)):

Now, to adapt the technique to cats and dogs, whose eyes turn yellow or blue...
|

|
|
| mouse issues after fresh windows install |
|
Posted by: Cream - 01-31-2018, 07:51 PM - Forum: Windows
- No Replies
|
 |
Hey, ive recently did a factory reset on my workstation and i've started to have some issues with gimp that i honestly cant track the source of.
The issue currently, mouse is behaving extremely odd, clicks don't always register, drop down menus instantly close after i open them, pointer always thinks it's using the Move tool and i have to click a bunch to switch from it, often having to alt tab or drag the window to use that window's contents.
here's what i've tried and other details.
- tried both latest releases of stable and dev.
- mouse: logitech g502, drivers up to date.
- no gimp plugins other than Gmic, but problem persists with and on 100% fresh stock gimp.
- windows, gpu, mobo drivers are all up to date.
- the issue ONLY happens in gimp, pc working 100% fine otherwise.
- this wasn't an issue prior to the factory reset, both versions of windows, driver, and gimp are the exact same unless they updated in the few hours i did factory reset which is unlikely.
- not a keyboard stuck using shortcuts issue.
- all settings are on default, like i said fresh install.
- only thing i havent tried is rolling back to an older version of gimp. but would be odd since it's the same exact setup was working prior to fresh install.
cad workstation specs, 6950x, 2x titan Xp in sli, msi carbon godlike x99a, 64gb dominator platinum.
|

|
|
| Change arrow color |
|
Posted by: gogreen - 01-31-2018, 01:42 PM - Forum: General questions
- Replies (19)
|
 |
I've downloaded the script arrow.scm and can use it OK. But the arrow is black and I'd like it to be permanently red. I've found nothing in the script parameters window that allows me to change the arrow's color. How do I change the arrow color permanently? I'm on a 2017 iMac and new to Mac, having recently changed from Windows 10 to Mac. Thanks.
|

|
|
|