| Welcome, Guest |
You have to register before you can post on our site.
|
| Latest Threads |
new plugin colour grading...
Forum: Extending the GIMP
Last Post: rich2005
Yesterday, 08:29 AM
» Replies: 5
» Views: 630
|
ExifToolGUI and ExifTool ...
Forum: Other graphics software
Last Post: denzjos
05-07-2026, 09:07 AM
» Replies: 14
» Views: 17,051
|
Langage français de l'int...
Forum: OSX
Last Post: rich2005
05-06-2026, 07:28 PM
» Replies: 1
» Views: 522
|
Locally Installed Help is...
Forum: General questions
Last Post: rich2005
05-06-2026, 10:10 AM
» Replies: 3
» Views: 702
|
scheme : error in vector
Forum: Extending the GIMP
Last Post: geka
05-06-2026, 05:40 AM
» Replies: 2
» Views: 322
|
Can a plugin be made to s...
Forum: Other graphics software
Last Post: firefox
05-06-2026, 02:23 AM
» Replies: 0
» Views: 117
|
Why does this.......
Forum: Watercooler
Last Post: CmykStudent_
05-05-2026, 08:41 PM
» Replies: 2
» Views: 671
|
How to change text inside...
Forum: General questions
Last Post: denzjos
05-05-2026, 06:39 PM
» Replies: 5
» Views: 834
|
logo for website profile ...
Forum: General questions
Last Post: tbint62
05-05-2026, 05:48 PM
» Replies: 6
» Views: 861
|
Requesting testers for CM...
Forum: General questions
Last Post: rich2005
05-05-2026, 12:28 PM
» Replies: 8
» Views: 898
|
|
|
| Making G2-continuous paths |
|
Posted by: Ottia Tuota - 03-18-2022, 05:24 PM - Forum: Extending the GIMP
- Replies (8)
|
 |
I made a plugin which, given a path as input, creates a smooth path through its anchors. You may remember that I already made one such simple plugin:
https://www.gimp-forum.net/Thread-Smooth...ple-plugin
but now I have a better algorithm. Instead of that simple plugin, this new plugin (named "G2-continuity") should be compared to the old smooth-path.exe:
https://www.gimp-forum.net/Thread-Rich-I...0#pid28230
That old plugin makes C2-continuous paths. The new plugin does that too, but it makes also more general G2-continuous paths.
To get the plugin, go to
http://kmarkku.arkku.net/Path_modify_fil...aster.html
scroll to the bottom, and click the right download button ("G2-continuity"). You get a zip file. Unzip it and place the one file it contains (G2_continuity.py) in your user's plug-ins folder. Then (re)start Gimp. To use the plugin: in the Paths tab, right-click a path and follow the links Tools > Modify path > G2-continuity.
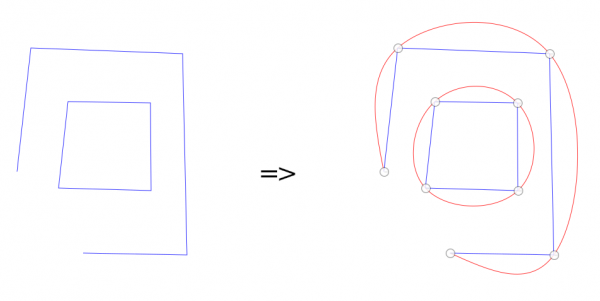
A picture using the default values:

The blue path is the input path, and the red path is the path made by the plugin. So, this is another method to draw a smooth path through some given points.
We had some discussion of C2-continuity with Ofnuts in:
https://www.gimp-forum.net/Thread-Rich-I...6#pid28246
C2-continuity is about derivatives of the parametric representation of the curve. So, it is very mathematical. We use now another concept, G2-continuity (the 'G' coming from "geometric"), which is more directly connected with the visual appearance of the curve and independent of the parametric representation. It means that the curve is smooth and has continuous curvature. For paths G2-continuity means:
- At every anchor the two tangents are parallel (the same). But the handles need not be symmetric, that is, of equal length.
- At every anchor the two curvatures are equal. This means that the two circles of curvature at the anchor are the same.
C2-continuity implies G2-continuity but not conversely. You may think that C2-continuity is better. After all, it is a stronger condition, so it should make more regular curves, right? But it has one feature I don't quite like. Consider a straight-edge path with very different edge lengths:

C2-continuity makes at the short edge an unnecessarily prominent arc. I would like better a smaller arc, see the picture. The reason why C2-continuity gives such a strong arc is the continuity of the first derivative: it forces the handles at an anchor to be of equal length (symmetric). But I think it would be better if the handle on the longer edge would be longer and the handle on the shorter edge would be shorter, like this:

So I think that the edge lengths should be taken into account when making the handles. But then C2-continuity is no longer possible, not even C1-continuity. But G2-continuity is possible. And I think that it is this condition which really counts visually. Continuous curvature means that the curve is very smooth.
So I took the theory in
https://www.stkent.com/2015/07/03/buildi...urves.html
and modified it suitably to take into account edge lengths, producing G2-continuous paths (and since that can be done in infinitely many ways I had to do some ad hoc choices). I also did the case of closed strokes and added some embellishments. No need to go into further details. It was rather pleasing work to do.
Be kind enough to tell me if you find cases where the plugin works wrong.
There are two tuning parameters. I try to explain what they do though you may do wisest if you just go experimenting.
The first tuning parameter: Let us consider a straight-edge path. The tuning parameter adjusts how strongly the different lengths of the edges are taken into account; see the above pictures. Let us call the parameter K. If K=0 the lengths are not taken into account at all, just like in C2-continuity. I put K=1 as the default since I think it gives nice results.
The second tuning parameter determines how tightly the curve will bend at anchors. C2-continuity allows no such adjustings, but with G2-continuity this can be done.
The way I implemented the two tuning parameters is very ad hoc and could be done in infinitely many different ways, still getting G2-continuity. I could easily make the plugin to have 10 tuning parameters, say, but who would want it? I think 2 parameters is optimal.
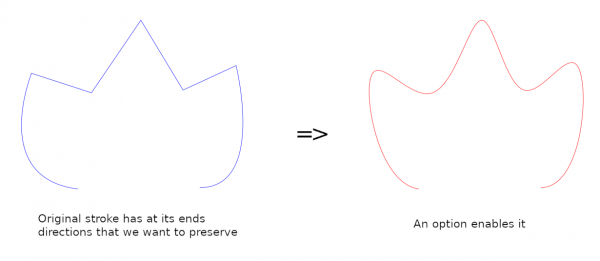
There is also an option on how the end parts of open strokes are treated. This is useful only if the original path has some curvature and you want to preserve the tangent directions at open stroke ends:

This option arose from a mathematical reason. If you look at the text by Stuart Kent you see that if an open stroke has n+1 anchors (knots) then the requirement of C2-continuity gives us a big group of equations with 2n unknowns and 2n-2 equations. So, to solve the group we need two additional equations. They can be chosen freely. For those two, Kent takes what he calls "natural boundary conditions": f''=0 at each end of the stroke. It occurred to me that we could use some other boundary conditions. I chose to preserve tangent directions at the ends; this seemed neat, easy to grasp, and sometimes useful.
There are two options about using a selection. They should be clear enough, so I say nothing about those here.
|

|
|
| Using on an All In One? |
|
Posted by: lectraplayer - 03-14-2022, 04:53 PM - Forum: Windows
- Replies (1)
|
 |
Just got me an All In One (Lenovo Yoga 9i running Windows 11) and am trying to get to where I can paint on the screen with the stylus, however wit doesn't seem to recognize when I put stylus to screen. I have tried to configure it as a Wacom tablet thing, but with no results, as well as from messing in the Lenovo Stylus settings. Is there a trick to getting GIMP to recognize stylus input on all in ones?
|

|
|
| exporting tifs |
|
Posted by: JayC - 03-14-2022, 10:19 AM - Forum: General questions
- Replies (2)
|
 |
I am experiencing a problem I did not have with former editions of GIMP. I am preparing historic tif maps to use in a GIS programme. The maps have been scanned as individual tiles and I want to edit the edges off them so that they will align when I construct the map in GIS. With a former edition of GIMP this was never a problem, I imported the map as a tif, made the adjustments and exported it as a tif. When I try to do this now I make all the changes and export the tif but none of the programmes on my computer recognise it. They all come up with the message 'it appears we don't except this file format'.
|

|
|
| Don't allow layers below background |
|
Posted by: kiwichick - 03-14-2022, 02:16 AM - Forum: General questions
- Replies (6)
|
 |
Hi everyone, When it comes to working with layers, the image editor I've been using for years has the background layer permanently 'locked' so that it can't be moved up and no layers can be moved below it. It doesn't seem that any of GIMP's lock layer options does this. Is there any way to achieve this in GIMP so that it avoids sending a layer to the bottom and then having to move it up one layer to be on the background.
|

|
|
|