| Welcome, Guest |
You have to register before you can post on our site.
|
| Forum Statistics |
» Members: 5,100
» Latest member: StevenMar
» Forum threads: 7,796
» Forum posts: 42,347
Full Statistics
|
| Latest Threads |
Can you identify effects/...
Forum: General questions
Last Post: rich2005
Today, 09:34 AM
» Replies: 11
» Views: 449
|
GIMP 3.0.8 Installation
Forum: Windows
Last Post: rich2005
Yesterday, 08:30 AM
» Replies: 2
» Views: 385
|
Best way to recolor this ...
Forum: General questions
Last Post: rich2005
Yesterday, 08:25 AM
» Replies: 12
» Views: 879
|
A Search For Missing Belg...
Forum: Watercooler
Last Post: Tas_mania
Yesterday, 03:18 AM
» Replies: 3
» Views: 1,149
|
eps file won't open
Forum: General questions
Last Post: rich2005
01-30-2026, 09:26 AM
» Replies: 2
» Views: 244
|
undesirable grid
Forum: General questions
Last Post: rich2005
01-29-2026, 12:45 PM
» Replies: 1
» Views: 211
|
GIMP won't start after fr...
Forum: Windows
Last Post: denzjos
01-27-2026, 05:04 PM
» Replies: 2
» Views: 344
|
Display not keeping up wi...
Forum: Extending the GIMP
Last Post: nmw01223
01-26-2026, 06:39 PM
» Replies: 2
» Views: 354
|
Preferences/Folders shows...
Forum: Gimp 2.99 & Gimp 3.0
Last Post: programmer_ceds
01-26-2026, 05:21 PM
» Replies: 6
» Views: 3,994
|
Perspective tool anchors.
Forum: Extending the GIMP
Last Post: denzjos
01-25-2026, 04:01 PM
» Replies: 7
» Views: 559
|
|
|
| Aligning a pattern or texture from a line? |
|
Posted by: eepjr24 - 11-15-2021, 03:47 PM - Forum: General questions
- Replies (7)
|
 |
  
Not mad at GIMP, the forum just ate my earlier post. lol. Probably too many image examples. I will try to be more concise.
Found this post: https://www.gimp-forum.net/Thread-Roofto...p-building
Rich made a video on that one that was excellent and just wanted to shout out to Rich for doing these, they are a life saver.
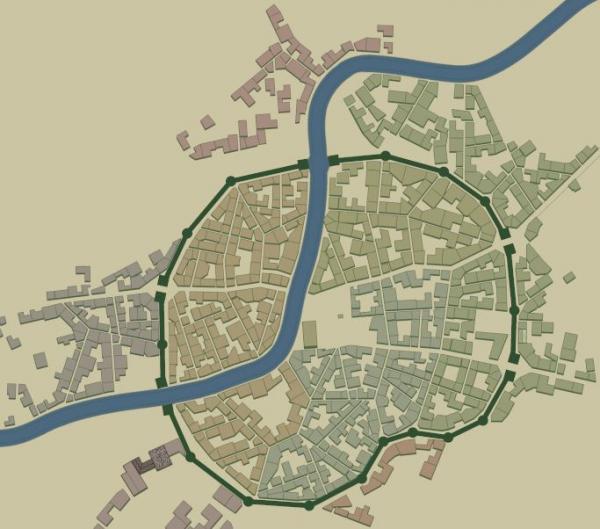
So I build maps, different kinds depending on needs for gaming. At the moment, I am looking to texture, pattern or stamp buildings for about 70 cities. These were generated using the Watabou generator and thus the angles of the buildings can be quite varied. I am looking for a way to align the rooftop patterns to the angles of the roof, essentially, in a quick manner. Here is an example city:

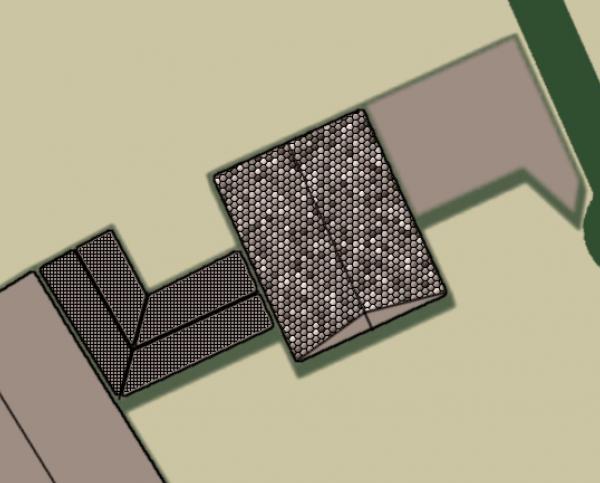
Here are some examples I have done, which work because I played with each of them for 10-15 minutes to figure out a pattern that worked with the angle of the building. I am using filters to apply the textures right now because of speed, but I would ideally like to use real pattern images or a brush.

Hopefully I have been clear on what I am trying to do, but in summary I'd like to find an easy way to apply textures to roughly rectangular areas that align to the angle of the rectangle, rather than to the X-Y axis of the image.
Thanks for any thoughts.
- E
|

|
|
| Struggling with Gimp Issues |
|
Posted by: andrew48 - 11-15-2021, 01:35 AM - Forum: Windows
- Replies (1)
|
 |
I recently installed the most recent version of GIMP on a new computer (HP Envy 360 15 with AMD Ryzen 7) with Windows 11 on it. I've been having some trouble with it. When I try to ctrl-scroll to zoom in and out, it doesn't work sometimes. It doesn't show me where the mouse is when I ctrl-click with the paint brush sometimes. I have to click some things several times for them to work sometimes (it's like it knows that the mouse is there and where it is, but doesn't know that clicking is an option). I've tried uninstalling and reinstalling. I've also tried installing an earlier version of GIMP. I've tried another mouse (even using the trackpad) and these issues still persist. Does anyone have any ideas that could help me with this? Thanks.
|

|
|
| Setting text on multiple layers issue |
|
Posted by: FloppaDisk - 11-12-2021, 06:52 PM - Forum: Scripting questions
- Replies (3)
|
 |
Hellois.
I'm on a mission to make an 'text atlass or sprite' ish plugin which will make the number of input characters to the power of two; combination 'sprite image'.
At the moment the code can generate one image atlass with n combinations. As a image has a limited combination spaces it will later add images as needed to make all the combinations over multiple images. But first i must understand how to set text which i hope someone would help out with.
What im struggling with is applying text. Im not able to set text on multiple layers. No matter what i do it seems like the ..WriteToCanvas() funciton only sets text to the original background layer. I'm unable to make a new layer and apply text to it.
The function ..SetAndAnchorText() is where you would modify the code to help me out if possible, or give me some good pointer as i'm been struggling for a few days to many. 
Starting point:
The code works and can produce an image so you can see what i mean by atlass/sprite. Create a new 256x256 RGB_Image and run the plugin to se results. Then make a new same image and add the letter i to the end of .."Text for atlass" of the plugin. The expected result should be a whole image with text combinations in stride of two and the second should be roughly half the image with text. At the moment the code creates and error instead.
Code:
#!/usr/bin/env python


from gimpfu import *

from math import *

from time import sleep


def WriteToCanvas(image, drawable, x, y, text):

    return pdb.gimp_text_fontname(

    image,         # IMAGE      image      The image

    drawable,      # DRAWABLE   drawable   The affected drawable: (-1 for a new text layer)

    x,             # FLOAT      x          The x coordinate for the left of the text bounding box

    y,             # FLOAT      y          The y coordinate for the top of the text bounding box

    text,          # STRING     text       The text to generate

    -1,            # INT32      border     The size of the border: -1 <= border

    False,         # INT32      antialias  Antialiasing (TRUE or FALSE)

    26,            # FLOAT      size       The size of text in either pixels or points

    0,             # INT32      size_type  The units of specified size: PIXELS (0) or POINTS (1)

    'Monospace')   # STRING     fontname   The fontname (conforming to the X Logical Font Description Conventions)


# returns stride of 3 for characters that use kerning

def FindKerning(src):

    kerning = []

    idx1 = idx2 = 0

    while ~idx1:

        idx1 = SearchSrc(src, '(', idx2)

        idx2 = SearchSrc(src, ')', idx1)

        if idx1 < idx2 and abs(idx1-idx2) != 1:

            kerning += [src[idx1-1]] + src[idx1+1:idx2].split(',')

            src = src.replace(src[idx1:idx2+1], '', 1)

            idx1 = idx2 = 0

    return kerning + [src]


# return index for for instance of ..test in ..src at interval ..stride

def SearchSrc(src, test, after=0, stride=0):

    x = 0

    if not ~after:

        return -1

    if stride <= 0:

        stride = 1

    if after > 0:

        x += after

    while x < len(src):

        if src[x] == test:

            return x

        x += stride

    return -1


# ab(-1,0)cdef(-1,0)ghijk(-1,0)lmnop(-1,0)qr(-1,0)stuvwxyz01(-1,0)23456789!"#%&/()=?\*<>-_,.:;~@${}

def SetAndAnchorText(image, drawable, text, newLayer):

    # sleep(3)

    pdb.gimp_message(str('Ono line: \n')+str(text))

    textLayer = WriteToCanvas(image, drawable, 0, 0, text)

    # image.add_layer(textLayer, len(image.layers))

    layer = pdb.gimp_image_merge_visible_layers(image, 1)

    drawable.visible = False

    if newLayer:

        newLayer = gimp.Layer(image, "Background", image.width, image.height, RGB_IMAGE, 100, 3)

        image.add_layer(newLayer, 0)

        image.active_layer = image.layers[0]

        # pdb.gimp_drawable_edit_bucket_fill(newLayer, 1, 1, 1)

        # newLayer.update(0, 0, drawable.width, drawable.height)


# pdb.gimp_drawable_get_name(item)

def textAtlas(image, drawable, NotUsed, text_var, boolean_var, colorText, colorBackground, radio_var):

    # ab(-1,0)cde(2,-4)fg(3,1)h

    pdb.gimp_message(str('~~~~~~~~~~~~~~~~~~~~'))

    kerningParams = FindKerning(text_var)  # stride of 3 for chars that use kerning

    text_var = kerningParams[-1] # will always be plain ..text_var

    del kerningParams[-1] # remove ..text_var

    # pdb.gimp_message(str('text_var: ')+str(text_var))

    # pdb.gimp_message(str('kerning: ')+str(kerningParams))

    # return

    pdb.gimp_context_set_foreground(colorText)

    pdb.gimp_context_set_background(colorBackground)

    rowNumber = drawable.width/32

    gridNumber = rowNumber * (drawable.height/32)

    number = int(pow(len(text_var), 2))

    length = len(text_var)

    gimp.progress_init('The growing bar')


    count = 0

    wholeText = ''

    tempText = ''

    for char1 in text_var:

        for char2 in text_var:

            wholeText += char1+char2

            tempText += char1+char2

            count += 1

            if count == gridNumber:

                SetAndAnchorText(image, drawable, tempText, not text_var[-1] == char1 == char2)

                # apply, merge and adjust for kerning here

                tempText = ''

                count = 0

            if not count%rowNumber and count:

                tempText += '\n'

    if count:

        SetAndAnchorText(image, drawable, tempText, False)


    pdb.gimp_message(str('Done'))


# abcdefghijklmnopqrstuvwxyz

# ab(-1,0)cdef(-1,0)ghijk(-1,0)lmnop(-1,0)qr(-1,0)stuvwxyz01(-1,0)23456789

# ab(-1,0)cdef(-1,0)ghijk(-1,0)lmnop(-1,0)qr(-1,0)stuvwxyz01(-1,0)23456789!"#%&/()=?\*<>-_,.:;~@${}


register(

    "python-fu-textAtlas",

    "Make text paired utf-8'ish atlas",

    "Generate an grid with n pared two character, number and/or symbol into an atlas/sprite",

    "Drop Woodland", "https://github.com/TeaWave", "2021",

    "Make text atlas...",

    "", # type of image it works on (*, RGB, RGB*, RGBA, GRAY etc...)

    [

        (PF_IMAGE, "image", "takes current image", None),

        (PF_DRAWABLE, "drawable", "Input layer", None),

        (PF_INT8, "NotUsed", "Colors", 8),

        (PF_TEXT, "text_var", "Text for atlas", "ab(-1,0)cde(2,-4)fg(3,1)h"),

        (PF_BOOL,   "boolean_var", "boolean name", True),

        (PF_COLOR, "colorText", "Text color", (0.541, 0.831, 0.235, 1.0)),

        (PF_COLOR, "colorBackground", "Background color", (0.298, 0.361, 0.576, 1.0)),

        (PF_RADIO, "radio_var", "radio", "scale",

            (

                ("Scale to fit", "scale"),

                ("Fill to fit", "fill")

            )

        )

    ],

    [],

    textAtlas, menu="<Image>/Extra")  # second item is menu location


main()
|

|
|
| Tile a seamless pattern |
|
Posted by: rockinaleather - 11-12-2021, 12:42 PM - Forum: Older Gimp versions (2.8, 2.6....)
- Replies (1)
|
 |
Hey guys! I use gimp on occasion but definately an amateur at it. Im currently paying a gal to take seamless images I find on vector stock, put them together then to a certain size, with the pattern on the image being around 1" in areas. Im terrible at explaining so here's another explanation: Take said image, tile it, then scale it down. I can't for the life of me figure out how to tile an image on gimp 2.8 (only version I have). Ive googled several times but it always wants me to create my own tile image, which isn't what im trying to to. any help would be great appreciated!
|

|
|
|